Introduction
This manual provides essential instructions for the safe and efficient operation, maintenance, and care of your Xmatch 4-Wheel Electric Mobility Scooter, Model Type 1 Golf Cart. Please read this manual thoroughly before operating the scooter to ensure proper usage and to prevent injury or damage.
Safety Information
Your safety is paramount. Always adhere to the following guidelines:
- Always wear appropriate safety gear, including a helmet, if local regulations require or if you deem it necessary for your safety.
- Familiarize yourself with all controls before operating the scooter.
- Operate the scooter at a safe speed, especially in crowded areas or on uneven terrain.
- Avoid sudden stops or turns that could lead to instability.
- Ensure the battery is fully charged before long trips.
- Do not exceed the maximum weight capacity of 550 lbs.
- Be aware of your surroundings and other pedestrians or vehicles.
- Avoid operating the scooter under the influence of alcohol or medication that impairs judgment.
- Regularly inspect tires, brakes, and lights for proper function.
- This scooter is designed for mobility assistance and light recreational use. It is not intended for competitive off-road driving.
Product Features
The Xmatch 4-Wheel Electric Mobility Scooter is equipped with features designed for comfort, performance, and safety:
- Motor: 1000W Differential Brushless Motor for reliable power.
- Battery: 60V Sealed Lead Acid (SLA-AGM) battery (12V/20AH*5 pcs) for extended range.
- Speed Control: Twist throttle with three speed grades: 4mph, 8mph, and a maximum of 15mph.
- Range: Up to 35 miles per charge (56 km/charge).
- Incline Capacity: Capable of handling inclines up to 20%.
- Weight Capacity: Supports up to 550 lbs.
- Tires: AT16x8-7" (x4) tubeless tires suitable for various terrains including sand, snow, grass, and muddy roads.
- Seating: Fully adjustable bucket seat with a car seat belt, accommodating drivers from 5.2 to 6.5 ft tall.
- Lighting System: LED headlights, signal turn lights, brake lights, and 4 security reflectors for visibility.
- Convenience: USB charge port, Key Fob for remote operation, and a rear lock box for storage.
- Braking: Automatic braking system.
- Charging: Two-step smart charger (110v/220v).

Image: The Xmatch 4-Wheel Electric Mobility Scooter in red, shown with its remote key fob.

Image: Diagram illustrating the 1000W motor and key performance specifications including 550 lbs weight capacity, 15 mph max speed, 35-40 miles driving range, and 25° climbing ability.

Image: Detailed view of the scooter's features: bright LED headlights, a convenient USB charging port, the adjustable seat mechanism, and the anti-slip rear wheel design.
Setup and Assembly
The Xmatch Mobility Scooter requires some assembly upon delivery. It is recommended to have assistance due to the weight and size of the components. Follow these general steps:
- Unpacking: Carefully remove all packaging materials. Ensure all components listed in the packing list are present.
- Handlebar Installation: Attach the handlebar assembly to the main frame, securing it with the provided fasteners.
- Seat Installation: Mount the adjustable bucket seat onto the scooter's base. Ensure it locks securely into place.
- Accessory Attachment: Install the rear lock box and golf cart rack (if applicable) as per the specific instructions provided in the box.
- Battery Connection: Connect the battery terminals. Refer to the battery compartment for specific wiring instructions.
- Initial Charge: Fully charge the scooter's battery before its first use.
- Pre-Operation Check: Before riding, verify that all connections are secure, tires are properly inflated, and all lights and controls are functional.
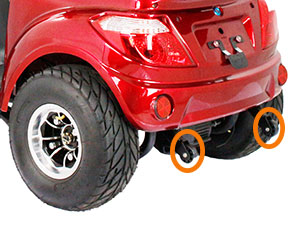
Image: A person demonstrating the installation of the spare tire on the rear of the scooter.

Image: A person attaching the red rear storage box, which is replaceable with a golf rack, to the scooter.
Operating Instructions
Follow these steps for safe operation of your mobility scooter:
- Prepare for Operation: Sit comfortably on the scooter and adjust the seat as needed for optimal control and safety. Fasten the car seat belt.
- Power On: Insert the key into the ignition and turn it to the 'ON' position, or use the Key Fob to power on the scooter.
- Select Speed: Use the speed selector switch on the handlebar to choose your desired speed grade (1, 2, or 3).
- Engage Drive: Select 'D' for forward or 'R' for reverse using the drive selector switch.
- Throttle Control: Gently twist the throttle control on the right handlebar to accelerate. Release the throttle to engage automatic braking and slow down.
- Steering: Use the handlebars to steer the scooter.
- Lighting and Signals: Use the switches on the left handlebar to activate LED headlights (far/near beam), turn signals, and the horn as needed.
- Braking: For additional braking, apply the manual brakes located on the handlebars. The scooter also features an automatic braking system when the throttle is released.
- Parking: When parking, ensure the scooter is on a stable, level surface. Turn off the power and remove the key.
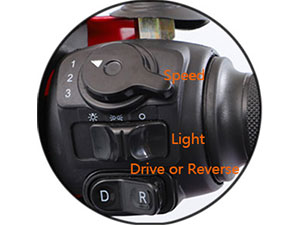
Image: Close-up of the right handlebar showing controls for speed selection (1, 2, 3), light switch, and drive (D) or reverse (R) selector.
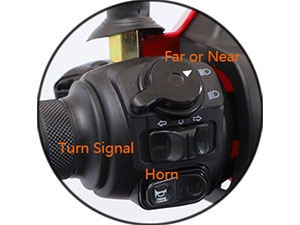
Image: Close-up of the left handlebar showing controls for far/near beam headlights, turn signals, and the horn button.

Image: The Xmatch mobility scooter illuminated by its LED lights, signal turn lights, and reflector lights, shown in an urban environment at dusk.
Maintenance
Regular maintenance ensures the longevity and safe operation of your scooter:
- Battery Care: Charge the battery regularly, especially after each use. Avoid completely draining the battery. Store the scooter with a fully charged battery if not in use for extended periods.
- Tire Pressure: Check tire pressure periodically and inflate to the recommended levels.
- Cleaning: Clean the scooter with a damp cloth. Avoid using high-pressure water or harsh chemicals that could damage electrical components.
- Brake Inspection: Regularly inspect the brakes for wear and ensure they are functioning correctly.
- Fastener Check: Periodically check all nuts, bolts, and fasteners to ensure they are tight.
- Professional Service: For complex repairs or electrical issues, consult with a qualified technician.
Troubleshooting
This section addresses common issues you might encounter:
| Problem | Possible Cause | Solution |
|---|---|---|
| Scooter does not power on. | Battery is discharged or disconnected. Key not fully inserted/turned. | Charge the battery. Check battery connections. Ensure key is fully engaged. |
| Reduced range or power. | Low battery charge. Battery degradation. Overloaded scooter. | Fully charge the battery. Consider battery replacement if old. Reduce load. |
| Unusual noises during operation. | Loose components. Motor issue. | Inspect for loose parts and tighten. If motor related, contact support. |
| Brakes not responding effectively. | Brake wear or adjustment needed. | Inspect brake pads and cables. Adjust or replace as necessary. |
Specifications
Detailed specifications for the Xmatch 4-Wheel Electric Mobility Scooter:
- Model: Type 1 Golf Cart
- Motor: 1000W Differential Brushless Motor
- Battery: 60V Sealed Lead Acid (SLA-AGM) - 12V/20AH x 5 pcs
- Max Speed: 15 mph (3 grades: 4mph, 8mph, 15mph)
- Range: Up to 35 miles per charge
- Incline Capacity: 20%
- Weight Capacity: 550 lbs
- Tire Size: AT16x8-7" (x4) tubeless tires
- Product Dimensions: 73.6" (L) x 32.3" (W) x 47.2" (H)
- Item Weight: 320 Pounds (without battery)
- Seat: Fully adjustable bucket seat, 19.7"W x 17.7"D x 16.1"H
- Deck to Floor Clearance: 5"
- Seat to Deck: 18.9"
- Rear Storage Lock Box: 17.7" x 9.66" x 8.66"
- Charging Time: 8-10 Hours

Image: A diagram illustrating the key dimensions of the Xmatch mobility scooter, including wheelbase, height, and width.
Warranty and Support
Xmatch is committed to providing quality products and support. Your scooter comes with:
- Manufacturing Experience: 10 years of manufacturing experience with a proven low failure rate.
- Spare Parts: Spare parts are available from our US distribution center.
- Technical Assistance: Detailed troubleshooting instructions and video guides are available to assist with spare part replacement. Local online service is available after receiving your message.
- Returns: 30-day easy returns policy.
- Customer Support: Dedicated customer support is available.

Image: Information regarding Xmatch customer support, including response times and availability of technical assistance.
Legal Disclaimer
Statements regarding dietary supplements have not been evaluated by the FDA and are not intended to diagnose, treat, cure, or prevent any disease or health condition.
Note: This disclaimer appears to be a generic placeholder from the source data and may not be directly relevant to a mobility scooter. Please disregard if inapplicable to the product.


