
1. Introduction
The Godox DP800III-V Upgraded Studio Flash Light is a professional-grade strobe designed for various photography applications, including wedding, fashion, advertising, and product photography. It features a robust design with advanced functionalities to enhance lighting control and efficiency.
Key Features:
- Built-in Godox 2.4G wireless X system for remote flash power, modeling lamp, and buzzer control.
- Fast flash duration (1/2000 to 1/800 second) and quick recycling (0.1-1s) with modeling lamp.
- Precise output control with 61 steps from 1/64 to 1/1.
- Anti-preflash function for synchronization with cameras featuring a one-preflash firing system.
- 30W modeling lamp with adjustable brightness.
- Compatible Bowens mount for a wide range of accessories.
- Settings are remembered after 3 seconds and recovered upon restart.
2. Safety Precautions
- Do not disassemble or modify the unit.
- Keep the unit dry. Do not handle with wet hands or immerse in water.
- Avoid direct eye exposure to the flash.
- Ensure proper ventilation during use to prevent overheating.
- Use only the specified power cord and accessories.
- Keep out of reach of children.
3. Package Contents
Verify that all items are included in your package:
- Godox DP800III-V Studio Flash Light Unit
- Standard Reflector
- Power Cord
- Instruction Manual
- Protective Lamp Cover
- Microfiber Cleaning Cloth
- Spare Fuses
4. Product Overview

Figure 1: Godox DP800III-V Studio Flash Light and included accessories.
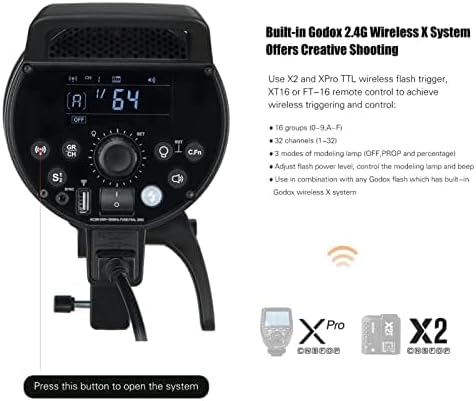
Figure 2: Rear control panel with display, buttons, and ports.

Figure 3: Front view of the flash unit, highlighting the flash tube and LED modeling lamp.
5. Setup
5.1 Attaching the Reflector and Flash Tube
- Carefully insert the flash tube into its socket on the front of the unit.
- Align the standard reflector with the Bowens mount on the flash unit.
- Twist the reflector clockwise until it locks securely into place.

Figure 4: Detailed view of the control panel for settings adjustment.
5.2 Power Connection
- Connect the power cord to the power input port on the rear of the flash unit.
- Plug the other end of the power cord into a suitable AC power outlet (100-240V).
- Flip the ON/OFF switch to the 'ON' position to power on the unit.
5.3 Mounting the Unit
Attach the flash unit to a light stand using the integrated mounting bracket. Adjust the tilt angle as needed and secure it with the locking knob.
Video 1: Overview of the Godox DP Series Studio Flash Light, demonstrating its components and basic handling. This video is provided by Languagepie (Seller).
6. Operating Instructions
6.1 Control Panel Overview
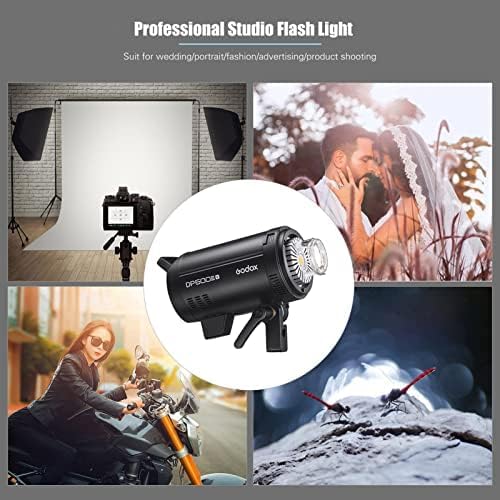
Figure 5: Close-up of the control panel, showing various buttons and display options for wireless ID, modeling lamp modes, and power adjustment.
6.2 Adjusting Flash Power
Use the rotary dial to adjust the flash power output. The power can be set in 61 steps from 1/64 to 1/1. The display shows the current power setting, which can be switched between decimal and fraction display.
6.3 Modeling Lamp Operation
The 30W LED modeling lamp's brightness is adjustable. Press the 'MOD/OFF' button to cycle through different modes (OFF, PROP, Percentage) and use the dial to adjust brightness in Percentage mode.

Figure 6: The modeling lamp providing continuous light, with examples of adjustable brightness levels.
6.4 Godox 2.4G Wireless X System
The built-in 2.4G wireless X system allows for remote control of the flash. Use a compatible Godox X2 or XPro TTL wireless flash trigger (not included) or XT16/FT-16 remote control to adjust flash power, modeling lamp, and trigger the flash wirelessly. The unit supports 16 groups (0-9, A-F) and 32 channels (1-32).
Video 2: Demonstration of flash operation and menu navigation, including wireless settings. While for the Godox AD600BM II, many operational principles are similar across Godox flash units. This video is provided by LetWell (Seller).
6.5 Anti-Preflash Function
This function enables synchronization with cameras that use a one-preflash firing system, ensuring accurate flash timing.
7. Maintenance
- Cleaning: Use a soft, dry cloth to clean the unit. For stubborn dirt, use a slightly damp cloth with mild detergent, then wipe dry. Do not use harsh chemicals or abrasive cleaners.
- Flash Tube: Handle the flash tube with care. Avoid touching it directly with bare hands to prevent oil residue, which can affect performance and lifespan. Use the provided microfiber cloth if necessary.
- Storage: Store the unit in a cool, dry place away from direct sunlight and extreme temperatures. Always attach the protective lamp cover when not in use or during transport.
- Fuses: If the unit fails to power on, check the fuses located near the power input. Replace with spare fuses of the correct rating if blown.
8. Troubleshooting
- Flash not firing: Check power connection, ensure the unit is turned on, and verify wireless trigger settings (channel, group, ID). Test the flash using the 'TEST' button on the unit.
- Modeling lamp not working: Check the modeling lamp mode setting. Ensure it's not set to 'OFF'.
- Inconsistent flash output: Verify power settings and ensure the unit has sufficient time to recycle between flashes.
- Unit overheating: Allow the unit to cool down. Ensure adequate ventilation and avoid continuous high-power firing for extended periods.
9. Specifications
| Model Number | DP800III-V |
| Brand | GODOX |
| Power Output | 800Ws |
| Color Temperature | 5600K ± 200K |
| Guide Number (GN) | GN126 |
| Flash Duration | 1/2000 to 1/800 seconds |
| Recycling Time | 0.1-1 seconds |
| Output Control | 61 steps (1/64 to 1/1) |
| Modeling Lamp | 30W LED, adjustable brightness |
| Wireless System | Built-in Godox 2.4G Wireless X System |
| Channels/Groups | 32 Channels (1-32), 16 Groups (0-9, A-F) |
| Sync Speed | Up to 1/2000s (with compatible trigger) |
| Mount Type | Bowens Mount |
| Item Weight | 9.68 pounds |
| Package Dimensions | 17.4 x 9.1 x 7.9 inches |
10. Warranty and Support
For warranty information and technical support, please refer to the official GODOX website or contact your authorized dealer. Keep your purchase receipt as proof of purchase for warranty claims.