
Introduction
Thank you for choosing the PHOLSY Timer Intervalometer C6. This device is designed to provide precise and versatile remote control for your camera, enabling advanced photography techniques such as time-lapse, long exposure, and HDR bracketing. This manual will guide you through the setup, operation, and maintenance of your intervalometer.
Key Features
- Timer Control: Delay (Self-timer), Interval (Interval timer), Long (Exposure timer), N (Number of frames), BKLN (Auto bracketing timed exposure for HDR).
- Shutter Modes: Single shooting (S), Continuous shooting (C), Bulb (B), 2-second delay (2S), and Timer.
- Wireless Operation: 2.4GHz wireless transmission with a range of up to 60 meters (196 feet), reducing camera shake.
- Precision Timing: Timing settings accurate to 0.1 seconds.
- LCD Display: Backlit display for clear visibility of settings in various lighting conditions.
- Compatibility: Designed for a wide range of Canon, Fuji, and Olympus cameras.
Camera Compatibility
The PHOLSY Timer Intervalometer C6 is compatible with various camera models, replacing Canon RS-60E3, Olympus RM-CB2, and Fuji RR-100. Compatible models include:
- Canon: R100, EOS R8, EOS R6 Mark II, EOS R7, EOS R10, EOS R6, EOS R, EOS RA, EOS RP, 850D, 90D, 80D, 70D, 77D, 60D, 60Da, 250D, 200D, 200DII, 100D, 800D, 760D, 750D, 700D, 650D, 600D, 550D, 500D, 450D, 400D, 1500D, 1300D, 1200D, 1100D, 1000D, 2000D, M5, M6, M6 Mark II; PowerShot SX50HS, SX60HS, SX70HS, G1X Mark III, G1X Mark II, G1X, G3X, G5X, G10, G11, G12, G15, G16; Rebel: XT, XTi, XS, XSi, T1i, T2, T2i, T3, T3i, T4, T4i, T5, T5i, T6, T6i, T7i, T8i, SL1.
- Fuji: X-T5, X-H2, X-H2S, GFX100, GFX100S, GFX100S II, GFX100IR, GFX50S, GFX50SII, GFX50R, X-H1, X-Pro3, X-Pro2, X-T4, X-T3, X-T2, X-T1, X-T30, X-T30II, X-T20, X-T10, X-T100, X-E3, X-E2S, X-E2, X-E1, X-A7, X-A5, X-A10, X100V, X100F, X100T, X70, X30, XF10.
- Olympus: SYSTEM OM-1, OM-1 Mark II, SYSTEM OM-5, E-M1X, E-M1 Mark II, E-M1 Mark III, E-M5 Mark III.
- Pentax: 645Z, K-1 Mark II, K100D, K110D, K200D, K-500, K100D, K20D, K10D, K-30, K-50, K-7, K-5, K-5II, K-5IIs, K-3, K-3II.
Package Contents
- PHOLSY Timer Intervalometer Transmitter
- PHOLSY Receiver
- Connection Cable (C6 type)
- User Manual
Note: 4 AAA batteries (2 for transmitter, 2 for receiver) are required and not included.
Setup Guide
1. Battery Installation
- Locate the battery compartments on both the transmitter and the receiver units.
- Insert two AAA batteries into each unit, ensuring correct polarity (+/-).
- Close the battery covers securely.
2. Connecting to Camera
- Attach the receiver unit to your camera's hot shoe. This provides a secure mounting point.
- Connect one end of the provided C6 connection cable to the receiver unit.
- Connect the other end of the cable to your camera's remote control terminal. Refer to your camera's manual for the exact location of this port.
3. Powering On and Pairing
- Turn on both the transmitter and receiver units. The LCD on the transmitter should illuminate.
- The units are pre-paired from the factory. If they do not connect automatically, ensure both are powered on and within range.
- For wired operation, the transmitter can be directly connected to the camera using the C6 cable, bypassing the receiver.

Image: The PHOLSY Timer Intervalometer can be used in both wired and wireless configurations. The wired setup connects the transmitter directly to the camera, while the wireless setup uses a receiver mounted on the camera's hot shoe.
Operating Modes
The PHOLSY Timer Intervalometer offers various shooting and timer control modes. Use the 'MODE' button to cycle through the main shutter modes and the directional buttons to adjust timer settings.
Shutter Modes
- S (Single Shooting): Takes a single photo each time the shutter button is pressed.
- C (Continuous Shooting): Takes multiple photos as long as the shutter button is held down.
- B (Bulb/Long Exposure): Keeps the shutter open for as long as the shutter button is pressed, ideal for long exposures.
- 2S (2-Second Delay): Takes a single photo after a 2-second delay.
- TIMER: Activates the advanced timer control functions.

Image: The LCD display of the intervalometer showing the different shutter modes: Single (S), Continuous (C), Bulb (B), and 2-second delay (2S).
Timer Control Settings (in TIMER mode)
When in TIMER mode, you can configure the following settings, adjustable to 0.1-second precision:
- DELAY (Self-timer): Sets a delay before the first shot is taken (00:00:00.1 to 59:59:59.9).
- LONG (Exposure Timer): Sets the duration of the exposure (00:00:00.1 to 59:59:59.9). Useful for precise long exposures.
- INTVL (Interval Timer): Sets the time between consecutive shots (00:00:00.1 to 59:59:59.9). Essential for time-lapse photography.
- N (Number of Frames): Sets the total number of photos to be taken (1-199 or '--' for unlimited).
- BKLN (Auto Bracketing Timed Exposure): Enables automatic bracketing for HDR photography, allowing for 3, 5, or 7 continuous shots with varying exposures.

Image: The intervalometer's LCD screen displaying the various timer settings, including Delay, Long exposure, Interval, Number of frames, and Bracketing (BKLN), alongside an example of time-lapse moon phases.

Image: An illustration of the HDR/BKLN feature, demonstrating how multiple exposures can be combined to create a single image with enhanced dynamic range, useful for scenes with high contrast like aurora photography.
LCD Display and Controls
The transmitter features an LCD display that provides a visual reference for all settings. It is backlit for use in low-light conditions. Buttons on the transmitter allow for easy navigation and adjustment of parameters.
- MODE Button: Cycles through shutter modes (S, C, B, 2S, TIMER).
- SET Button: Confirms selections and enters setting adjustment mode.
- Directional Buttons (Up/Down/Left/Right): Navigate menus and adjust numerical values.
- Shutter Button: Initiates shooting based on the selected mode and settings.
- ON/OFF Button: Powers the unit on or off.
- Backlight/Lock Button: Toggles the LCD backlight and locks the controls to prevent accidental changes.
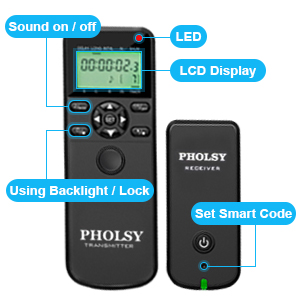
Image: A diagram illustrating the key components of the PHOLSY transmitter and receiver, including the LCD display, LED indicator, sound on/off button, backlight/lock button, and the smart code setting for pairing.
Product Demonstration
Video: An official product video demonstrating the PHOLSY Camera Remote Control Shutter Release Remote Timer in use, showcasing its features and functionality.
Maintenance
- Cleaning: Use a soft, dry cloth to clean the device. Do not use harsh chemicals or solvents.
- Storage: Store the intervalometer in a cool, dry place away from direct sunlight and extreme temperatures.
- Battery Replacement: Replace batteries when the low battery indicator appears on the LCD or if the device fails to power on. Always use fresh AAA alkaline batteries. Remove batteries if the device will not be used for an extended period to prevent leakage.
- Cable Care: Avoid bending or twisting the connection cable excessively to prevent damage.
Troubleshooting
| Problem | Possible Cause | Solution |
|---|---|---|
| Device does not power on. | Dead or incorrectly inserted batteries. | Check battery polarity and replace with fresh AAA batteries. |
| Camera does not respond to shutter release. | Incorrect cable connection, receiver not powered on, camera not in remote mode, or out of wireless range. | Ensure cable is securely connected. Power on receiver. Check camera settings for remote control. Move closer to the camera (within 60m). |
| LCD display is dim or unreadable. | Backlight off or low battery. | Press the Backlight button to activate. Replace batteries if necessary. |
| Settings change unexpectedly. | Controls are not locked. | Use the Lock function to prevent accidental button presses. |
Specifications
| Feature | Detail |
|---|---|
| Brand | PHOLSY |
| Model Name | PHOLSYWT-C6 |
| Color | Black |
| Connectivity Technology | Radio Frequency (2.4GHz) |
| Maximum Range | 60 meters (196 feet) |
| Power Source | 4 AAA batteries (2 for transmitter, 2 for receiver) |
| Timing Accuracy | 0.1 seconds |
| Special Features | Backlit LCD, Digital Display, Ergonomic Design |
| Item Weight | 100 Grams |
Warranty and Support
PHOLSY products are designed for reliability and performance. For warranty information, technical support, or further assistance, please visit the official PHOLSY store or contact customer service through the retailer where you purchased the product.
Visit the PHOLSY Store on Amazon for more information and products.