Introduction
This manual provides detailed instructions for the assembly, installation, operation, and maintenance of your Architectural Mailboxes Mailbox-to-Go MC11KITBAM Galvanized Steel Mailbox and Post Kit. Please read all instructions carefully before beginning installation to ensure proper setup and safe use. This mailbox kit is designed for residential use and is USPS Post Master General Approved, ensuring compliance with postal regulations for secure and accessible mail delivery.

Image: The Architectural Mailboxes Mailbox-to-Go MC11KITBAM, a black galvanized steel mailbox with a red flag, installed on its matching post in front of a house.
Safety Information
- Always wear appropriate safety gear, including gloves and eye protection, during installation.
- Before digging, contact your local utility companies to identify and mark any underground cables, pipes, or other utilities to prevent damage or injury.
- Ensure the installation area is clear of obstructions and stable.
- If using concrete for installation, follow the manufacturer's instructions for mixing and handling.
- Keep small parts away from children.
What's Included
Your Mailbox-to-Go kit includes the following components:
- Medium rust-resistant galvanized steel mailbox
- Durable steel post (consisting of top and bottom sections)
- Assembly and mounting hardware (screws, hex nuts, post brackets, L-brackets)
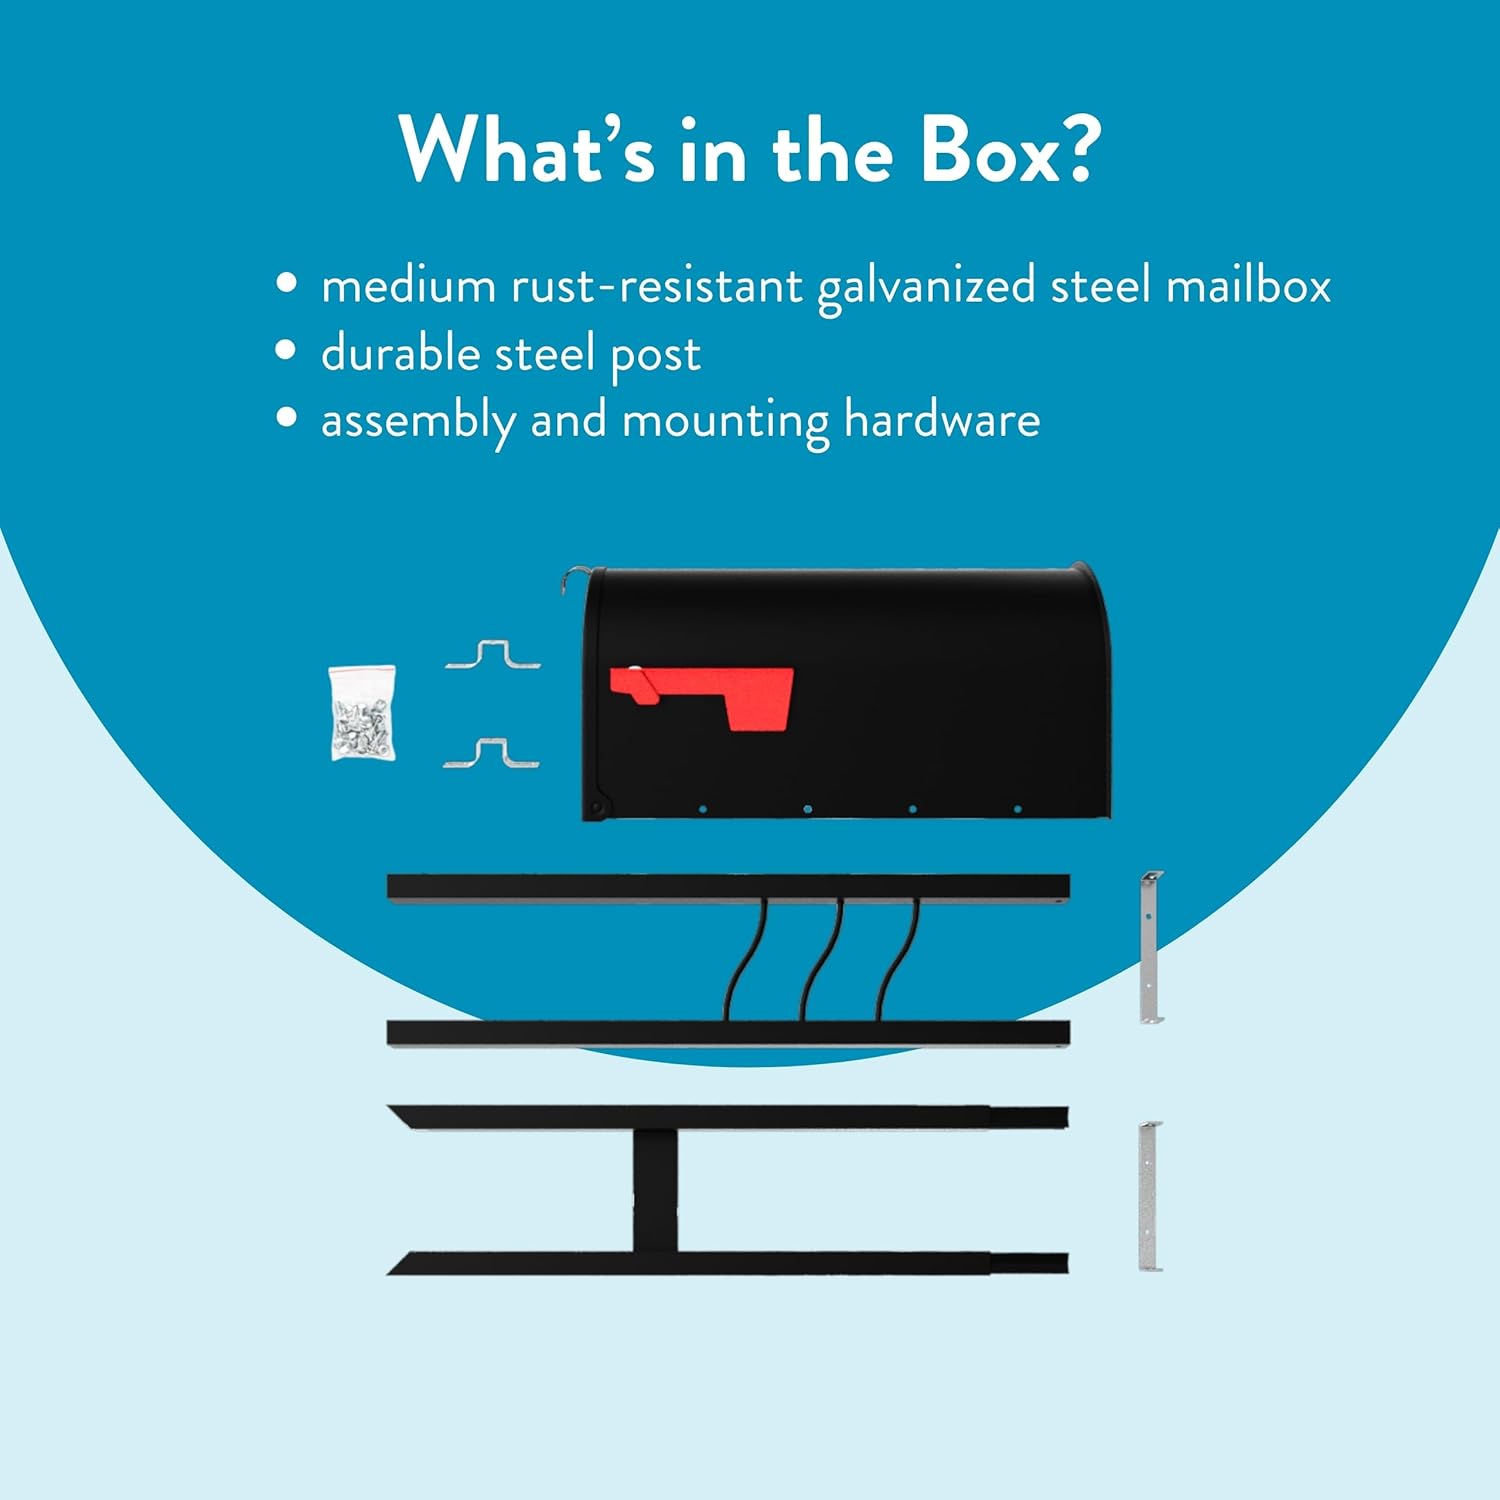
Image: An exploded view showing the mailbox, the two sections of the post, and a bag of assembly hardware.
Tools Required (Not Included)
- Shovel
- Level
- Wrench
- Screwdriver
- Concrete mix (recommended for secure in-ground installation)
Setup and Installation
Follow these steps for proper assembly and installation of your mailbox kit.
Step 1: Assemble the Post
- Turn the top post section upside down and place it on a flat, non-abrasive surface.
- Insert the bottom post section into the top post. Lift the entire post assembly and gently pound it on a non-abrasive surface until the two sections are securely connected.
Video: This video demonstrates the assembly of the mailbox post, showing how to connect the top and bottom sections securely.
Step 2: Attach Post Brackets
- Position the two post brackets and two L-brackets onto the assembled post as shown in the video.
- Attach these brackets to the post assembly using the provided screws and hex nuts. Ensure all connections are tight and secure.
Video: This video illustrates the process of attaching the post brackets and L-brackets to the assembled mailbox post.
Step 3: Install the Post in the Ground
- Choose a suitable location for your mailbox, ensuring it complies with local postal regulations (see Step 5).
- Dig a hole approximately 12 inches deep and 8 inches in diameter. Remember to check for underground utilities before digging.
- Place the assembled post into the hole. Use a level to ensure the post is perfectly straight.
- Fill the hole with concrete mix, following the concrete manufacturer's instructions. Allow the concrete to cure completely before proceeding.
Video: This video demonstrates how to dig the hole, place the post, and secure it with concrete for a stable installation.
Step 4: Attach the Mailbox to the Post
- Once the post is securely installed and the concrete is cured, align the mailbox with the attached post brackets.
- Attach the mailbox to the post assembly using the remaining screws and hex nuts. Tighten all fasteners to ensure the mailbox is firmly attached and does not wobble.
Video: This video shows the final steps of attaching the mailbox body to the installed post assembly.
Step 5: USPS Mailbox Placement Guidelines
For smooth, uninterrupted mail service, ensure your mailbox adheres to the United States Postal Service (USPS) guidelines:
- Height: The bottom of the mailbox should be 41-45 inches from the road's surface.
- Setback: The mailbox should be set back 6-8 inches from the street curb.
- USPS Approval: This Mailbox-to-Go kit is USPS Post Master General Approved. Always ensure your mailbox is approved to avoid service suspension.

Image: A diagram showing a mail truck next to a mailbox, with measurements indicating the correct height (41-45 inches) and setback (6-8 inches) from the road.
Video: This video explains the importance of USPS approval for mailboxes and how to verify compliance, including checking for the seal on the mailbox and consulting the USPS website.
Operating Instructions
- Opening/Closing the Door: Gently pull the mailbox door open to retrieve or deposit mail. Push the door firmly until the adjustable latch engages to ensure it remains closed and mail is protected from weather.
- Using the Signal Flag: Raise the red signal flag when you have outgoing mail for pickup. Lower the flag after mail has been collected.

Image: A detailed view of the black galvanized steel mailbox, highlighting the adjustable latch door closure and the red signal flag.
Maintenance
- Cleaning: Periodically clean the mailbox exterior with a soft cloth and mild soap to remove dirt and maintain its finish. Avoid abrasive cleaners.
- Rust Prevention: The galvanized steel construction and powder-coat finish provide rust resistance. Inspect regularly for any chips or scratches in the paint and touch up as needed to prevent rust.
- Fasteners: Annually check all screws and nuts for tightness. Re-tighten if necessary to ensure the mailbox remains stable and secure.
- Hinge and Latch: Apply a small amount of silicone lubricant to the door hinges and latch mechanism if they become stiff or squeaky.
Troubleshooting
| Problem | Possible Cause | Solution |
|---|---|---|
| Mailbox wobbles on post. | Loose mounting hardware or unstable post foundation. | Check and tighten all screws and nuts securing the mailbox to the post. Ensure the post is firmly set in the ground, adding more concrete if necessary. |
| Mailbox door does not close securely. | Latching mechanism is stiff or misaligned. | Apply silicone lubricant to the latch mechanism. Check for any debris obstructing the latch. |
| Red signal flag does not stay up/down. | Loose pivot point or worn mechanism. | Inspect the flag's pivot point for looseness or damage. Tighten any loose fasteners. |
Specifications
| Model Number: | MC11KITBAM |
| Material: | Galvanized Steel |
| Color: | Black |
| Mounting Type: | Post Mount (In-ground installation) |
| Product Dimensions (Mailbox & Post): | 20.05"D x 6.93"W x 60.89"H |
| Mailbox Capacity: | Medium (800 Cubic Inches) |
| Item Weight: | 9.4 Pounds |
| Access Location: | Front |
| USPS Approved: | Yes |
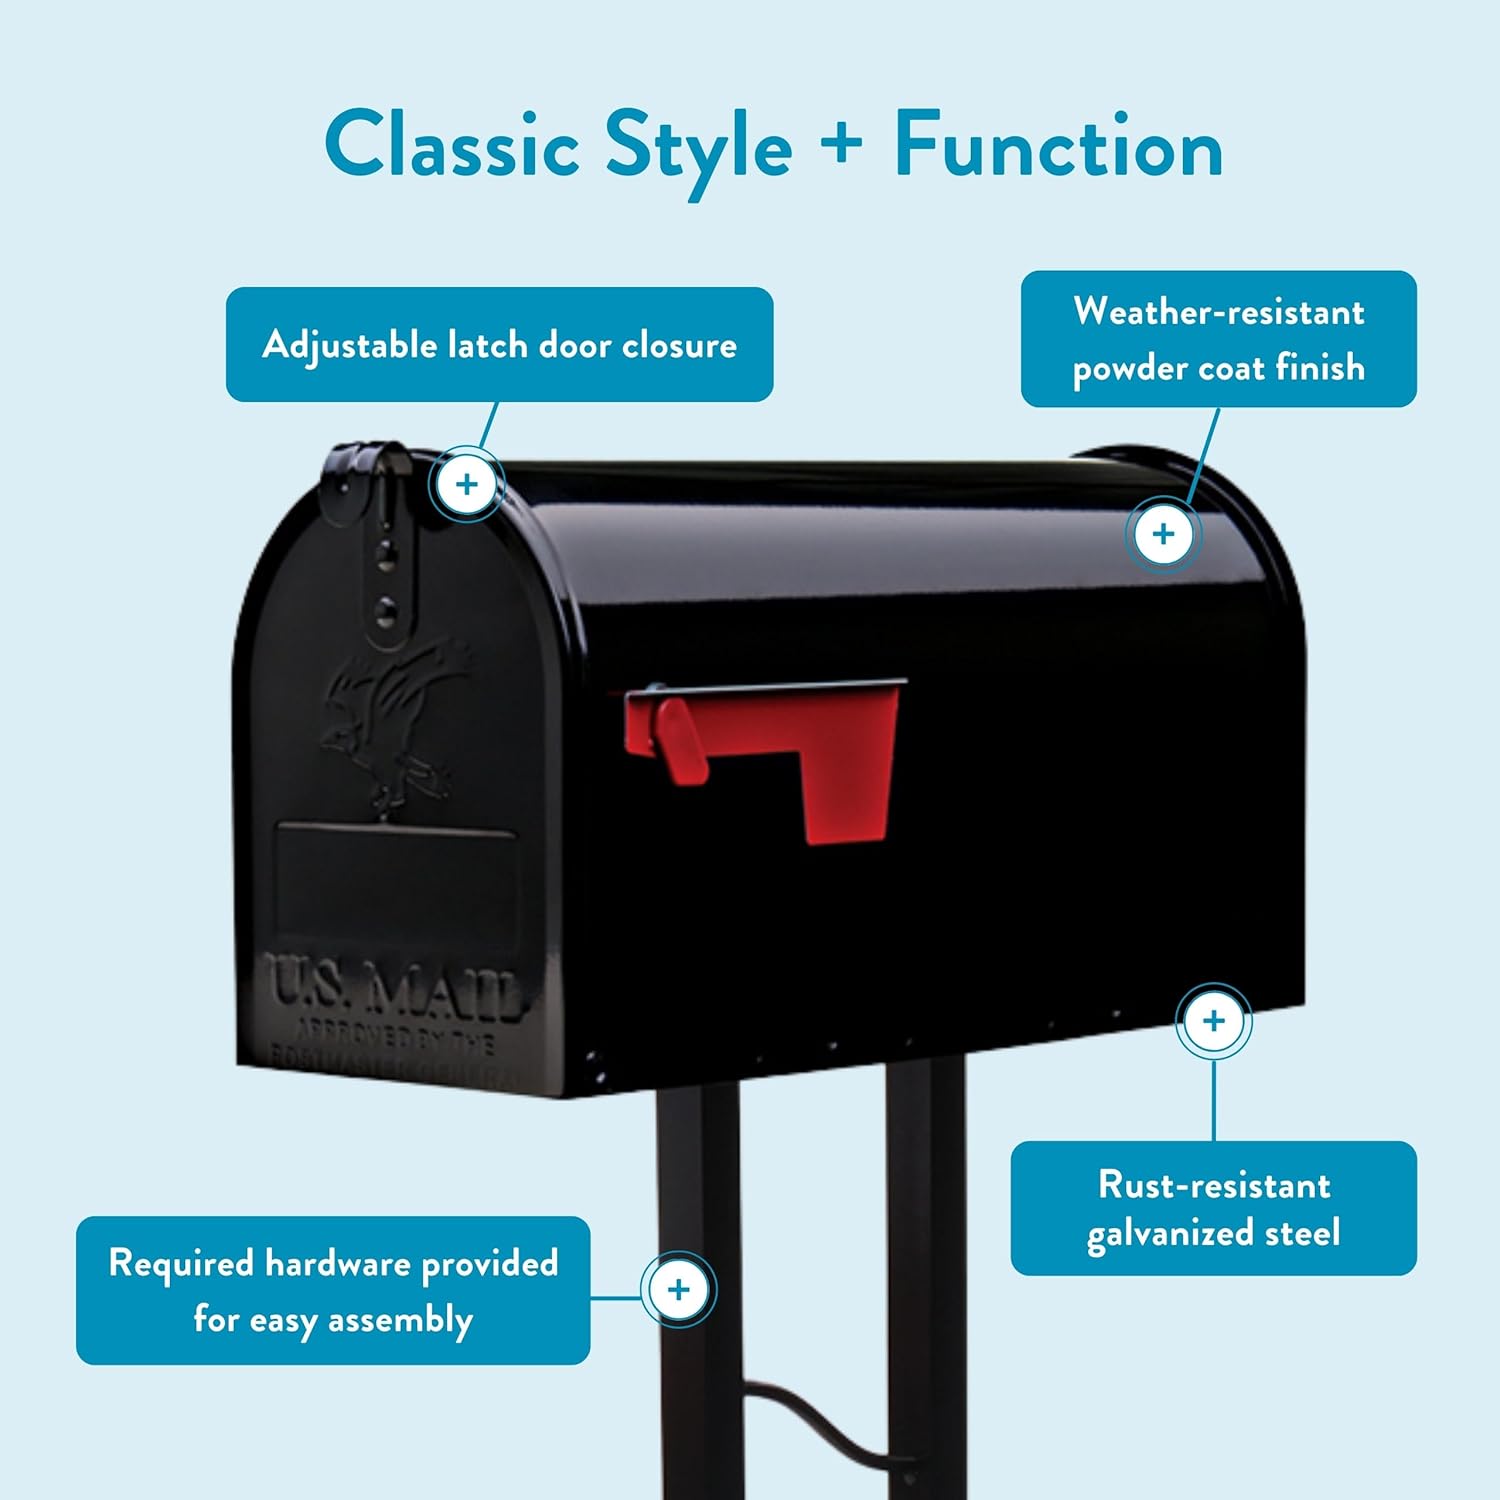
Image: Technical drawing showing the overall dimensions of the mailbox and post assembly, including depth, width, and height measurements.
Video: This video provides an explanation of different mailbox sizes, including the medium (T1) size, and what they can accommodate.
Warranty and Support
This Architectural Mailboxes product comes with a manufacturer's warranty. For specific warranty details or technical support, please refer to the contact information provided with your purchase or visit the official Architectural Mailboxes website.
For additional information or assistance, please contact:
- Manufacturer: Solar Group, Inc.
- Brand: ARCHITECTURAL MAILBOXES
- Website: architecturalmailboxes.com


