1. Introduction
This manual provides detailed instructions for the installation, operation, and maintenance of your Geekee Solar Security Camera Wireless Outdoor, Model Solar CG6. Please read this manual thoroughly before using the product to ensure proper functionality and safety.
2. Product Overview
The Geekee Solar Security Camera is a wireless, battery-powered outdoor camera designed for home security. It features 2K resolution, solar charging capabilities, and advanced motion detection.
Key Features:
- 2K Live Video and Full Color Night Vision: Captures 3MP ultra-HD video with a 110° wide-angle lens. Offers both full-color and infrared night vision options.
- 100% Wireless and Solar Powered: Equipped with a 3W high-performance solar panel and built-in rechargeable batteries for continuous operation without external power cables.
- Intelligent PIR Motion Detection: Features a built-in infrared motion detection sensor that sends instant notifications to your phone via the VicoHome app upon detecting movement. Customizable monitoring range.
- Two-Way Talk and Siren Alarm: Integrated microphone and speaker allow for real-time communication. Flashing white lights and a siren can be activated to deter intruders.
- Dual Storage Options: Supports both local SD card storage (up to 128GB, not included) and cloud storage. Includes free rolling 3-day cloud storage.
- IP65 Weatherproof: Designed to withstand various weather conditions, including rain, snow, and sun.
- Wi-Fi Connectivity: Operates on 2.4GHz Wi-Fi networks only (does not support 5GHz Wi-Fi).

Image: The Geekee Solar Security Camera shown with its accompanying solar panel, illustrating its outdoor design and weather resistance.
3. Package Contents
Please check the package for the following items:
- Geekee Solar Security Camera (Model Solar CG6)
- Solar Panel
- Mounting Bracket(s)
- Mounting Screws and Wall Plugs
- USB Charging Cable
- User Manual (this document)

Image: An illustration of the items included in the product package, such as the camera, solar panel, mounting hardware, and cables.
4. Setup Instructions
4.1 Initial Charging
Before first use, fully charge the camera's built-in battery using the provided USB cable and a standard 5V USB power adapter (not included). A full charge ensures optimal performance and allows the solar panel to maintain the charge effectively.
4.2 App Download and Account Registration
- Scan the QR code provided in the quick start guide or search for "VicoHome" in your mobile app store (App Store for iOS, Google Play for Android).
- Download and install the VicoHome app.
- Open the app and register for a new account, following the on-screen prompts.
4.3 Connecting the Camera to Wi-Fi
- Ensure your mobile device is connected to a 2.4GHz Wi-Fi network. The camera does not support 5GHz Wi-Fi.
- Open the VicoHome app and tap the "+" icon to add a new device.
- Select your camera model from the list.
- Follow the in-app instructions to connect the camera to your Wi-Fi network. This typically involves scanning a QR code displayed on your phone with the camera lens.
- Once connected, you can name your camera and complete the setup process.

Image: A QR code for downloading the VicoHome application, essential for camera setup and control.
4.4 Mounting the Camera and Solar Panel
Choose a suitable location for your camera and solar panel. For optimal solar charging, the solar panel should be placed in an area that receives direct sunlight for several hours each day. The camera can be mounted indoors or outdoors.
- Mark the drilling spots using the mounting bracket as a template.
- Drill holes and insert wall plugs if mounting on masonry.
- Secure the mounting bracket(s) with the provided screws.
- Attach the camera to its bracket and adjust the angle for the desired viewing area.
- Attach the solar panel to its bracket and connect its cable to the camera's charging port.

Image: The security camera mounted on an exterior wall, demonstrating its outdoor placement and integration with the solar panel.
5. Operating Instructions
5.1 Live View
Open the VicoHome app and select your camera to view the live feed. You can switch between standard definition (SD) and high definition (HD) video quality.
5.2 Motion Detection and Alerts
- PIR Motion Sensor: The camera uses a Passive Infrared (PIR) sensor to detect heat signatures of moving objects, reducing false alarms.
- Customizable Zones: Within the VicoHome app settings, you can define specific activity zones to monitor and ignore others, optimizing detection accuracy.
- Instant Notifications: When motion is detected, the camera will record a short video clip and send an instant notification to your phone.
- AI Recognition: Advanced features (may require subscription) include AI recognition for distinguishing between people, pets, and vehicles.
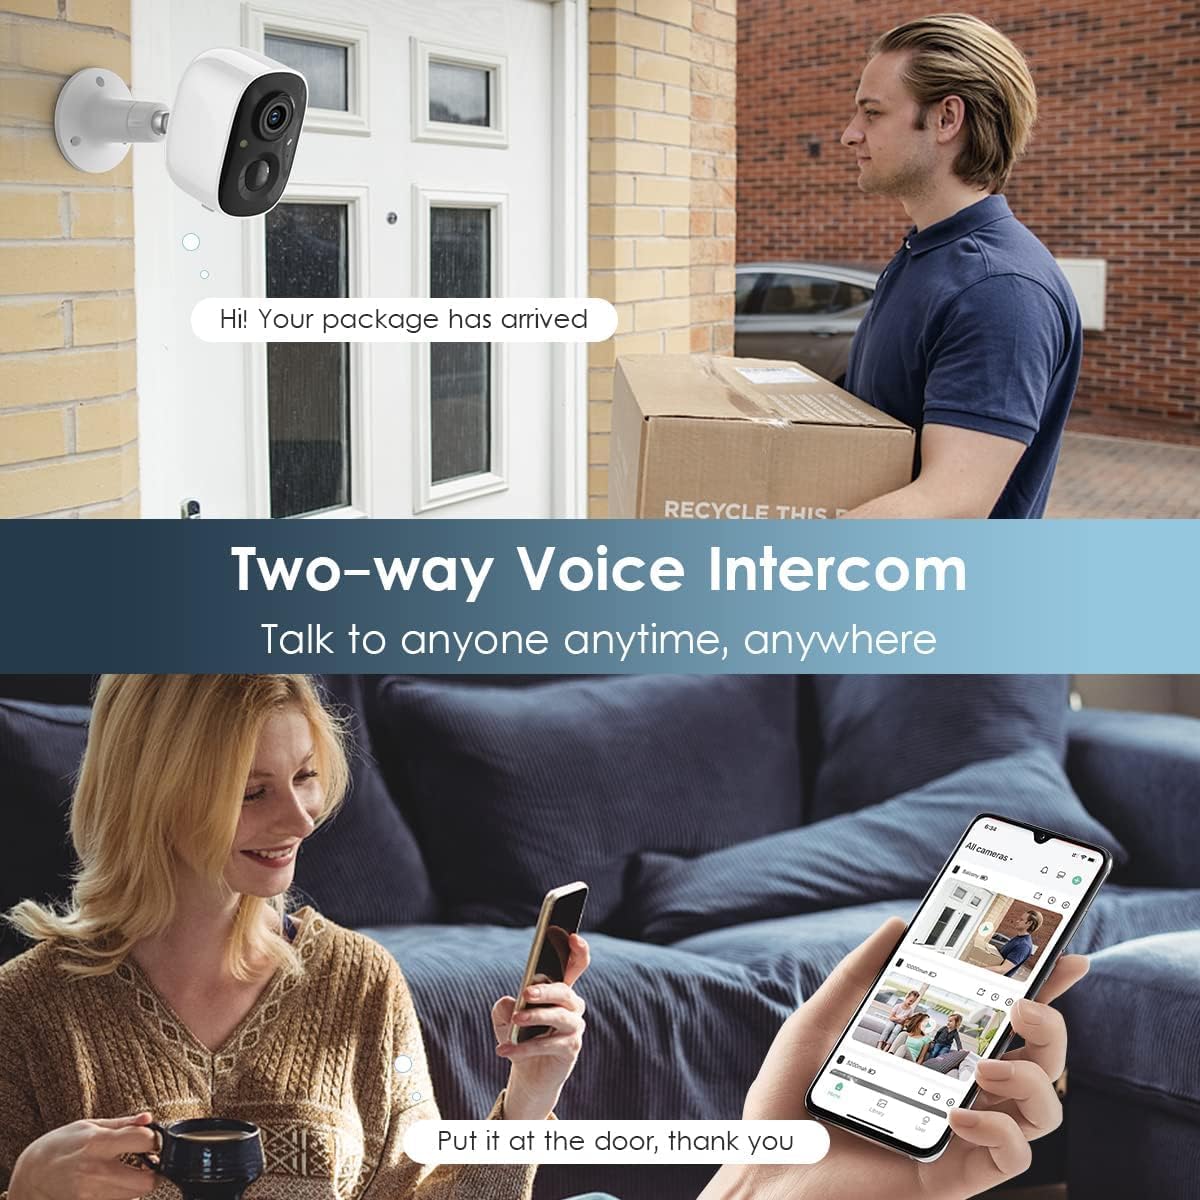
Image: An illustration showing the camera's motion detection capabilities, including flashlight and siren alerts, and notification pushes to a mobile device.
5.3 Night Vision Modes
The camera offers two night vision modes:
- Infrared Night Vision: Provides clear black-and-white video in low-light conditions using infrared LEDs.
- Full-Color Night Vision: Utilizes built-in spotlights to illuminate the area, providing full-color video even at night. This mode may consume more battery power.

Image: A comparison demonstrating the camera's 2K HD day vision and full-color night vision capabilities, showing clear images even in darkness.
5.4 Two-Way Audio and Siren
- Two-Way Talk: Use the microphone and speaker in the VicoHome app to communicate with individuals near the camera.
- Siren and Spotlight: Manually activate the siren and flashing white lights through the app to deter unwanted visitors. These can also be set to trigger automatically upon motion detection.

Image: An illustration of the two-way voice intercom feature, showing a user communicating with a delivery person via the camera.
5.5 Video Storage and Playback
- SD Card Storage: Insert a Micro SD card (up to 128GB, not included) into the camera's designated slot for local video storage.
- Cloud Storage: The camera provides free rolling 3-day cloud storage for recorded events. Extended cloud storage and advanced features may be available through a subscription within the VicoHome app.
- Playback: Access recorded videos from both SD card and cloud storage through the VicoHome app's playback function.

Image: An illustration depicting the dual storage options: Micro SD card support and free 3-day rolling cloud storage for video history.
6. Maintenance
- Cleaning the Lens: Regularly wipe the camera lens with a soft, clean cloth to ensure clear image quality. Avoid abrasive materials.
- Cleaning the Solar Panel: Keep the solar panel free from dust, dirt, leaves, and snow to maximize charging efficiency. Clean gently with a damp cloth.
- Battery Health: While solar-powered, if the camera is in a shaded area or experiences prolonged periods of low sunlight, occasional manual charging via USB may be necessary to maintain battery health.
- Firmware Updates: Check the VicoHome app periodically for firmware updates. Keeping the camera's firmware updated ensures optimal performance and security.
7. Troubleshooting
| Problem | Possible Cause | Solution |
|---|---|---|
| Camera not connecting to Wi-Fi |
|
|
| Battery drains quickly |
|
|
| Delayed motion notifications or live feed lag |
|
|
| No video recording to SD card |
|
|
8. Specifications
| Feature | Detail |
|---|---|
| Model Name | Solar CG6 |
| Video Capture Resolution | 2K (3MP) |
| Viewing Angle | 110 Degrees |
| Connectivity Protocol | Wi-Fi (2.4GHz only) |
| Power Source | Battery Powered (5000 mAh Lithium Polymer), Solar Panel (3W) |
| Storage Options | Micro SD Card (up to 128GB), Cloud Storage |
| Weatherproof Rating | IP65 |
| Motion Detection | PIR Sensor, AI Recognition (optional) |
| Audio | Two-Way Talk |
| Dimensions (L x W x H) | 5.04 x 3.27 x 6.26 inches |
| Item Weight | 1.04 pounds (0.47 Kilograms) |
9. Warranty and Support
Geekee is committed to providing high-quality products and customer satisfaction. For technical assistance, warranty information, or any product-related inquiries, please contact our support team.
- Manufacturer: Geekee
- Support Email: support@getgeekee.com
- Please refer to your purchase documentation for specific warranty terms and conditions.


