1. Introduction
Thank you for choosing the MONDAWE 12-Inch Thermostatic Ceiling Mounted Shower System. This manual provides essential information for the safe installation, operation, and maintenance of your new shower system. Please read it thoroughly before installation and keep it for future reference.
Key Features:
- Thermostatic Anti-Scald Valve: Equipped with a thermostatic shower valve that can be locked at 38°C (100°F) to prevent scalding from sudden water pressure changes.
- Rotating Body Jets: Features 6 spa body jets that rotate 360 degrees for a full-range massage experience.
- 3-Function Shower Faucet Set: Effortlessly switch between rainfall shower head, body jets, or handheld spray. All functions can be used separately or simultaneously.
- Premium Quality Materials: Valve body, handheld holder, and body jets are made of solid brass. Shower head, shower arm, handheld shower, and shower hose are made of 304 stainless steel.
- Easy Installation: Adopts American standard 1/2 inch NPT thread, compatible with most standard U.S. plumbing connections.
2. What's in the Package
Please verify that all components are present and undamaged before proceeding with installation.

Image: All components of the MONDAWE 12-Inch Thermostatic Shower System laid out, including the shower head, body jets, control panel, handheld shower, hoses, and mounting hardware.
- 12-Inch Shower Head
- 6 pcs Massage Body Jets
- Cover Plate
- Handheld Shower
- Thermostatic Valve Body
- Valve Panel
- Handheld Shower Holder
- 59-Inch Shower Hose
- Shower Arm
- Mounting Hardware
- User Manual
3. Specifications
| Feature | Detail |
|---|---|
| Brand | MONDAWE |
| Model Number | WF6310 |
| Color | Chrome |
| Material | Stainless Steel (Shower Head, Arm, Handheld, Hose), Brass (Valve Body, Handheld Holder, Body Jets) |
| Finish Type | Chrome |
| Number of Handles | 4 |
| Mounting Type | Ceiling Mount |
| Item Weight | 23.3 pounds |
| Product Dimensions | 12 x 12 x 7.87 inches |
| Standard Thread | American Standard 1/2 inch NPT |
4. Safety Information
- Always turn off the main water supply before beginning any installation or maintenance.
- If you are unsure about any part of the installation process, consult a qualified plumber.
- The thermostatic valve is designed to prevent scalding by maintaining a consistent water temperature. Do not tamper with the factory-set temperature limit of 38°C (100°F) unless you fully understand the risks.
- Ensure all connections are secure and watertight to prevent leaks.
- Wear appropriate personal protective equipment (PPE) during installation.
5. Installation Guide
Proper installation is crucial for the optimal performance and longevity of your MONDAWE shower system. Follow these steps carefully.
5.1 Pre-Installation Considerations
- Ensure your wall structure can support the weight of the shower system.
- Verify that your plumbing connections are 1/2 inch NPT standard.
- The installation depth of the main body and shower components must be within specified limits relative to the finished wall line. Refer to the diagrams below.
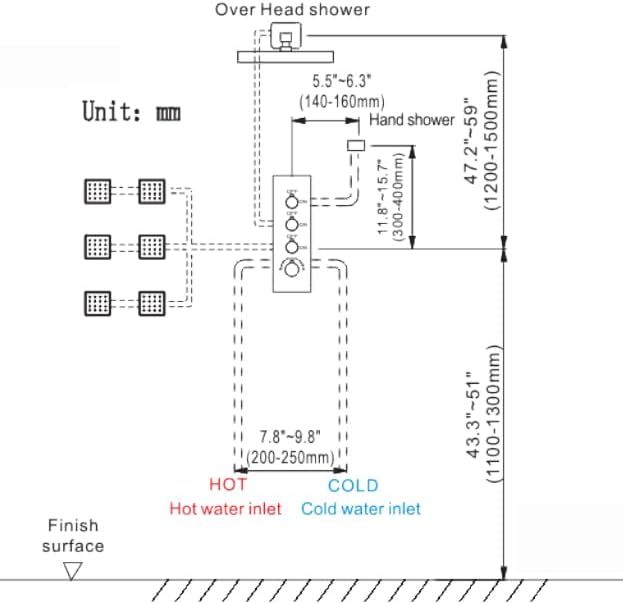
Image: Recommended height dimensions for shower components.
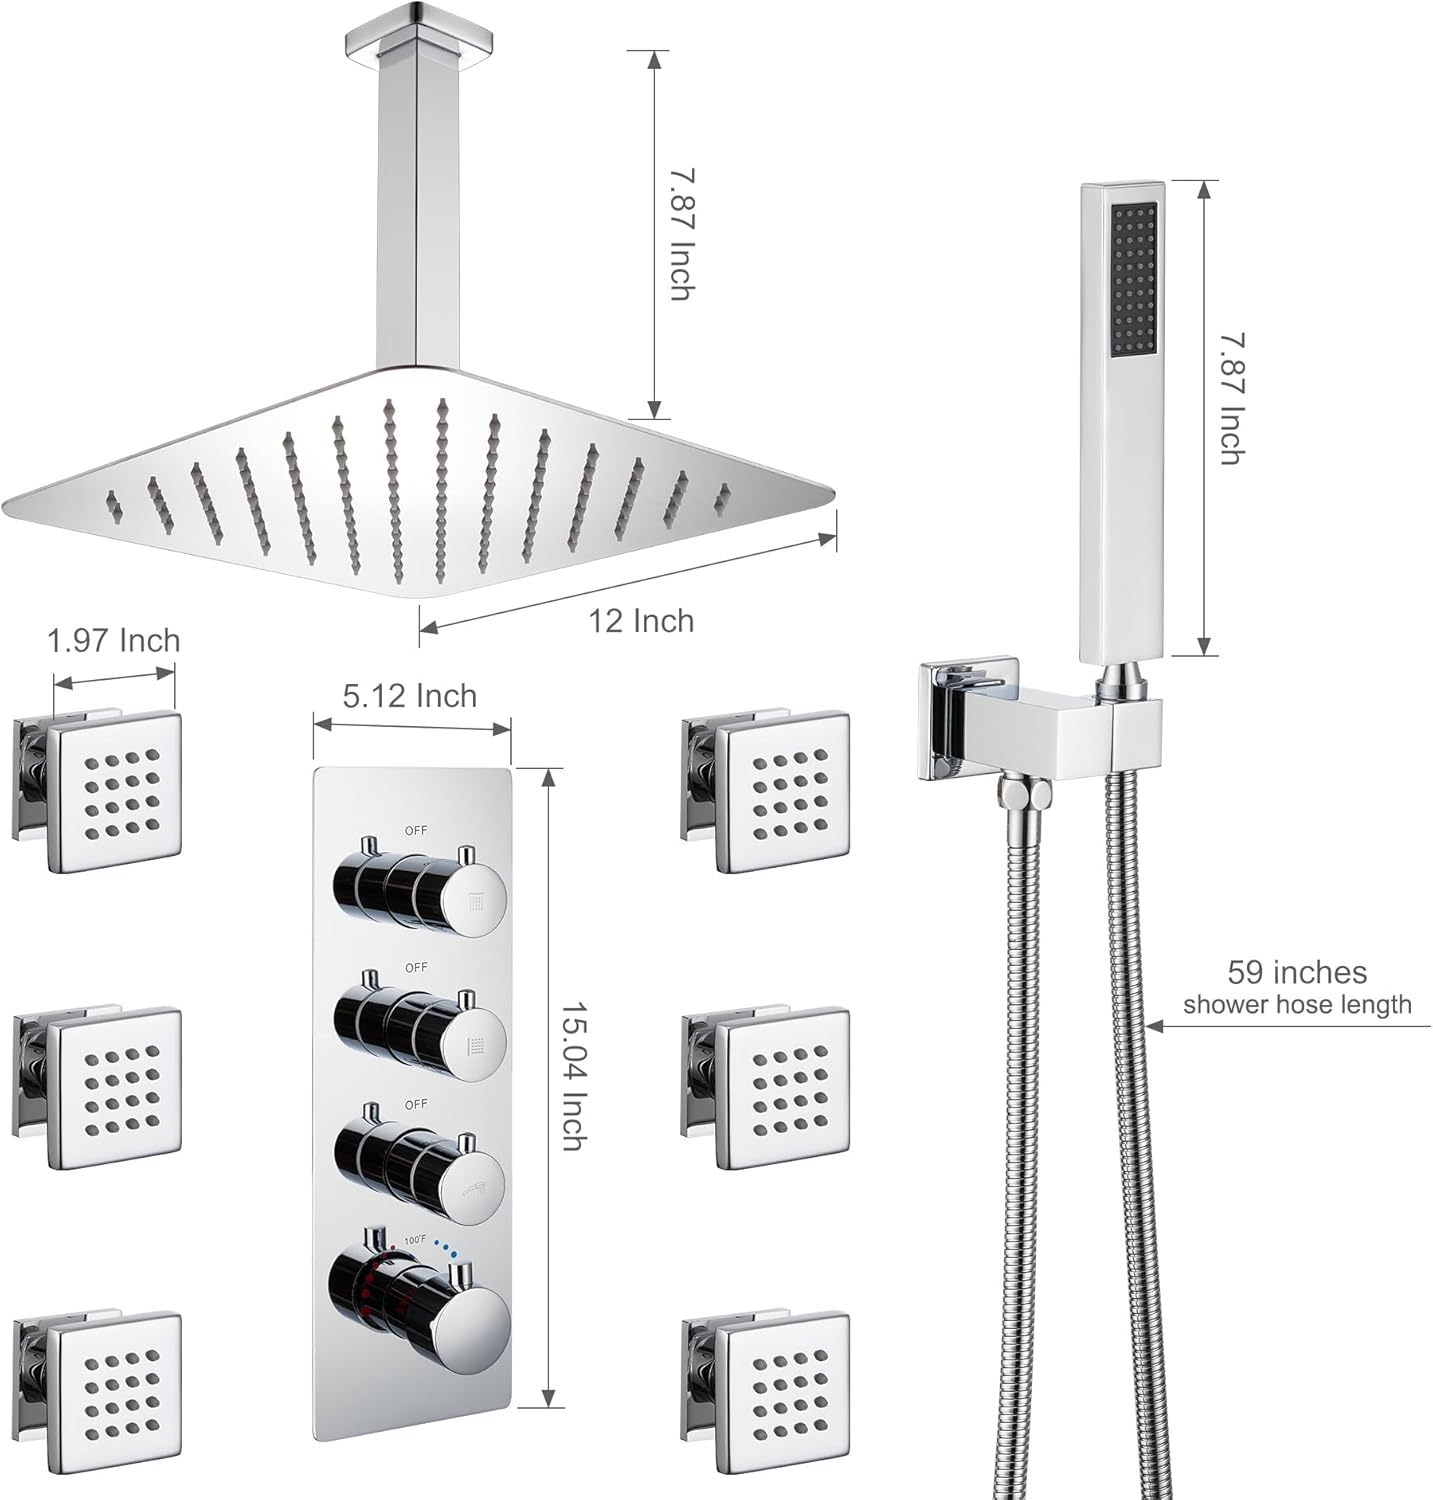
Image: Installation depth requirements for shower arm, holder, and body jets.
5.2 Video Installation Guide
For a visual step-by-step guide, please watch the official installation video provided by MONDAWE:
Video: Installation steps for the 12-inch thermostatic shower system. This video demonstrates the process of installing the main valve, connecting pipes, and mounting the various shower components.
Video: Detailed installation instructions for the WF6310 model. This video offers a comprehensive walkthrough of each installation phase, from rough-in to final assembly.
5.3 General Installation Steps:
- Prepare the Wall: Ensure the wall framing is ready for the main valve body and other components. Mark precise locations for the shower head, body jets, and handheld shower holder according to your desired layout and the provided diagrams.
- Install Main Valve Body: Secure the thermostatic valve body within the wall, ensuring it is properly aligned and at the correct depth relative to the finished wall surface. Connect the hot and cold water inlets (NPT 1/2") and outlets for the shower head, handheld, and body jets.
- Connect Piping: Run the necessary plumbing lines from the main valve body to the locations of the shower head, handheld shower holder, and body jets. Use appropriate NPT 1/2" fittings and ensure all connections are sealed with Teflon tape for a watertight fit.
- Install Shower Head and Arm: Mount the ceiling-mounted shower arm securely to the ceiling structure. Connect the 12-inch shower head to the arm.
- Install Body Jets: Install the 6 solid brass body jets into their designated wall openings. Ensure they are flush with the finished wall.
- Install Handheld Shower Holder and Hose: Mount the handheld shower holder to the wall. Connect the 59-inch stainless steel shower hose to the handheld shower and the wall outlet.
- Water Testing: Before closing the wall, perform a thorough water test. Turn on the main water supply and check all connections for leaks. Operate each function (shower head, handheld, body jets) to ensure proper flow and temperature control.
- Install Control Panel and Trim: Once water testing is complete and no leaks are found, install the decorative valve panel and handles onto the main valve body. Install the covers for the body jets and handheld holder.
6. Operating Instructions
Your MONDAWE shower system offers versatile control over your showering experience.
6.1 Temperature Control:
- The bottom knob on the control panel is for temperature adjustment. Rotate it to select your desired water temperature.
- The thermostatic valve is factory-set with a safety stop at 38°C (100°F) to prevent accidental scalding. To exceed this temperature, press the safety button and continue rotating the knob.
6.2 Function Selection:
The upper knobs on the control panel allow you to select and activate different shower functions:
- Each knob corresponds to a specific shower outlet (e.g., rainfall shower head, handheld shower, body jets).
- Turn a knob to the 'ON' position to activate the corresponding function.
- You can use individual functions or combine them for a customized experience.
6.3 Body Jet Adjustment:
- The 6 body jets feature 360-degree rotation. Adjust their direction to target specific areas for a personalized massage.
6.4 Product Demonstration Video:
See the shower system in action and understand its various functions:
Video: Demonstration of the Thermostatic Shower System 6310. This video showcases the different spray patterns and functions of the shower head, handheld, and body jets.
7. Maintenance
Regular cleaning and maintenance will ensure your MONDAWE shower system remains in excellent condition and functions optimally.
7.1 Cleaning the Chrome Finish:
- Use a soft cloth and mild soap or a non-abrasive cleaner specifically designed for chrome finishes.
- Avoid abrasive cleaners, scouring pads, or harsh chemicals, as these can damage the finish.
- Rinse thoroughly with clean water and dry with a soft cloth to prevent water spots.
7.2 Cleaning Shower Head and Body Jet Nozzles:
- Over time, mineral deposits can build up in the nozzles, affecting water flow.
- Many nozzles are made of rubber and can be easily cleaned by gently rubbing them with your finger or a soft brush to dislodge deposits.
- For stubborn buildup, a solution of white vinegar and water can be used. Soak the affected parts (if removable) or apply the solution with a cloth, then rinse thoroughly.
8. Troubleshooting
If you encounter any issues with your shower system, refer to the following common problems and solutions:
| Problem | Possible Cause | Solution |
|---|---|---|
| Low Water Pressure | Clogged nozzles, partially closed shut-off valves, low household water pressure. | Clean shower head/body jet nozzles. Ensure all shut-off valves are fully open. Check household water pressure. |
| Inconsistent Water Temperature | Thermostatic valve malfunction, insufficient hot water supply. | Ensure hot water supply is adequate. If problem persists, contact customer support. |
| Leaks from Connections | Loose connections, damaged seals/O-rings. | Tighten connections. Replace any damaged seals or O-rings. Ensure Teflon tape was used during installation. |
| No Water from a Specific Function | Diverter valve issue, clogged outlet. | Ensure the correct diverter knob is fully engaged. Check for clogs in the specific outlet. |
If you are unable to resolve an issue using these troubleshooting steps, please contact MONDAWE customer support for assistance.
9. Warranty and Support
MONDAWE is committed to providing high-quality products and excellent customer service. Your shower system is manufactured with durable materials to ensure longevity.
Customer Support:
If you have any questions regarding installation, operation, maintenance, or require assistance with your product, please do not hesitate to contact us. Our customer service team is ready to help.
You can reach us via email at the address provided in your purchase documentation or visit the MONDAWE store on Amazon for more information and support resources.

Image: MONDAWE Brand Logo


