1. Introduction
Thank you for choosing the Ibergrif M41101 Rectangular Ceramic Wall-Mounted Hand Wash Basin. This manual provides essential information for the safe and correct installation, operation, and maintenance of your new basin. Please read these instructions thoroughly before beginning installation and keep them for future reference.
The Ibergrif M41101 is designed for compact spaces, offering a modern and minimalist aesthetic suitable for various bathroom and toilet styles. Its ceramic construction ensures durability and ease of cleaning.
2. Safety Information
- Professional Installation Recommended: If you are unsure about any part of the installation process, it is highly recommended to consult a qualified plumber or professional installer.
- Water Supply: Always turn off the main water supply before starting any plumbing work to prevent water damage.
- Wall Integrity: Ensure the wall where the basin will be mounted is structurally sound and capable of supporting the weight of the basin when filled with water.
- Drilling Caution: Exercise extreme caution when drilling into walls to avoid hidden electrical wires, water pipes, or gas lines. Use a stud finder and consult building plans if available.
- Ceramic Handling: Ceramic is fragile. Handle the basin with care to prevent chipping or breakage. Do not overtighten fixing bolts, as this can damage the ceramic.
- Sealants: Use appropriate waterproof sealants (e.g., silicone) to prevent leaks around connections and wall mounts.
3. Package Contents
Please check that all components are present before beginning installation:
- 1 x Ceramic Hand Wash Basin (Ibergrif M41101)
- 2 x Fixing Bolts with Wall Plugs
- 2 x Metal Screws
- 2 x Plastic Solenoids (Wall Plugs)
- 2 x Plastic Gaskets
- 2 x Metal Gaskets
- 2 x Metal Nuts
Note: Faucet, drain assembly, and P-trap are not included and must be purchased separately.

Image: Ibergrif M41101 basin with wall mounting hardware.
4. Specifications
| Feature | Detail |
|---|---|
| Model Number | M41101 |
| Brand | Ibergrif |
| Material | Ceramic |
| Color | White |
| Shape | Rectangular |
| Installation Type | Wall-Mounted |
| Number of Faucet Holes | 1 |
| Dimensions (L x W x H) | 37.5 cm x 26.2 cm x 10.5 cm (approx. 14.76 x 10.31 x 4.13 inches) |
| Weight | 6.89 kg (approx. 15.19 lbs) |

Image: Detailed dimensions of the Ibergrif M41101 basin.
5. Setup and Installation
Important Note: These fixings are suitable for solid walls only. Plasterboard or stud walls may require specialist fixings (not supplied). Ensure you have the correct tools before starting.
Tools Required (Not Supplied):
- Drill
- 14mm Masonry Drill Bit
- 8mm Spanner
- Measuring Tape
- Pencil
- Level
- Silicone Sealant
Installation Steps:
- Mark Drilling Positions: Hold the basin against the wall at the desired height and use a pencil to mark the positions for the two mounting holes. Ensure the basin is level.
- Drill Holes: Drill two holes at the marked positions using a 14mm masonry drill bit to a depth of approximately 75mm.
- Insert Wall Plugs: Push a plastic wall plug (solenoid) into each drilled hole until flush with the wall surface.
- Insert Fixing Bolts: Screw a fixing bolt (metal screw) into each wall plug. Use an 8mm spanner to tighten the bolt until the spanner contacts the wall. Do not overtighten at this stage.
- Mount Basin: Carefully place the basin onto the fixing bolts, aligning the holes in the rear of the basin with the bolts.
- Secure Basin: Place a plastic gasket, followed by a metal gasket, and then a metal nut onto each fixing bolt. Tighten the metal nuts evenly with an 8mm spanner to secure the basin to the wall. Caution: Do not overtighten, as this will damage the ceramic.
- Connect Plumbing: Install the faucet and drain assembly (not included) according to their respective manufacturer's instructions. Connect the water supply lines and P-trap.
- Seal Edges: Apply a bead of silicone sealant around the edges where the basin meets the wall to create a watertight seal and prevent water ingress.
- Test for Leaks: Once all connections are made and sealant has cured (refer to sealant instructions), slowly turn on the main water supply and check all connections for leaks.
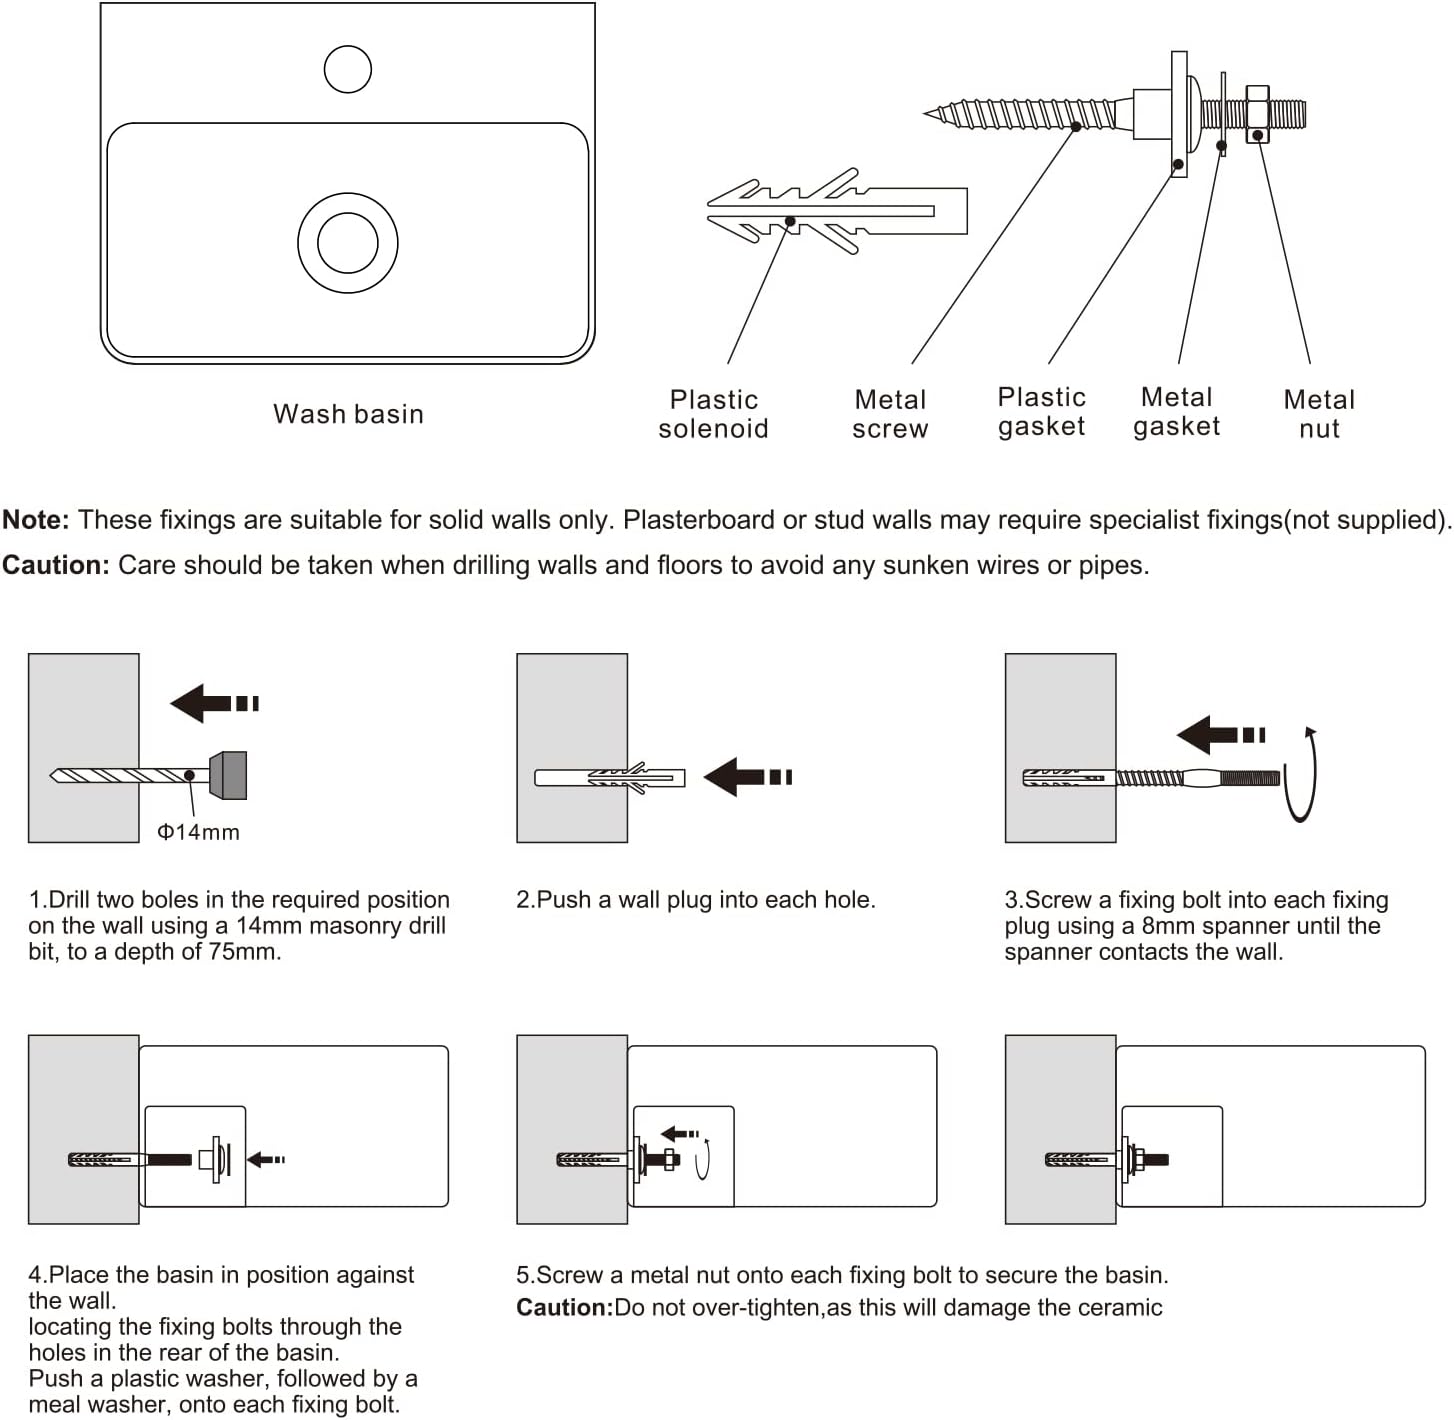
Image: Step-by-step installation guide for wall mounting.
6. Operating Instructions
The Ibergrif M41101 hand wash basin operates in conjunction with a faucet and drain assembly (purchased separately). Once installed, operate the basin by:
- Water Flow: Turn the faucet handle to control the water flow and temperature as desired.
- Drainage: Ensure the drain stopper (if applicable to your chosen drain assembly) is open for water to flow out.
Always ensure the faucet is fully closed after use to prevent water wastage and potential overflow.
7. Maintenance
Regular cleaning and maintenance will ensure the longevity and appearance of your ceramic basin.
- Daily Cleaning: Wipe the basin surface with a soft cloth and mild, non-abrasive cleaner after each use to prevent water spots and soap scum buildup.
- Deep Cleaning: For more thorough cleaning, use a ceramic-safe bathroom cleaner. Avoid abrasive powders, scouring pads, or harsh chemical cleaners (e.g., strong acids or alkalis) as these can damage the ceramic glaze.
- Stain Removal: For stubborn stains, a paste of baking soda and water can be applied, left for a short period, and then gently scrubbed with a soft brush or cloth. Rinse thoroughly.
- Drain Maintenance: Periodically clean the drain stopper and P-trap to prevent blockages and maintain good drainage.
- Inspection: Regularly check all plumbing connections for any signs of leaks. Tighten connections if necessary, but do not overtighten. Inspect the silicone sealant around the basin for any cracks or deterioration and reapply if needed.

Image: Features of the Ibergrif M41101 basin, including easy cleaning.
8. Troubleshooting
This section addresses common issues you might encounter with your basin.
| Problem | Possible Cause | Solution |
|---|---|---|
| Water Leakage | Loose plumbing connections, damaged seals, cracked basin. | Check and tighten all water supply and drain connections. Replace worn-out gaskets or seals. If the basin is cracked, it requires replacement. |
| Slow Drainage | Drain blockage (hair, soap scum), improperly installed P-trap. | Remove and clean the drain stopper. Clear any blockages in the P-trap. Ensure the P-trap is correctly installed and aligned. |
| Basin Feels Loose on Wall | Mounting bolts are loose, wall fixings are inadequate. | Carefully tighten the mounting nuts. If the wall fixings are compromised, the basin may need to be re-mounted with appropriate fixings for your wall type. Consult a professional. |
9. Warranty and Support
For warranty information regarding your Ibergrif M41101 basin, please refer to the documentation provided at the time of purchase or contact your retailer. Warranty terms and conditions may vary depending on the region and retailer.
If you require technical assistance, have questions about installation, or need to report a defect, please contact the retailer from whom you purchased the product. They will be able to provide the most accurate and up-to-date support information.
You may also visit the official Ibergrif website for general product information and support resources.


