1. Introduction
The ORTUR YRC1.0 Y-axis Rotary Chuck is a versatile accessory designed for laser engravers, enabling precise engraving on cylindrical and irregular objects. Its robust aluminum alloy construction ensures durability and stability. This manual provides detailed instructions for setup, operation, maintenance, and troubleshooting to help you maximize the potential of your rotary chuck.

2. Setup
2.1 Package Contents
Before beginning assembly, verify that all components are present according to the package list:

| Item No. | Component |
|---|---|
| ① | Main Part (Rotary Chuck Unit) |
| ② | Tailstock |
| ③ | Rotary Knob |
| ④ | Square Jaw (4 pcs) |
| ⑤ | Ladder Jaw (4 pcs) |
| ⑥ | Stud (3 pcs) |
| ⑦ | Wrench (2 pcs) |
| ⑧ | M4*10mm Screw (4 pcs) |
| ⑨ | Tape Measure |
| ⑩ | Adapter Cable (2 types) |
| ⑪ | 3mm Allen key |
| ⑫ | Y-axis Motor Cable |
| ⑬ | Mini Level |
2.2 Physical Assembly
The ORTUR YRC1.0 features an "all-in-one" framework structure for easy setup. Follow these general steps for physical assembly:
- Place the main rotary chuck unit and tailstock on a stable, flat surface.
- Adjust the position of the tailstock to accommodate the length of the object you intend to engrave.
- Attach the appropriate jaws (Square Jaw or Ladder Jaw) to the chuck based on the object's shape. Secure them using the provided screws and Allen key.
- For spherical objects, attach the studs to the chuck.
- Adjust the chuck angle using the rotary knob for conical or irregular items.

2.3 Connecting to Your Laser Engraver
Proper connection of the YRC1.0 to your laser engraver is crucial for correct operation. The connection method depends on your engraver model.
For ORTUR Laser Master 3 models, use the provided Y-axis Motor Cable (⑫) to directly connect the rotary chuck to the engraver's Y-axis motor port. For other brands or specific ORTUR models, you may need to use the included Adapter Cables (⑩) to ensure compatibility. Refer to the video above for detailed wiring instructions, paying close attention to the correct adapter cable usage (A-wire or B-wire) to avoid motor issues.
Important: Incorrect wiring can prevent the YRC from rotating and may cause a "clunking" sound from the motor. Always ensure the correct adapter cable is used for your specific engraver model.
3. Operating Instructions
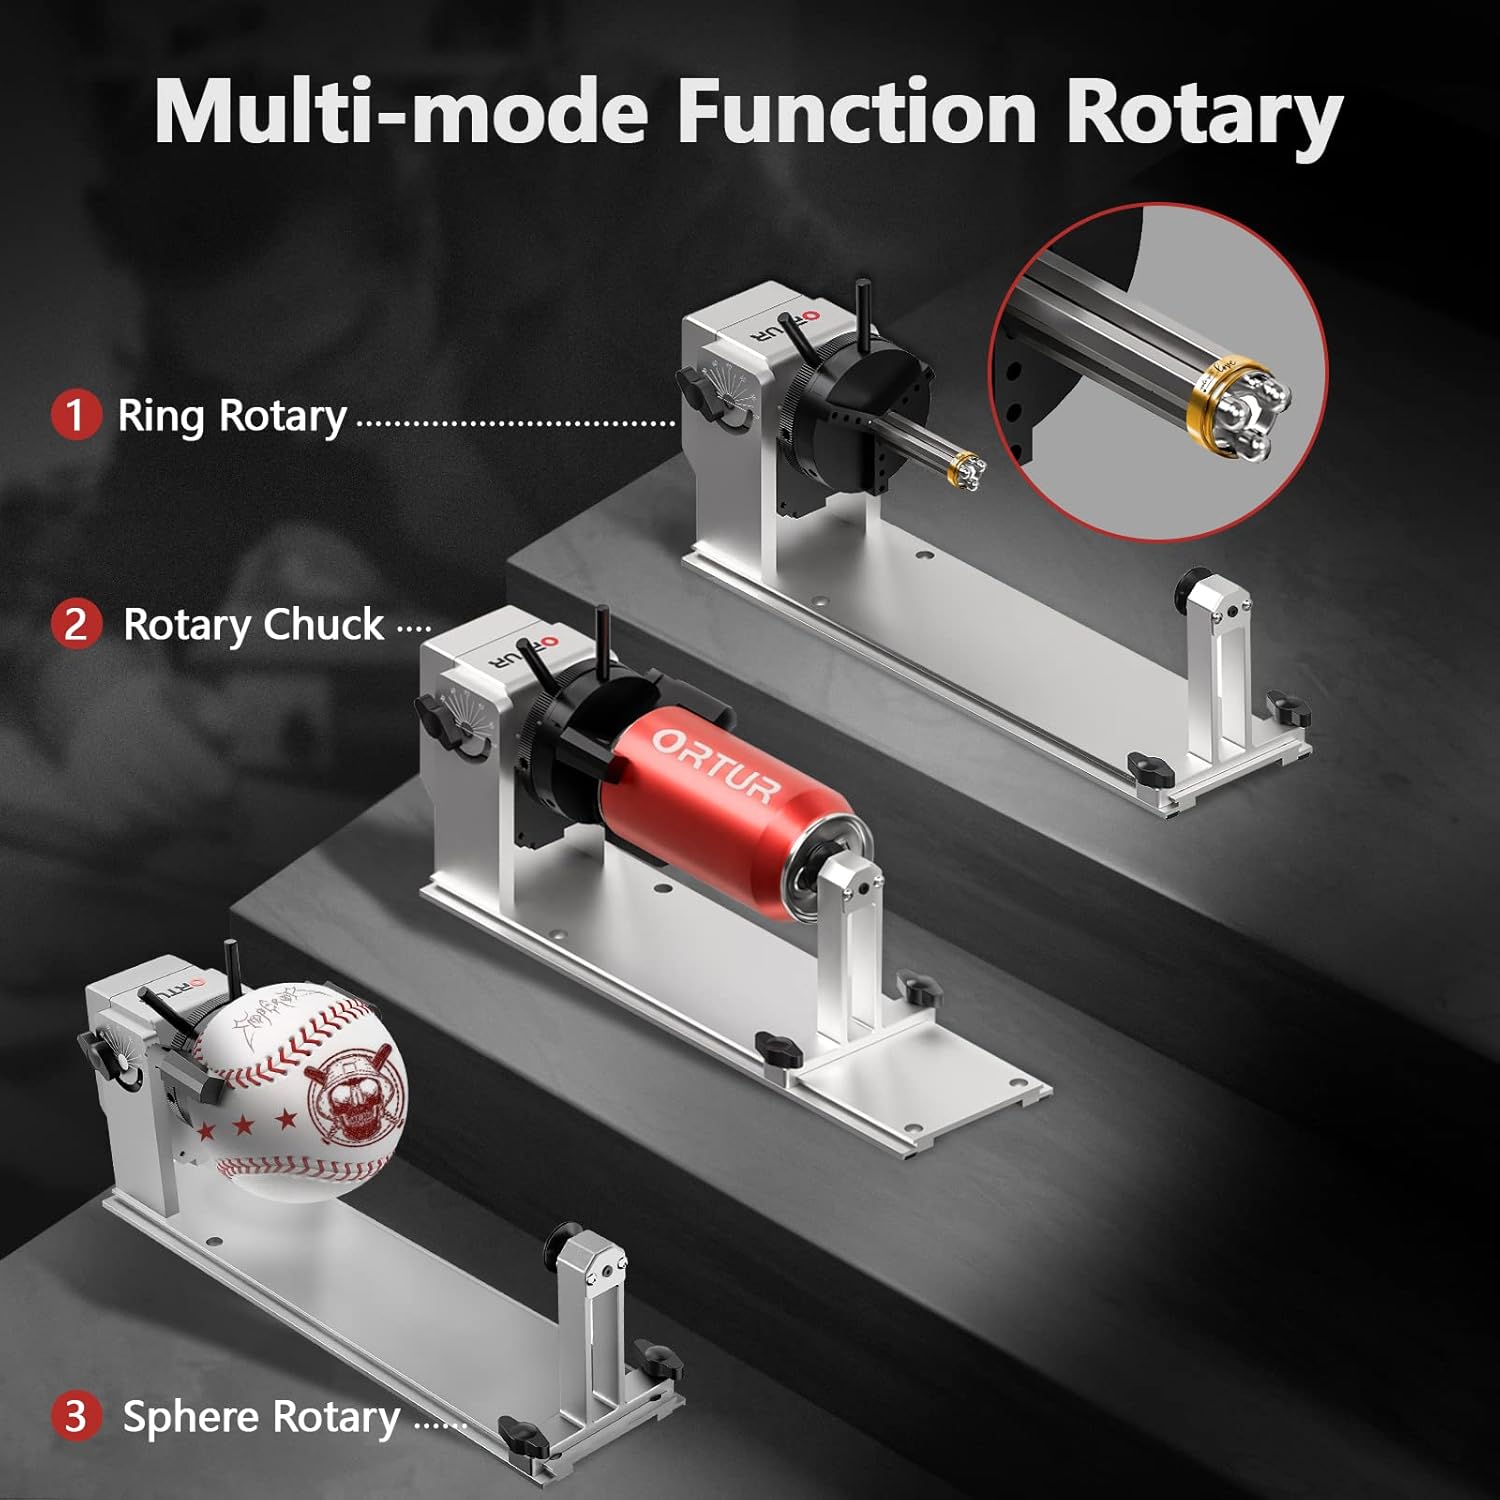
3.1 Modes of Operation
The ORTUR YRC1.0 supports multiple engraving modes for various object types:
- Chuck Rotary: Ideal for cylindrical objects like tumblers, bottles, and mugs.
- Ring Rotary: Specialized for engraving rings and other small circular items.
- Sphere Rotary: Designed for engraving spherical objects such as baseballs or decorative balls.
3.2 Adjusting for Different Object Sizes and Shapes
The YRC1.0 offers flexible adjustments to accommodate a wide range of objects:
- Chuck Adjustment: Extend or shrink the chuck by scrolling to fit objects with diameters from 1mm to 120mm.
- Jaw Placement: Assemble jaws on different holes for optimal grip on various shapes.
- Sphere Engraving: Supports spheres from 25mm to 150mm.
- Ring Engraving: Accommodates rings from 11mm to 100mm.
- Angle Adjustment: The chuck supports 180° angle adjustment for engraving conical objects or items with handles (like mugs).


3.3 Software Configuration (LightBurn/LaserGRBL)
The YRC1.0 is compatible with popular laser engraving software such as LightBurn and LaserGRBL. Before using the rotary chuck, ensure your software is configured correctly:
- After connecting the engraving machine to the computer, open the LightBurn software.
- In the console command column, enter
$22=0and press Enter to turn off the automatic zero function. This is essential for rotary engraving. - Access the Rotary Setup settings within your software (e.g., in LightBurn, go to "Laser Tools" > "Rotary Setup").
- Select "Chuck" as the rotary type.
- Enable "Enable Rotary" and ensure "Mirror Output to Rotary" is selected if needed for your design orientation.
- Set the "Rotary Axis" to "Y Axis".
- Input the correct "mm per rotation" value (e.g., 96.00 for the YRC1.0).
- Measure the diameter of your object and input the "Object Diameter" (e.g., 22.25mm for a ring) or "Circumference" (e.g., 70mm for a ring). The software will use this to calculate the correct rotation.
- Use the "Test" function to verify the rotation and alignment before starting your engraving project.

4. Maintenance
Regular maintenance ensures the longevity and optimal performance of your ORTUR YRC1.0 Y-axis Rotary Chuck:
- Cleaning: Regularly clean the chuck and base plate to remove dust, debris, and engraving residue. Use a soft, dry cloth. Avoid abrasive cleaners.
- Lubrication: Periodically apply a small amount of machine oil to moving parts, such as the chuck mechanism and the tailstock slide, to ensure smooth operation.
- Connection Check: Before each use, inspect all cable connections to ensure they are secure and free from damage.
- Jaw Inspection: Check the jaws for wear or damage. Replace them if they no longer provide a secure grip on objects.
5. Troubleshooting
This section addresses common issues you might encounter with your ORTUR YRC1.0 Y-axis Rotary Chuck.
5.1 YRC Not Rotating or Making a Clunking Sound
This is typically caused by incorrect wiring between the rotary chuck and your laser engraver.
- Symptom: The rotary chuck does not rotate, or the motor produces a repetitive "clunking" sound when activated.
- Cause: The Y-axis motor cable is incorrectly connected, or the wrong adapter cable (A-wire vs. B-wire) is being used for your specific engraver model.
- Solution:
- Power off your laser engraver and disconnect it from the power source.
- Refer to Video 1 ("How to Connect YRC with Your Machine") in the Setup section.
- Carefully check the connection of the Y-axis motor cable to the rotary chuck and to your engraver's Y-axis port.
- If your engraver is not an ORTUR Laser Master 3 model, ensure you are using the correct adapter cable (A-wire or B-wire) as shown in the video. The video highlights common incorrect wiring methods and the correct approach.
- Reconnect power and test the rotary chuck's movement.
5.2 Engraving Inaccuracies or Slippage
- Symptom: Engravings are distorted, misaligned, or the object slips during engraving.
- Cause: Incorrect object diameter/circumference settings in software, insecure object clamping, or the automatic zero function is not disabled.
- Solution:
- Double-check the object's diameter/circumference measurement and ensure it's accurately entered into your engraving software's rotary settings.
- Ensure the object is securely clamped in the chuck or supported by the tailstock. Adjust jaw positions or use additional support if necessary.
- Verify that the
$22=0command has been successfully applied in your software's console to disable automatic zeroing. - Use the mini level (⑬) to ensure the rotary chuck and the object are perfectly level before starting the engraving process.
6. Specifications
| Feature | Specification |
|---|---|
| Brand | Ortur |
| Model | 2022120501 (YRC1.0) |
| Material | Aluminum |
| Item Weight | 3.72 pounds |
| Package Dimensions | 15.98 x 9.25 x 4.88 inches |
| Country of Origin | China |
| Engraving Diameter Range (Chuck) | 1mm to 120mm |
| Engraving Diameter Range (Sphere) | 25mm to 150mm |
| Engraving Diameter Range (Ring) | 11mm to 100mm |
| Angle Adjustment | 0-180° |
| Engraving Speed | Up to 360° per second |
| Compatible Devices | All ORTUR laser engravers and most laser engravers on the market |
| Compatible Software | Laser Explorer, LaserGRBL, LightBurn |
| Supported OS | Windows (XP-10), Mac OS, Linux |
7. Warranty and Support
ORTUR is committed to providing excellent customer service and professional technical support. If you encounter any issues or have questions regarding your YRC1.0 Y-axis Rotary Chuck, please reach out to Ortur Official customer service.
They are available to assist with troubleshooting and guide you through your creative journey.


