1. Introduction
This manual provides essential information for the safe installation, operation, and maintenance of your C Cattleya CA2018-W Large 2-Light Brass Modern Outdoor Wall Lantern. Please read these instructions thoroughly before beginning installation and retain them for future reference.
The C Cattleya CA2018-W wall sconce is designed to provide illumination for outdoor spaces such as patios, doorways, porches, and garages. It features a solid brass frame and clear tempered glass panels, offering a modern aesthetic and durable construction.

Image 1.1: Front view of the C Cattleya CA2018-W Outdoor Wall Lantern.
2. Safety Information
WARNING: Risk of electric shock. Disconnect power at the fuse or circuit breaker before installation or servicing.
- All electrical connections must be in accordance with local codes, ordinances, or the National Electric Code (NEC). Contact a qualified electrician if you are unfamiliar with proper electrical wiring connections.
- This fixture is intended for outdoor use and is ETL Listed for safety.
- Ensure the mounting surface is structurally sound and can support the weight of the fixture.
- Do not exceed the maximum wattage specified for the bulbs.
- Wear safety glasses and gloves during installation.
- Keep flammable materials away from the light fixture when in operation.
3. Package Contents
Verify that all components are present before beginning installation:
- 1 x C Cattleya CA2018-W Outdoor Wall Lantern
- 1 x Mounting Hardware Kit (includes screws, wire nuts, and mounting plate)
Note: E26 base bulbs are not included and must be purchased separately.
4. Specifications
| Feature | Specification |
|---|---|
| Brand | c cattleya |
| Model Number | CA2018-W |
| Color | Dark Bronze |
| Material | Brass, Tempered Glass |
| Style | Modern |
| Fixture Form | Sconce |
| Product Dimensions | 7"L x 5"W x 20"H |
| Indoor/Outdoor Usage | Outdoor |
| Power Source | Corded Electric |
| Installation Type | Wall Mount |
| Light Source Type | Incandescent (compatible with LED, CFL) |
| Number of Light Sources | 2 |
| Voltage | 120 Volts |
| Bulb Base | E26 |
| Max Wattage per Bulb | 60 Watts |
| Water Resistance Level | Waterproof |
| Certifications | ETL Listed |

Image 4.1: Dimensional drawing of the C Cattleya CA2018-W Outdoor Wall Lantern.
5. Setup and Installation
Tools Required (not included): Screwdriver, wire strippers, electrical tape, ladder, safety glasses, gloves.
- Prepare for Installation:
- Turn off power at the circuit breaker or fuse box to avoid electrical shock.
- Ensure the wall surface is clean and dry.
- Mounting Plate Installation:
- Attach the mounting plate (from the hardware kit) to the junction box on the wall using the provided screws. Ensure it is securely fastened.
- Wiring Connections:
- Connect the fixture's black wire to the house's black (hot) wire.
- Connect the fixture's white wire to the house's white (neutral) wire.
- Connect the fixture's ground wire (usually bare copper or green) to the house's ground wire and to the mounting plate's ground screw.
- Secure all connections with wire nuts and wrap with electrical tape for added safety.
- Attach the Fixture:
- Carefully align the fixture with the mounting plate and secure it using the provided screws. Ensure the fixture is flush against the wall and stable.
- Install Bulbs:
- Open the glass door of the fixture using the special handle.
- Screw two E26 base bulbs (max 60W each, not included) into the sockets.
- Close the glass door securely.
- Restore Power:
- Turn the power back on at the circuit breaker or fuse box.
- Test the light fixture to ensure proper operation.
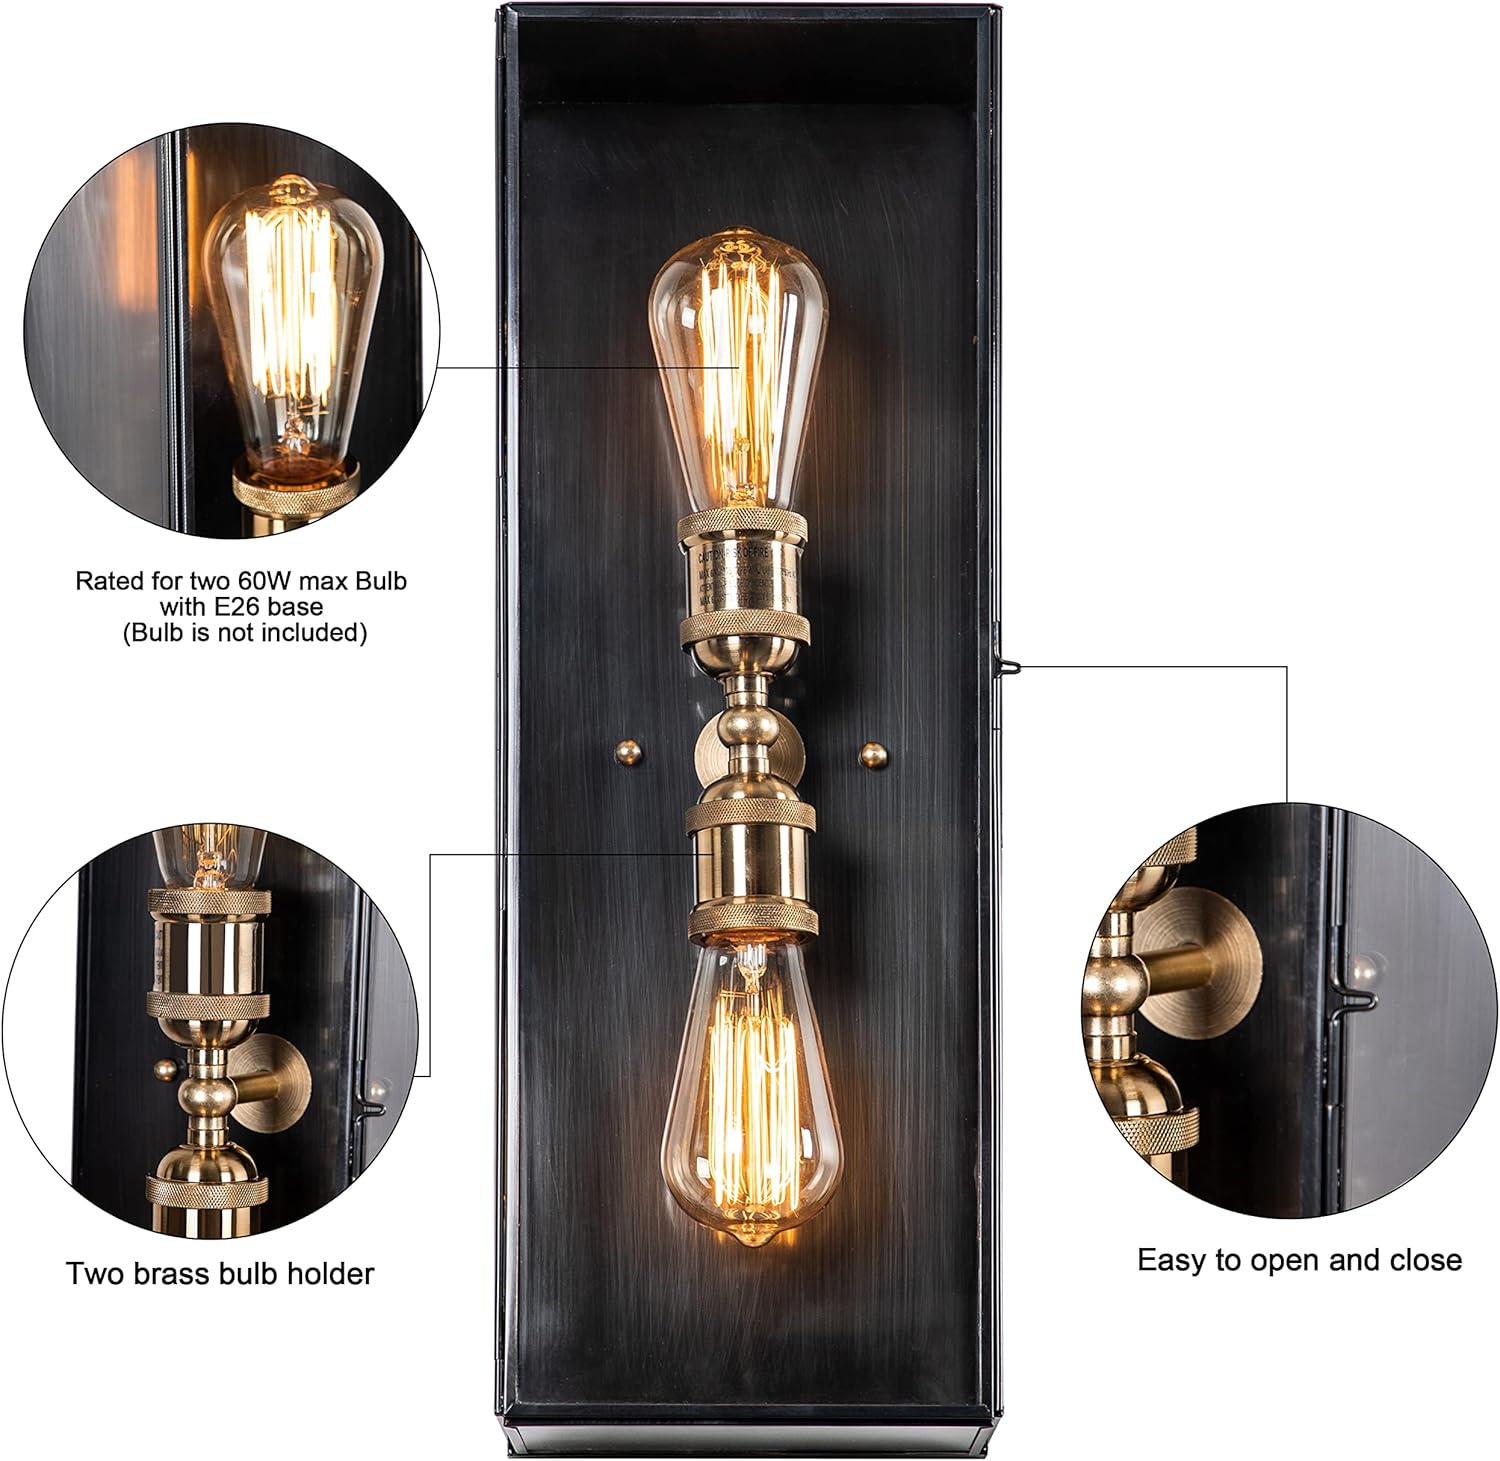
Image 5.1: Close-up of the fixture's internal components, showing bulb holders and the handle for accessing bulbs.
6. Operating Instructions
The C Cattleya CA2018-W Outdoor Wall Lantern operates via a standard wall switch (not included). Once installed and wired correctly, simply use the wall switch to turn the light fixture on or off.
- Ensure bulbs are securely tightened in their sockets.
- For optimal performance and energy efficiency, consider using LED bulbs compatible with E26 bases.

Image 6.1: Example of the wall lantern installed on a modern home exterior.
7. Maintenance
Regular maintenance helps ensure the longevity and appearance of your outdoor wall lantern.
- Cleaning: Periodically clean the fixture with a soft, damp cloth. Do not use abrasive cleaners or solvents, as these can damage the finish or glass.
- Bulb Replacement: Before replacing bulbs, ensure the power is turned off at the circuit breaker. Open the glass door using the handle, unscrew the old bulb, and screw in a new E26 base bulb (max 60W). Close the door securely.
- Inspection: Annually inspect the wiring and connections for any signs of wear or damage. Ensure all screws and mounting hardware remain tight.
- Weather Resistance: The fixture is waterproof. However, ensure no water accumulates around the base or electrical connections.
8. Troubleshooting
If you encounter issues with your wall lantern, refer to the following common problems and solutions:
| Problem | Possible Cause | Solution |
|---|---|---|
| Light does not turn on | No power to the fixture Loose wire connection Faulty bulb Faulty wall switch | Check circuit breaker/fuse. Verify all wire connections are secure (power off). Replace bulb with a known working one. Test or replace wall switch (consult electrician). |
| Light flickers | Loose bulb Loose wire connection Incorrect bulb type/wattage | Tighten bulb. Check wire connections (power off). Ensure bulb is E26 base and within 60W limit. |
| Glass panels are foggy/dirty | Environmental residue | Clean with a soft, damp cloth. |
9. Warranty and Support
This C Cattleya CA2018-W Outdoor Wall Lantern comes with a 1-Year Warranty from the date of purchase, covering defects in materials and workmanship under normal use.
For technical assistance, warranty claims, or to purchase replacement parts, please contact Cattleya Lighting directly. Refer to your purchase documentation for specific contact information or visit the official C Cattleya store on Amazon.
Seller: Cattleya Lighting
Amazon Store Link: Visit the C Cattleya Store


