
1. Introduction
This manual provides essential information for the safe and effective use of your Pride Mobility Go Go Ultra X S39 3-Wheel Travel Electric Mobility Scooter. Please read this manual thoroughly before operating your scooter to ensure proper setup, operation, and maintenance. Retain this manual for future reference.
2. Safety Information
Your Go Go Ultra X S39 scooter is designed to provide personal mobility. It is classified as an FDA Class II Medical Device. Adherence to all safety instructions is crucial to prevent injury or damage. Always operate the scooter responsibly and within its specified limits.
- Always ensure the scooter is fully assembled and all components are securely fastened before use.
- Do not exceed the maximum weight capacity of 300 lbs.
- Avoid operating the scooter on steep inclines or uneven terrain that may compromise stability.
- Exercise caution when operating near traffic or pedestrians.
- Always turn off the scooter and remove the key when not in use or when performing maintenance.
- Keep hands and feet clear of moving parts.
3. Product Overview
The Pride Mobility Go Go Ultra X S39 is a 3-wheel electric mobility scooter designed for both indoor and outdoor use. It features feather-touch disassembly for easy transport and a front basket for convenience.
Key Components

Figure 3.1: Front view of the Pride Mobility Go Go Ultra X S39 3-Wheel Mobility Scooter, showcasing the tiller, front basket, seat, and base unit.

Figure 3.2: Side view of the scooter, highlighting the seat, tiller, and rear wheels.
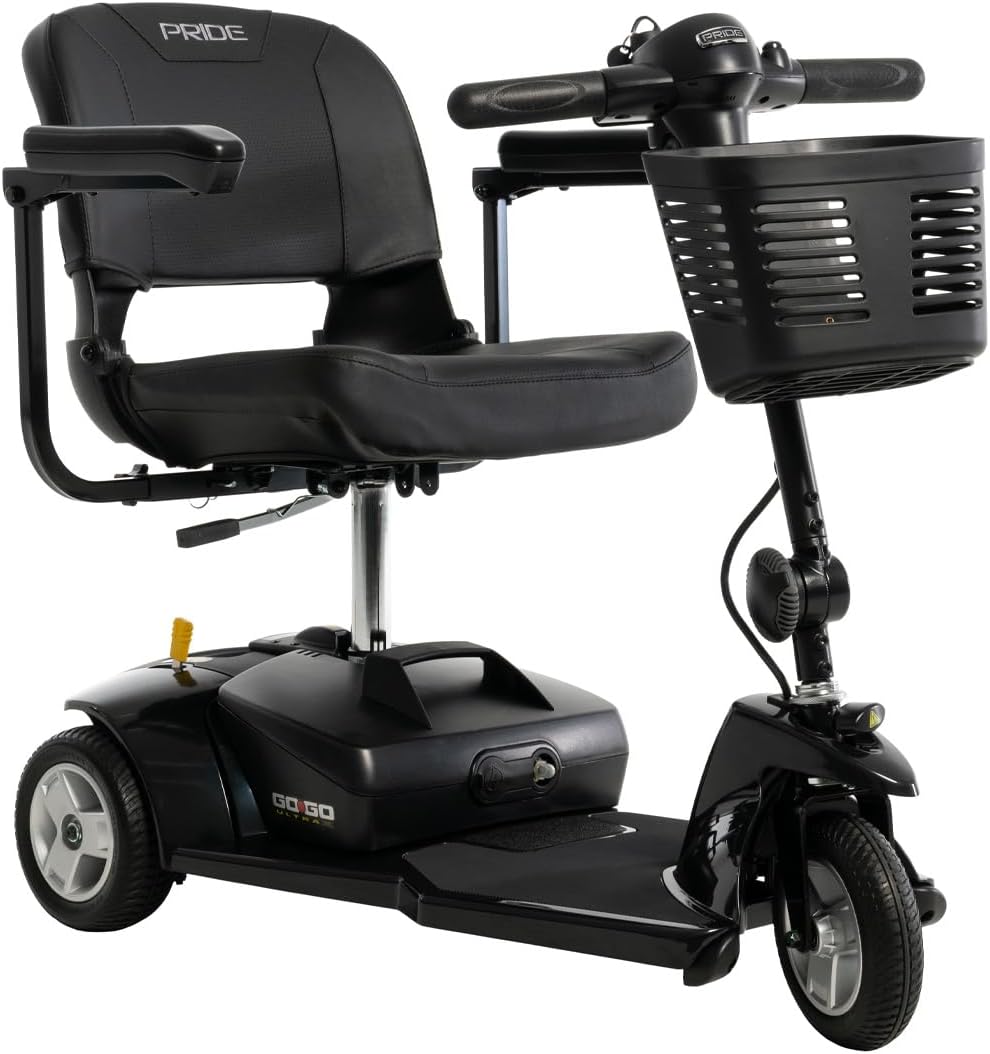
Figure 3.3: Angled front view of the scooter, showing the front wheel, basket, and controls.

Figure 3.4: Close-up view of the 'Go Go Ultra X' branding on the scooter's base unit.
Features
- Weight Capacity: Accommodates up to 300 lbs.
- Maximum Speed: Up to 4.3 mph (3-wheel model).
- Range: Up to 6.2 miles per charge at 300 lbs.
- Charging: Dual voltage charger for on-board or off-board charging. Charger port located on the tiller.
- Disassembly: Feather-touch disassembly into 5 lightweight pieces for transport and storage.
- Seat: 17"x17" compact foldable seat.
- Tiller: Convenient tiller adjustment knob for handlebar position customization.
- Stability: Stable, front frame-mounted seat post.
4. Setup
The Go Go Ultra X S39 is designed for easy assembly. Follow these steps to prepare your scooter for use.
4.1 Unpacking and Initial Assembly
- Carefully remove all components from the packaging.
- Place the heaviest part, the rear drive unit, on a flat, stable surface.
- Attach the front section (tiller and front wheel assembly) to the rear drive unit. Ensure the connection is secure.
- Insert the seat post into the receiver on the base unit.
- Attach the seat to the seat post.
- Install the front basket onto the tiller.

Figure 4.1: The main components of the Go Go Ultra X S39 scooter when disassembled for transport or storage, including the seat, base unit, tiller, and front shroud.
4.2 Battery Installation and Charging
The scooter uses a drop-in battery box. Ensure the battery is fully charged before first use.
- Locate the battery box.
- Connect the battery cables as indicated.
- The charger port is located on the tiller. Connect the dual voltage charger to the port and then to a standard electrical outlet.
- Allow the battery to charge completely, typically overnight, before initial operation. Refer to the charger's indicator lights for charging status.
5. Operating Instructions
Familiarize yourself with the controls before operating the scooter.
5.1 Tiller Controls

Figure 5.1: Close-up view of the tiller, showing the key switch, battery gauge, speed adjustment dial, and horn button.
- Key Switch: Insert the key and turn it to the 'ON' position to power on the scooter. Turn to 'OFF' to power off.
- Battery Gauge: Displays the current battery charge level. Charge the battery when the indicator is low.
- Speed Adjustment Dial: Rotate to increase or decrease the maximum speed of the scooter.
- Throttle Lever: Press the left or right lever to move forward or backward. Release to engage the electromagnetic brake.
- Horn Button: Press to sound the horn.
- Tiller Adjustment Knob: Loosen to adjust the angle of the tiller for comfortable steering, then tighten to secure.
5.2 Driving the Scooter
- Ensure you are seated comfortably and securely.
- Turn the key to the 'ON' position.
- Set the speed adjustment dial to a comfortable, slow speed for initial operation.
- Gently press the throttle lever to begin moving. Release the lever to stop.
- Steer by turning the tiller handlebars in the desired direction.
- Practice in an open, safe area before operating in more challenging environments.
6. Maintenance
Regular maintenance ensures the longevity and safe operation of your scooter.
6.1 Battery Care
- Always charge the battery fully after each use.
- If storing the scooter for an extended period, ensure the battery is fully charged and recharge it at least once a month.
- Keep battery terminals clean and free of corrosion.
6.2 Cleaning
- Wipe down the scooter with a damp cloth. Do not use abrasive cleaners or excessive water.
- Avoid spraying water directly onto electronic components.
6.3 General Checks
- Periodically check all nuts and bolts for tightness.
- Inspect tires for wear and proper inflation.
- Ensure all electrical connections are secure.
7. Troubleshooting
This section addresses common issues you might encounter with your scooter.
- Scooter does not power on: Check if the key is fully inserted and turned to 'ON'. Ensure the battery is charged and properly connected.
- Scooter moves slowly or has reduced range: The battery may be low or not holding a full charge. Ensure proper charging. Check tire pressure.
- Unusual noises: Turn off the scooter immediately and inspect for loose parts or obstructions. Contact customer support if the issue persists.
- Brakes not engaging: Release the throttle lever completely. If the scooter continues to move, turn off the power and contact customer support.
For issues not covered here, please contact Pride Mobility customer support.
8. Specifications
Detailed technical specifications for the Go Go Ultra X S39 3-Wheel Mobility Scooter.
| Attribute | Value |
|---|---|
| Product Dimensions | 40.25"D x 19.25"W x 33.5"H |
| Item Weight | 95.75 Pounds |
| Manufacturer | Pride Mobility Products Corporation |
| Date First Available | December 1, 2022 |
| Color | Black |
| Style | Compact, Electric |

Figure 8.1: Dimensional diagram of the Go Go Ultra X S39 scooter, indicating length, width, and height measurements.
9. Warranty and Support
Pride Mobility provides the following warranty for your Go Go Ultra X S39 scooter:
- Frame: 2-Year Warranty
- Electronics & Drivetrain: 2-Year Warranty
- Battery: 6-Month Warranty
Please contact your seller for specific warranty details, questions, and exclusions. For customer support, refer to the contact information provided with your purchase or visit the official Pride Mobility website.
10. Legal Disclaimer
Statements regarding dietary supplements have not been evaluated by the FDA and are not intended to diagnose, treat, cure, or prevent any disease or health condition.


