
1. Product Overview
The NORDRIVE Silenzio Black Aluminum Roof Bars are designed to provide a robust and aerodynamic solution for transporting goods on your vehicle's roof. This manual provides essential information for the correct installation, safe operation, and proper maintenance of your roof bars.
Key Features:
- Robust Aluminum Profile: Made from powder-coated aluminum alloy, featuring a T-slot for quick connector insertion.
- Aerodynamic Design: The front rubber profile is engineered to reduce air resonance and enhance aerodynamic efficiency, contributing to a distinctive vehicle design.
- Patented PTO System: The "press-to-open" system allows for quick insertion of T-slot connectors without removing the end terminal.
- Sealing Rubber Profile: A rubber profile is included to seal the T-slot after accessory mounting.
- Graduated Scale: The lower groove includes a graduated scale for simple and quick positioning of the foot attachments.

Figure 1: NORDRIVE Silenzio Black Aluminum Roof Bars mounted on a vehicle. This image illustrates the sleek, low-profile design of the roof bars when installed, showcasing their integration with the car's roofline.
Partial Compatibility List:
This is a partial list of compatible vehicles. For a complete and up-to-date compatibility list, please refer to the manufacturer's website or contact your seller.
| Vehicle Model | Year Range | Roof Type |
|---|---|---|
| 500 | 07/08>05/16 | Standard roof, also glass roof |
| 500C | 06/10>05/16 | Standard roof |
| 595 | 06/16> | Standard roof |
| 695 Biplace | 12/14>05/16 | Standard roof |
| 695 Biplace | 06/16> | Standard roof |
| 156 Crosswagon | 10/04>12/07 | Standard railing |
| 156 Sportwagon | 03/00>05/03 | Standard rail |
| 156 Sportwagon | 06/03>12/07 | Standard railing |
| 159 Sportwagon | 03/06>09/13 | Standard rail |
| Giulia | 06/16>11/19 | Standard roof, also glass roof |
| Giulia | 12/19> | Standard roof, also glass roof |
| Giulietta | 04/10>12/13 | Standard roof, also roof |
| Giulietta | 01/14>01/16 | Standard roof, also roof |
| Giulietta | 02/16>04/21 | Standard roof, also roof |
| Stelvio | 03/17> | Integrated profile mounting |
| 100 Avant | 01/82>12/94 | Standard railing |
| 200 Avant | 08/83>11/90 | Standard railing |
| A1 Sportback | 02/12>01/15 | Standard roof |
| A1 Sportback | 02/15>10/18 | Standard roof |
| A1 Sportback | 11/18> | Standard roof |
| A1 Sportback Citycarver | 11/19> | Standard roof |
| A3 3p | 09/12>07/16 | Standard roof only with bright package |
| A3 3p | 08/16>11/19 | Standard roof only with bright package |
| A3 Sportback | 09/04>06/08 | Integrated profile |
| A3 Sportback | 07/08>10/12 | Integrated profile |
| A3 Sportback | 11/12>07/16 | Standard roof without roof |
| A3 Sportback | 11/12>07/16 | Integrated profile |
| A3 Sportback | 08/16>04/20 | Integrated profile |
| A3 Sportback | 08/16>04/20 | Standard roof without roof |
| A4 4p | 11/07>01/12 | Standard roof |
| A4 4p | 02/12>10/15 | Standard roof |
| A4 4p | 11/15>07/19 | Standard roof |
| A4 4p | 08/19> | Standard roof |
| A4 Allroad | 04/09>01/12 | Standard rail |
| A4 Allroad | 02/12>05/16 | Standard railing |
| A4 Avant | 11/95>08/01 | Standard railing |
| A4 Avant | 09/01>10/03 | Standard railing |
| A4 Avant | 11/03>10/0 | Standard railing |
2. Setup and Installation
Proper installation is crucial for the safety and performance of your NORDRIVE Silenzio roof bars. Always refer to the detailed installation guide provided in the product packaging for vehicle-specific instructions and torque settings. The following steps provide a general overview.
General Installation Steps:
- Identify Mounting Points: Locate the designated mounting points on your vehicle's roof as per your vehicle's owner's manual or the specific NORDRIVE fitting kit instructions.
- Assemble Foot Packs: Attach the foot packs to the roof bar profiles. Use the graduated scale in the lower groove for accurate positioning.
- Mount Roof Bars to Vehicle: Carefully place the assembled roof bars onto the vehicle's roof, aligning the foot packs with the designated mounting points.
- Secure Foot Packs: Tighten the foot pack clamps or bolts according to the torque specifications provided in your specific fitting kit. Ensure all connections are secure.
- Insert T-Slot Accessories (Optional): If using T-slot mounted accessories, utilize the patented "press-to-open" (PTO) system to insert the connectors into the upper groove. After insertion, seal the groove with the provided rubber profile.
- Final Check: Before driving, double-check all connections and ensure the roof bars are firmly attached and level. Gently shake the bars to confirm stability.
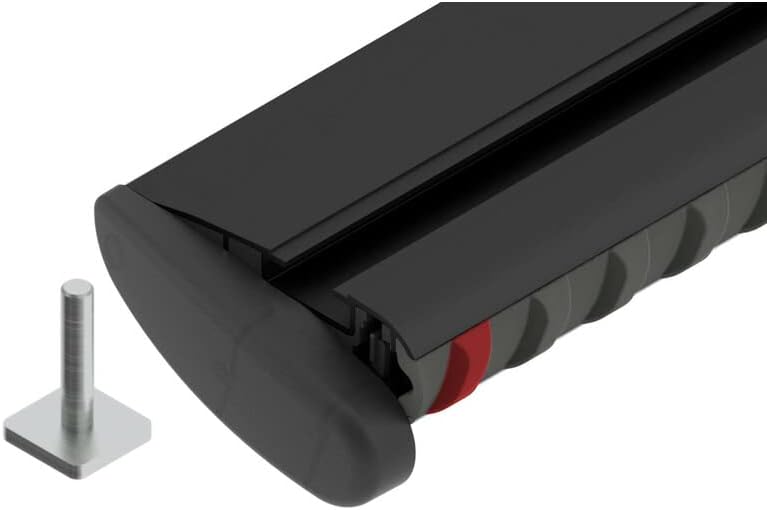
Figure 2: Detail of the NORDRIVE Silenzio roof bar end. This image highlights the robust aluminum profile, the end cap, and the T-slot channel, along with a T-bolt accessory, demonstrating the connection mechanism.
3. Operating Instructions
Once installed, your NORDRIVE Silenzio roof bars are ready for use. Adhere to the following guidelines for safe operation:
- Load Capacity: Never exceed the maximum load capacity specified for your roof bars and your vehicle's roof. Refer to your vehicle's owner's manual for its specific roof load limit.
- Load Distribution: Distribute the load evenly across the roof bars. Place heavier items at the bottom and center of the load.
- Secure Loads: Always secure your load firmly using appropriate straps, nets, or other securing devices. Ensure there is no movement of the load during transit.
- Check Clearance: Be aware of the increased height of your vehicle with the roof bars and any loaded items, especially when entering garages, car washes, or low-clearance areas.
- Driving Behavior: Adjust your driving style when carrying a load on the roof. Reduce speed, especially when cornering, braking, or in strong winds.
- Regular Checks: Periodically check the tightness of all fasteners and the security of your load during long journeys.
4. Maintenance
Regular maintenance will ensure the longevity and safe operation of your roof bars.
- Cleaning: Clean the aluminum profiles and rubber components with mild soap and water. Avoid abrasive cleaners or solvents that could damage the finish or materials.
- Inspection: Periodically inspect the roof bars for any signs of wear, damage, or corrosion. Check all bolts, screws, and clamps for tightness.
- Rubber Profiles: Ensure the rubber profiles are intact and properly seated to maintain aerodynamic efficiency and prevent water ingress into the T-slot.
- Storage: If not in use for extended periods, it is recommended to remove the roof bars and store them in a dry, protected environment to prevent unnecessary wear and exposure to elements.
5. Troubleshooting
This section addresses common issues you might encounter with your roof bars.
- Excessive Wind Noise:
- Ensure the rubber profile in the upper T-slot is fully inserted and covers the entire length of the slot.
- Verify that the front rubber profile is correctly positioned to optimize aerodynamics.
- Check if any accessories mounted on the bars are contributing to the noise.
- Loose Roof Bars:
- Re-check all mounting bolts and clamps for proper tightness according to the installation instructions.
- Ensure the foot packs are correctly seated on the vehicle's mounting points.
- Difficulty Inserting T-Slot Accessories:
- Ensure you are using the "press-to-open" (PTO) system correctly. Apply firm, even pressure.
- Check for any debris or obstructions in the T-slot.
6. Specifications
Detailed technical specifications for the NORDRIVE Silenzio Black Aluminum Roof Bars (Model N15080).
| Brand | NORDRIVE |
| Model Number | N15080 |
| Manufacturer | Lampa |
| Material | Aluminum, Rubber |
| Bar Length | 120 cm (M size) |
| Profile Dimensions | 83 mm (width) x 28 mm (height) |
| Color | Black |
| ASIN | B0BNQV4D9Z |

Figure 3: Technical diagram illustrating the cross-sectional dimensions of the NORDRIVE Silenzio roof bar profile, showing a width of 83 mm and a height of 28 mm.
7. Warranty and Support
For information regarding product warranty, please refer to the documentation included with your purchase or visit the official NORDRIVE website. For technical support, spare parts, or further assistance, please contact your retailer or the manufacturer directly using the contact information provided in your product packaging or on their official website.
Manufacturer: Lampa
Brand: NORDRIVE