1. Introduction
This manual provides detailed instructions for the setup, operation, maintenance, and troubleshooting of your MINISFORUM UM560 Mini-PC. Please read this manual thoroughly before using the device to ensure proper functionality and longevity.
2. Product Overview
The MINISFORUM UM560 is a high-performance mini-PC designed for various applications, from daily computing to demanding tasks like video editing and light gaming. It features an AMD Ryzen 5 5625U processor and extensive connectivity options.
2.1 Key Features
- High Performance: Equipped with an AMD Ryzen 5 5625U processor (6 cores/12 threads, 3.3 GHz base, up to 4.3 GHz boost).
- Expandable Memory: Comes with 16 GB DDR4 RAM, expandable up to 64 GB.
- Flexible Storage: Includes a 512 GB PCIe M.2 SSD and supports an additional 2.5-inch SATA HDD/SSD.
- Quad Display Support: Two HDMI ports and two USB Type-C ports for up to four 4K@60Hz displays.
- Compact Design: Space-saving form factor with low power consumption.
- Extensive Connectivity: Features 2.5 Gigabit Ethernet, multiple USB 2.0, USB 3.2 (Gen2), and USB-C ports.
2.2 Component Details


2.3 Port Layout
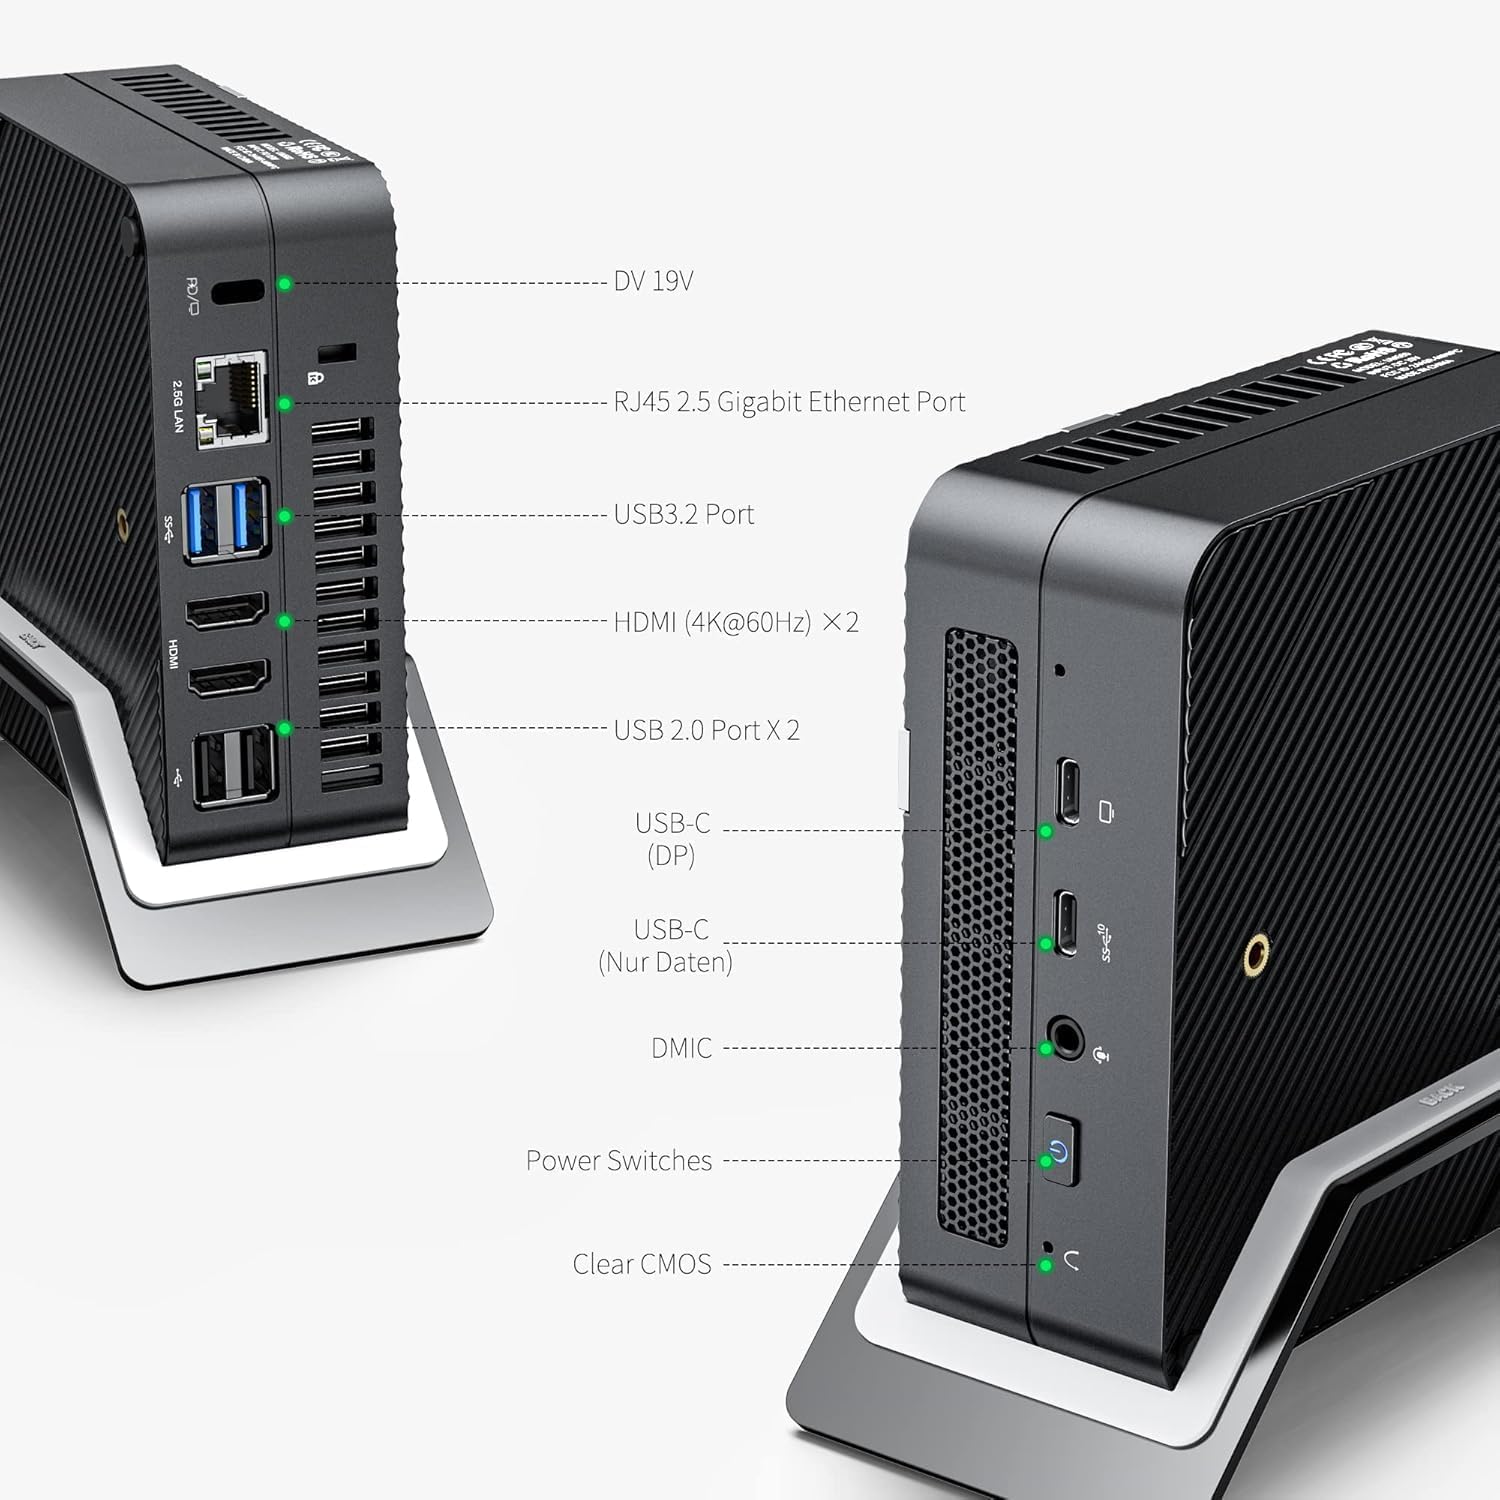
The MINISFORUM UM560 offers a comprehensive set of ports for various peripherals and display connections. Refer to Figure 3 for a visual guide to the port layout.
3. Setup Instructions
3.1 Package Contents
Verify that all components are present in the package:
- MINISFORUM UM560 Mini-PC unit
- Power Adapter
- HDMI Cable
- VESA Mount (optional, for wall/monitor mounting)
- User Manual (this document)
3.2 Connecting Peripherals
- Connect Display: Connect your monitor(s) to the HDMI ports or USB Type-C ports on the mini-PC. The UM560 supports up to four displays simultaneously.
- Connect Keyboard and Mouse: Plug your USB keyboard and mouse into the available USB ports.
- Connect Network: For a wired connection, connect an Ethernet cable to the RJ45 2.5 Gigabit Ethernet port. For wireless, ensure Wi-Fi is enabled in the operating system.
- Connect Power: Plug the power adapter into the DV 19V port on the mini-PC, then connect the adapter to a power outlet.
3.3 Powering On
Press the power button located on the front of the mini-PC. The system will boot up. If an operating system is pre-installed (e.g., Windows 11), follow the on-screen instructions for initial setup.
3.4 VESA Mount Installation (Optional)
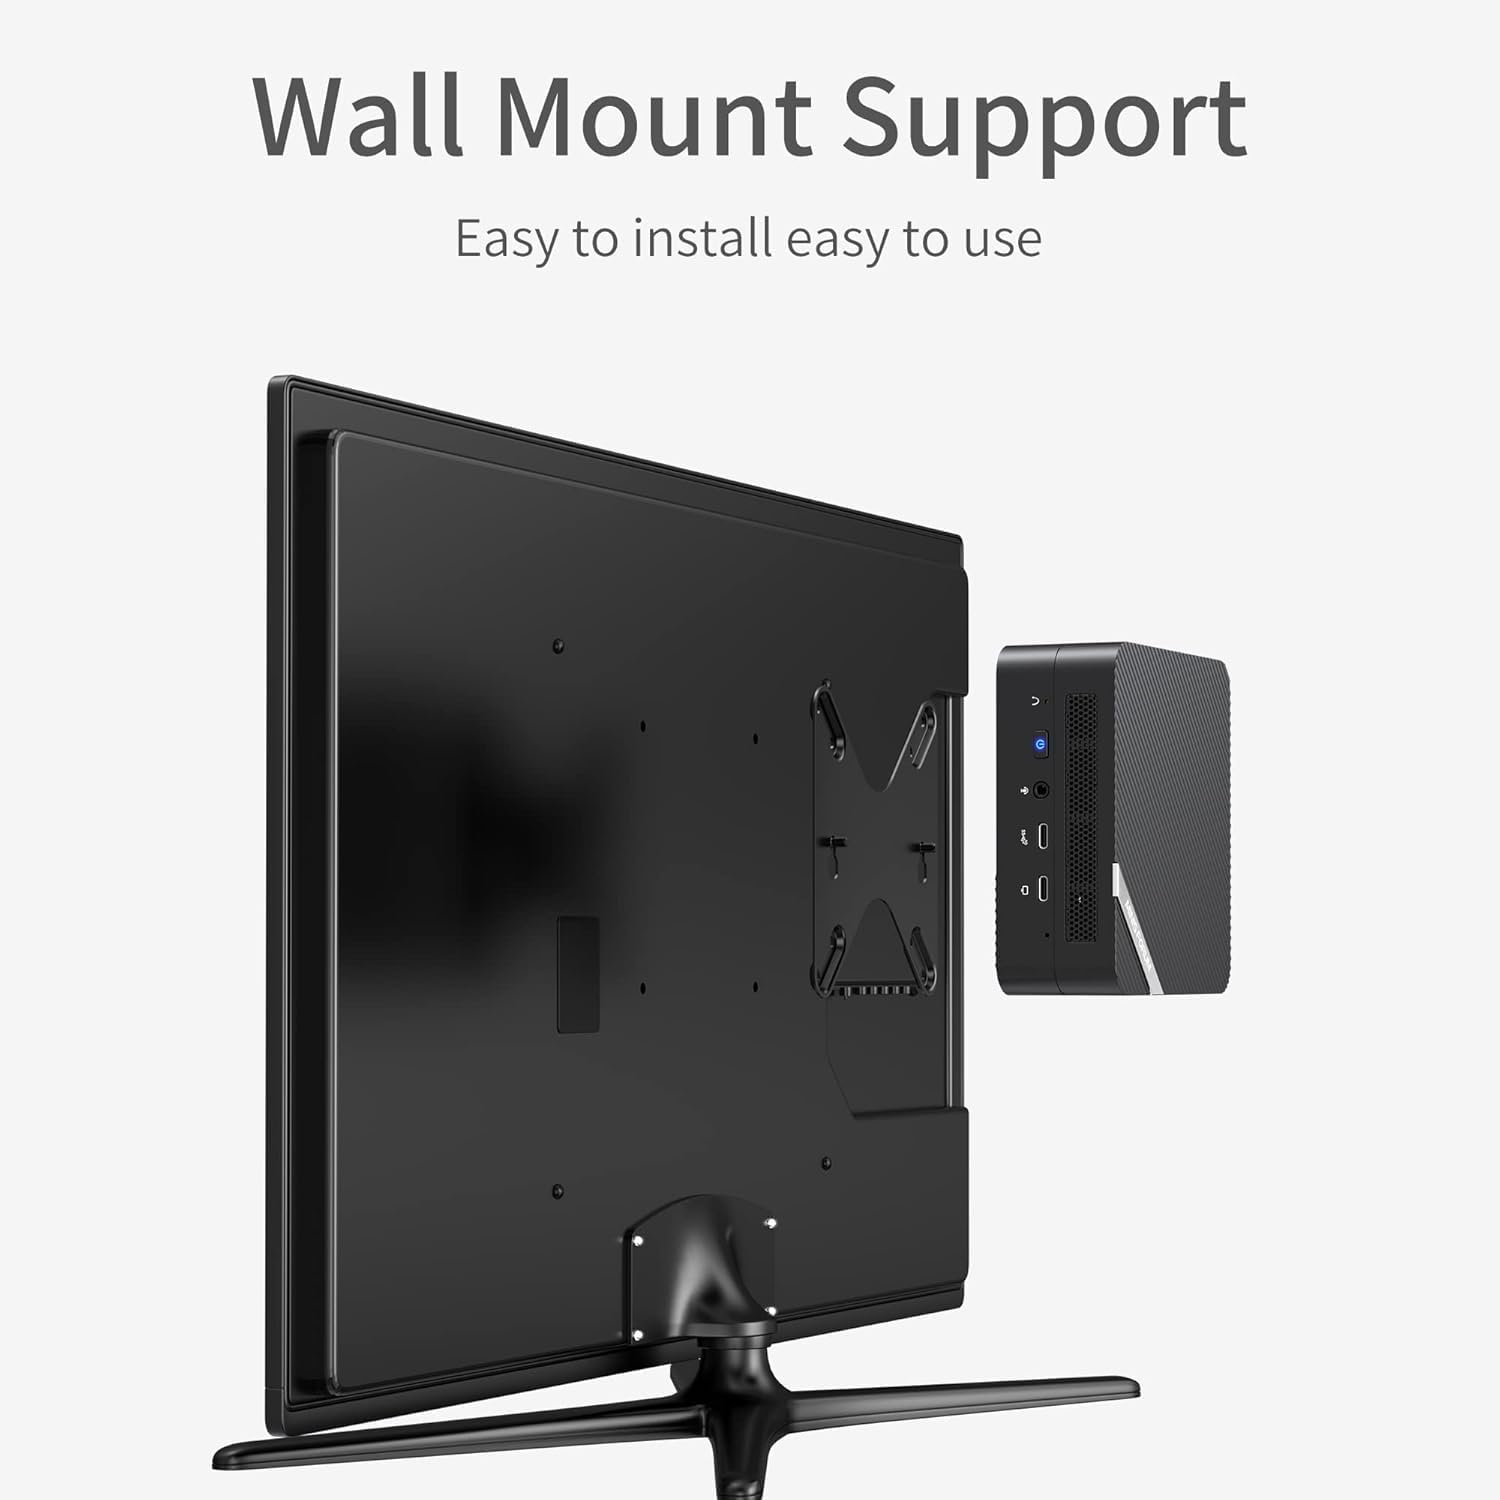
If you wish to mount your mini-PC to the back of a monitor or a wall, use the provided VESA mount. Attach the VESA bracket to the mini-PC, then secure it to the VESA mounting holes on your monitor or a compatible wall mount. Ensure the mount is securely fastened before placing the mini-PC.
4. Operating Instructions
4.1 Basic Operation
Once powered on, the mini-PC functions like a standard desktop computer. Navigate the operating system using your connected keyboard and mouse. Install applications as needed for your specific tasks.
4.2 Multi-Display Configuration

The UM560 supports up to four 4K displays. Connect your displays to the available HDMI and USB Type-C ports. The operating system should automatically detect the connected displays. You can configure display settings (e.g., extend, duplicate, resolution) through your operating system's display settings panel.
4.3 Storage Expansion
The mini-PC allows for storage expansion by adding a 2.5-inch SATA HDD or SSD. Refer to Figure 2 for the location of the SATA drive bay. This process typically involves opening the chassis, connecting the drive, and securing it. It is recommended to consult a professional if you are unfamiliar with hardware installation.
5. Maintenance
5.1 Cleaning
Regularly clean the exterior of the mini-PC with a soft, dry cloth. Use compressed air to clear dust from ventilation grilles to ensure proper airflow and prevent overheating. Do not use liquid cleaners directly on the device.
5.2 Software Updates
Keep your operating system and drivers updated to ensure optimal performance and security. Check for updates regularly through your OS settings or the MINISFORUM support website.
5.3 Hardware Upgrades
The RAM and storage (M.2 SSD and 2.5-inch SATA drive) can be upgraded. When performing hardware upgrades, ensure the device is powered off and unplugged. Handle components with care to avoid electrostatic discharge. Refer to Figure 2 for component locations. For detailed instructions, consult the manufacturer's support resources or a qualified technician.
6. Troubleshooting
This section addresses common issues you might encounter with your MINISFORUM UM560 Mini-PC.
6.1 No Power
- Ensure the power adapter is securely connected to both the mini-PC and a working power outlet.
- Verify the power outlet is functional by plugging in another device.
- Try a different power adapter if available and compatible.
6.2 No Display Output
- Check that the display cable (HDMI or USB-C) is securely connected to both the mini-PC and the monitor.
- Ensure the monitor is powered on and set to the correct input source.
- Test with a different display cable or monitor if possible.
- If using multiple displays, try connecting only one display to isolate the issue.
6.3 System Instability or Freezing
- Ensure the mini-PC has adequate ventilation and is not overheating.
- Update your operating system and device drivers.
- Run a memory diagnostic tool to check for RAM issues.
- Consider performing a system restore or reinstalling the operating system if software corruption is suspected.
6.4 Clear CMOS
If you encounter boot issues or incorrect BIOS settings, you can clear the CMOS. Locate the 'Clear CMOS' button (refer to Figure 3) and press it while the device is powered off and unplugged. This will reset the BIOS settings to their default values.
7. Specifications
| Feature | Specification |
|---|---|
| Brand | MINISFORUM |
| Product Type | Mini PC |
| Model Number | UM560 |
| CPU Model | AMD Ryzen 5 5625U |
| CPU Speed | Up to 4.3 GHz |
| CPU Cores/Threads | 6 Cores / 12 Threads |
| Cache Size | 16 MB |
| Graphics Coprocessor | AMD Radeon (Integrated) |
| RAM | 16 GB DDR4 (Expandable up to 64 GB) |
| Storage | 512 GB PCIe M.2 SSD (Expandable with 2.5-inch SATA HDD/SSD) |
| Operating System | OS (May vary, often pre-installed with Windows) |
| Video Output | 2x HDMI (4K@60Hz), 2x USB Type-C (4K@60Hz) |
| Ethernet | 1x RJ45 2.5 Gigabit Ethernet |
| USB Ports | 2x USB 2.0, 2x USB 3.2 (Gen2), 1x USB-C (Data), 1x USB-C (DisplayPort Alt Mode) |
| Wireless Connectivity | Bluetooth, Wi-Fi (details not specified, assumed standard) |
| Specific Uses | Business, video editing, photo editing, light gaming, multimedia, daily use, education |
8. Warranty and Support
8.1 Manufacturer Warranty
According to product information, there is No Warranty provided by the manufacturer for this product. Please refer to your retailer's return and warranty policies for any coverage.
8.2 Spare Parts Availability
Information regarding the availability of spare parts for the MINISFORUM UM560 is unavailable.
8.3 Technical Support
For technical assistance, driver downloads, or further inquiries, please visit the official MINISFORUM website or contact their customer support channels. Keep your product model number (UM560) and any purchase details ready when seeking support.