1. Introduction
This manual provides essential information for the proper setup, operation, and maintenance of your Eyoyo EM07C 7-Inch Mini HDMI Monitor. Please read this manual thoroughly before using the product to ensure optimal performance and safety.

Image 1.1: Eyoyo EM07C 7-Inch Mini HDMI Monitor with included remote control and stand.
2. Package Contents
Verify that all items listed below are included in your package. If any items are missing or damaged, please contact customer support.
- 1 x 7" Small Monitor
- 1 x Adjustable Stand & Stand-Sticker
- 1 x HDMI Cable
- 1 x BNC Cable
- 1 x AV Cable
- 1 x Remote Controller
- 1 x Power Adapter
- 1 x User Manual (this document)

Image 2.1: All items included in the Eyoyo EM07C monitor package.
3. Specifications
| Feature | Detail |
|---|---|
| Model Number | EM07C |
| Screen Size | 7 Inches |
| Resolution | 1024 x 600 Pixels (SVGA) |
| Aspect Ratio | 16:9 |
| Image Brightness | 400 Candela |
| Contrast Ratio | 500:1 |
| Viewing Angle | 160° |
| Input Interfaces | HDMI, VGA, BNC, USB, AV |
| Total USB Ports | 1 (USB 2.0 support) |
| Voltage | 12 Volts |
| Product Dimensions | 1.3 x 7.2 x 4.9 inches |
| Item Weight | 2 pounds |
| Manufacturer | Eyoyo |
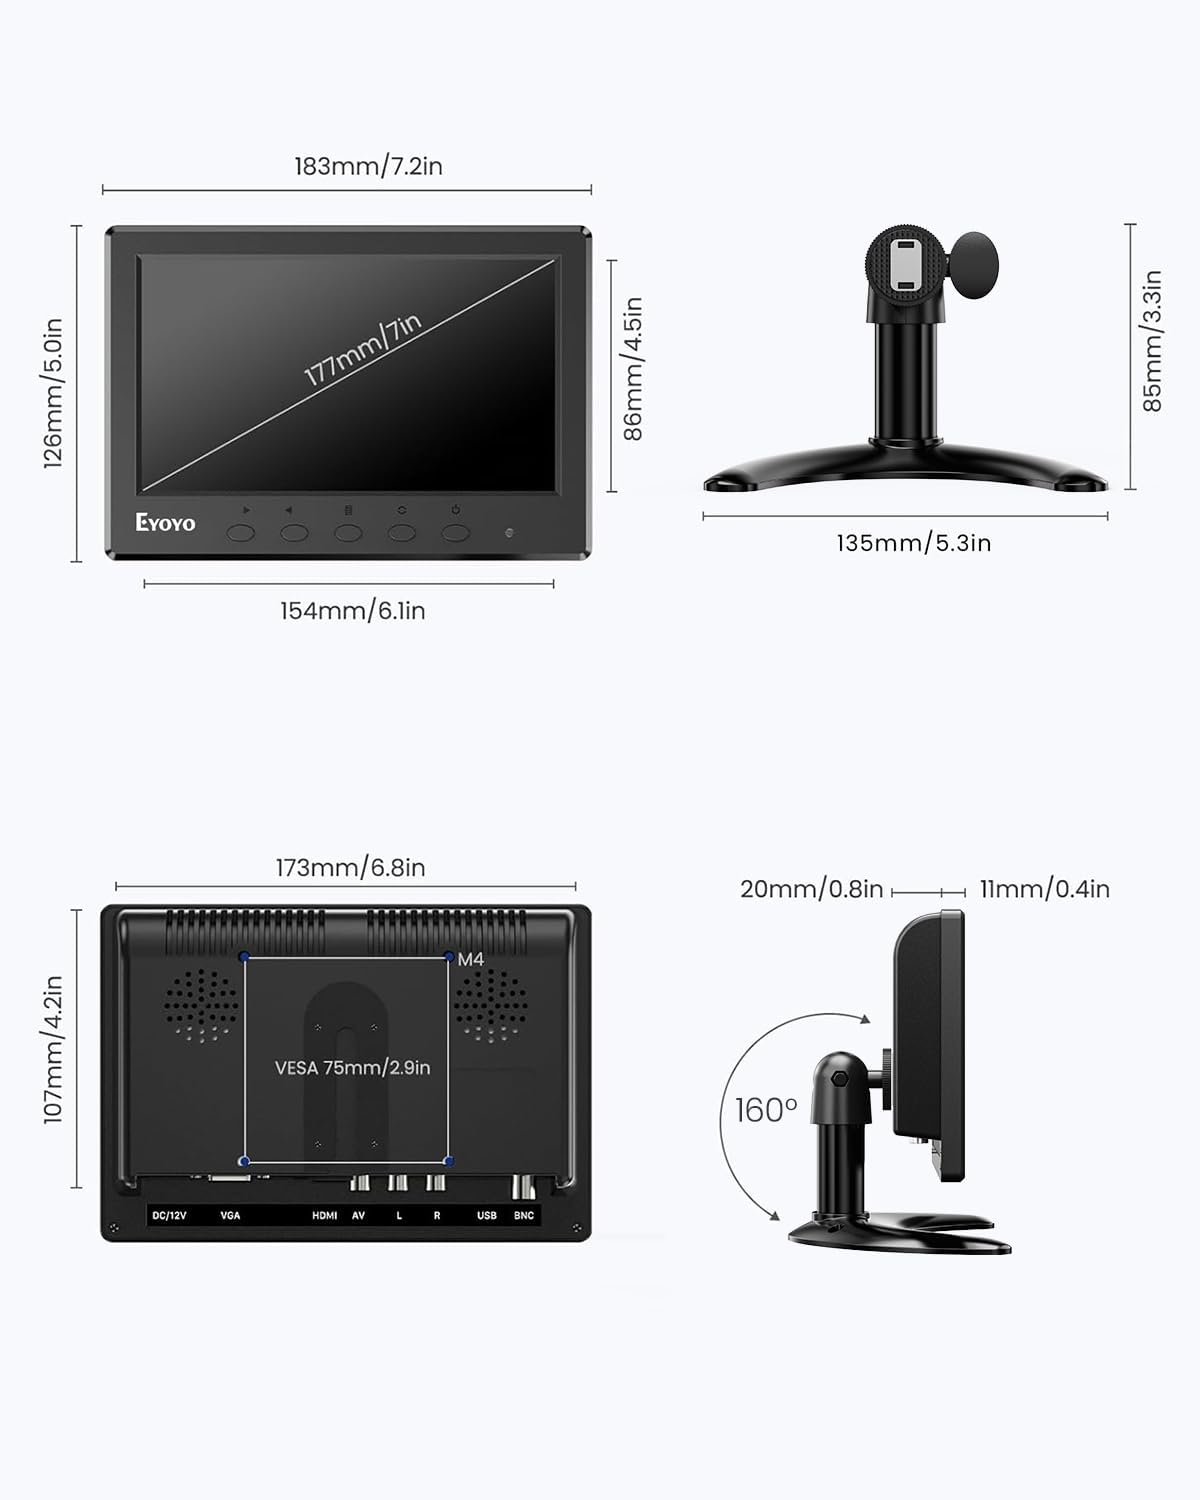
Image 3.1: Physical dimensions of the monitor and stand.
4. Setup
4.1 Assembling the Stand
The monitor can be used with the included desktop stand or mounted using a VESA 75mm mount (not included).
- Attach the adjustable stand to the monitor's rear mounting point.
- Secure the stand by tightening the screw.
- Adjust the viewing angle and height as desired.
- For added stability, apply the provided stand-sticker to the base of the stand.

Image 4.1: Visual guide for monitor stand installation.

Image 4.2: Two installation options: desktop stand and VESA wall mount.
4.2 Connecting to Devices
The monitor supports multiple input interfaces for broad compatibility.
- HDMI Input: Connect to PCs, laptops, Raspberry Pi, DVD players, game consoles (PS4, Xbox), and TV boxes using the provided HDMI cable.
- VGA Input: Connect to computers and laptops using the provided VGA cable.
- BNC Input: Primarily for analog CCTV security cameras using the provided BNC cable. Note: BNC can only connect analog cameras. TVI/CVI/AHD coaxial HD cameras require a converter adapter (not included).
- AV Input: Connect to DVD players, VCD players, and TV boxes using the provided AV cable.
- USB Input: Supports USB 2.0 for media playback from U Disks. Audio, video, visuals, and files must reside in an initial folder for recognition.
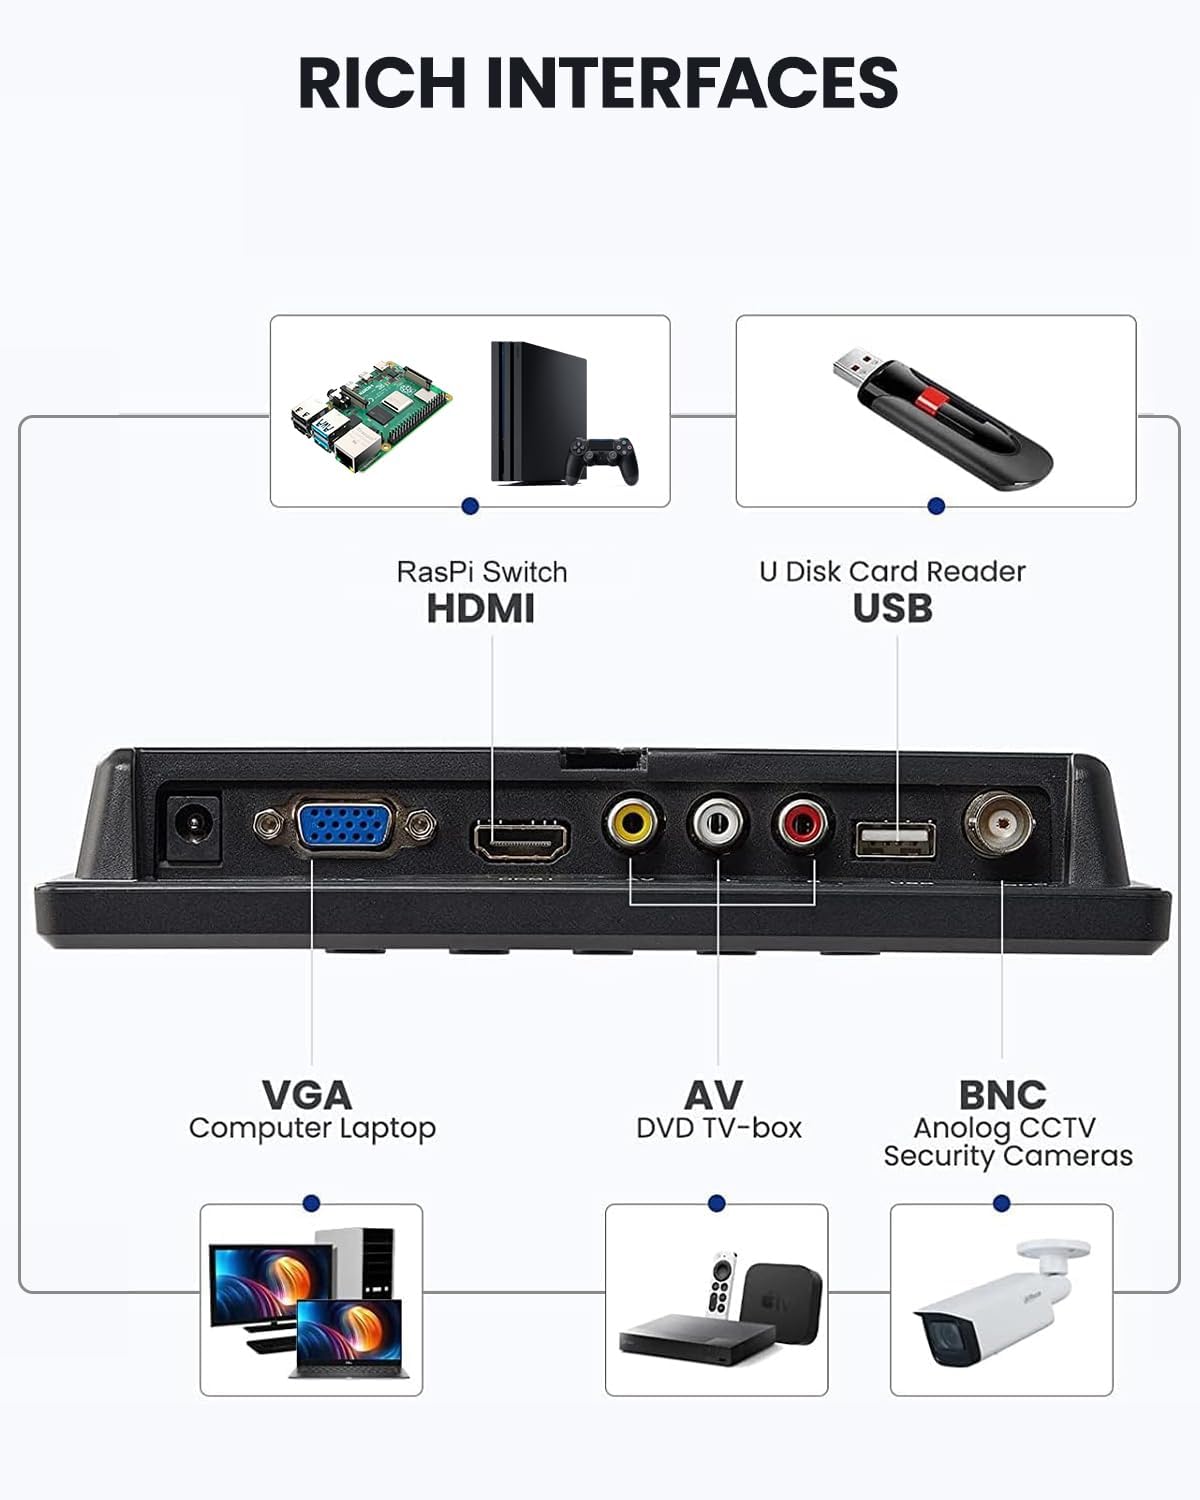
Image 4.3: Overview of the monitor's rich input interfaces.
Video 4.1: A demonstration of connecting the Eyoyo 7" Mini Security Camera Monitor to various devices and its features.

Image 4.4: BNC input compatibility details for analog CCTV.
5. Operating Instructions
5.1 Powering On/Off
Connect the power adapter to the DC 12V port on the monitor and plug it into a power outlet. Press the power button on the monitor or the remote control to turn the device on or off.
5.2 Input Source Selection
Use the "AV1/AV2" button on the monitor or the "SELECT" button on the remote control to cycle through available input sources (HDMI, VGA, BNC, AV, USB).
5.3 Menu Navigation and Settings
Access the On-Screen Display (OSD) menu by pressing the "MENU" button on the monitor or remote. Use the arrow buttons (or +/- buttons on the monitor) to navigate and "ENTER" to confirm selections.
- Picture Settings: Adjust brightness, contrast, color, sharpness, and tint.
- Sound Settings: Control volume and select sound modes. The monitor features dual built-in speakers.
- Display Options: Adjust aspect ratio (16:9, 4:3), enable image mirror/flip functions (vertical/horizontal inversion).
- Language: Select the desired menu language.

Image 5.1: Image Mirror Functionality for various applications.
Video 5.1: A demonstration of connecting the monitor to a computer via Type-C and VGA, and navigating the OSD menu.

Image 5.2: Key display features of the 7-inch IPS monitor.
6. Maintenance
- Cleaning: Use a soft, dry cloth to clean the monitor screen and casing. Avoid using liquid cleaners or aerosol sprays directly on the screen.
- Storage: Store the monitor in a cool, dry place away from direct sunlight and extreme temperatures.
- Handling: Handle the monitor with care to prevent damage to the screen or internal components.
7. Troubleshooting
- No Signal:
- Ensure the power adapter is securely connected and the monitor is powered on.
- Verify that the input cable (HDMI, VGA, BNC, AV) is correctly connected to both the monitor and the source device.
- Select the correct input source using the "AV1/AV2" or "SELECT" button.
- Check the resolution settings of your source device to ensure compatibility with the monitor (1024x600).
- No Sound:
- Check the volume settings on both the monitor and the source device.
- Ensure the audio cables (for AV input) are correctly connected.
- For USB media playback, ensure audio files are in a recognized format and located in the root directory or an initial folder.
- Image Distortion/Poor Quality:
- Adjust picture settings (brightness, contrast, color, sharpness) in the OSD menu.
- Ensure the cable connections are secure and not damaged.
- Try a different cable if available.
- Remote Control Not Working:
- Ensure batteries are correctly inserted and not depleted.
- Point the remote directly at the monitor's infrared receiver.
- Remove any obstructions between the remote and the monitor.
8. Warranty & Support
Eyoyo provides a 365-day warranty for this product. For technical assistance, troubleshooting, or warranty claims, please contact Eyoyo customer service.
Eyoyo Customer Service:
- Online support is available 7 days a week, 24 hours a day.
- Refer to the official Eyoyo website or your purchase platform for specific contact details.


Image 8.1: Eyoyo brand commitment to customer service and warranty.


