1. Introduction
This instruction manual provides essential information for the safe and efficient operation, installation, and maintenance of your PreAsion 3T/H 110V 0.75KW Sanitary Centrifugal Pump. Please read this manual thoroughly before using the product and retain it for future reference. This pump is designed for transferring non-viscous liquids in sanitary applications across various industries.
2. Safety Information
Adherence to the following safety guidelines is crucial for preventing injury and damage to the equipment.
- Electrical Safety: Ensure the pump is connected to a grounded 110V power supply. Do not operate with damaged cords or plugs. Disconnect power before any maintenance or inspection.
- Liquid Compatibility: This pump is designed for non-viscous liquids such as water, juices, lotions, and certain chemicals. It is not suitable for highly viscous substances like honey, syrup, yogurt, or tomato sauce.
- Explosion Risk: If this centrifugal pump is used to transport liquids containing alcohol, there is a risk of explosion. Exercise extreme caution and ensure proper ventilation.
- Dry Running: Do not idle the pump (run dry) as this can cause severe damage to the motor and internal components. Always ensure the pump is primed with liquid before operation.
- Temperature Limits: The maximum liquid temperature for safe operation is 100 ℃ (212 ℉).
- Installation: Ensure the pump is installed on a stable, level surface. All connections must be secure to prevent leaks.
- Maintenance: Only qualified personnel should perform maintenance. Use appropriate personal protective equipment (PPE).
3. Product Overview and Components
The PreAsion Sanitary Centrifugal Pump is a single-suction, single-stage pump constructed from 304 stainless steel, designed for hygienic liquid transfer.
3.1 Key Features
- Versatile Application: Suitable for food, beverage, dairy, cosmetics, pharmaceuticals, and fine chemicals.
- Hygienic Design: Mirror-polished, dead-angle-free interior prevents liquid residue.
- Easy to Clean: Detachable pump head allows for quick disassembly and thorough cleaning.
- Durable Construction: Made with 304 stainless steel for corrosion resistance and longevity.
- High Security: Open-type shaft sealing allows immediate identification of any leakage, isolating the motor from liquid exposure.
- Quality Materials: Stainless steel motor cover for protection against rust and splashes; high-quality stainless steel rotor for safety and long service life.
3.2 Component Identification


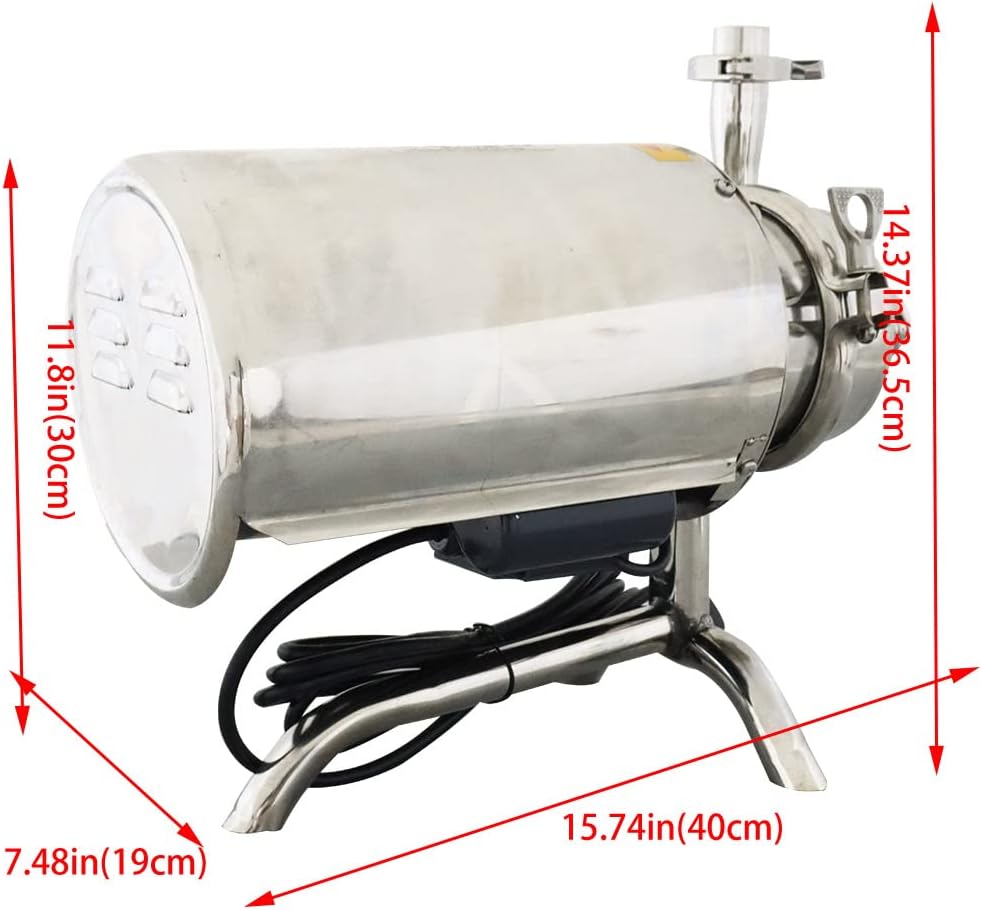
4. Specifications
| Parameter | Value |
|---|---|
| Brand | PreAsion |
| Model Number | 0724417595095 |
| Voltage | 110 V |
| Power | 0.75 KW (750 watts) |
| Maximum Liquid Temperature | 100 ℃ (212 ℉) |
| Flow Rate | 3 T/h (3 Cubic Meters Per Hour) |
| Lift (Head of Delivery) | 18 m (59 ft) |
| Material | 304 Stainless Steel |
| Inlet Diameter | φ1.5 inch (φ38 mm) |
| Outlet Diameter | φ1.26 inch (φ32 mm) |
| Operating Current | 3.9 Amp (Peak starting current: ~28 Amp) |
| Item Weight | 43.3 pounds |
| Package Dimensions | 20 x 18 x 12.2 inches |

5. Setup and Installation
Proper setup is crucial for optimal performance and safety.
- Unpacking: Carefully remove the pump from its packaging. Inspect for any signs of damage during transit.
- Placement: Position the pump on a stable, level, and dry surface. Ensure adequate space for ventilation and access for maintenance.
- Piping Connections:
- Connect the inlet pipe to the φ1.5 inch (φ38 mm) inlet port.
- Connect the outlet pipe to the φ1.26 inch (φ32 mm) outlet port.
- Ensure all connections are secure and leak-free, utilizing the clamp connection system as shown in Figure 5.
- Avoid putting strain on the pump connections from heavy or unsupported piping.
- Liquid Source Connection: The pump is designed for efficient transfer when the liquid source is positioned at or above the pump's inlet level (bottom or side connection). Avoid configurations where the pump needs to lift liquid from a significantly lower level (top connection), as this can affect priming and efficiency.

- Electrical Connection: Connect the pump to a standard 110V AC grounded outlet. Ensure the circuit can handle the operating current of 3.9 Amp and the peak starting current of approximately 28 Amp.
6. Operation
Follow these steps for safe and effective operation.
- Priming the Pump: Before starting, ensure the pump casing and suction line are completely filled with the liquid to be transferred. This is critical to prevent dry running.
- Starting the Pump: Once primed and all connections are secure, switch on the power supply. The pump should start immediately.
- Monitoring: Observe the pump during operation for any unusual noises, vibrations, or leaks. Ensure the liquid is flowing smoothly.
- Stopping the Pump: To stop the pump, switch off the power supply.
- Post-Operation: If the pump will not be used for an extended period, or if transferring different liquids, it is recommended to flush the pump with clean water.
7. Maintenance
Regular maintenance ensures the longevity and hygienic performance of your pump.
- Cleaning: Due to its detachable pump head, the pump can be easily disassembled for thorough cleaning. After each use, especially with food-grade liquids, disassemble and clean all liquid-contacting parts with appropriate cleaning agents and rinse thoroughly.
- Inspection: Regularly inspect the shaft seal for any signs of leakage. The open-type structure allows for immediate identification of minor leaks. Check all connections for tightness.
- Bearings: The high-quality bearings are designed for long life. However, listen for any unusual noises that might indicate bearing wear.
- Storage: When not in use, store the pump in a clean, dry environment.
8. Troubleshooting
This section addresses common issues you might encounter.
| Problem | Possible Cause | Solution |
|---|---|---|
| Pump does not start or trips breaker |
|
|
| Reduced flow or no flow |
|
|
| Excessive noise or vibration |
|
|
| Liquid leakage |
|
|
9. Warranty and Support
For warranty information and technical support, please refer to the documentation provided at the time of purchase or contact PreAsion customer service. Keep your purchase receipt and model number (0724417595095) readily available when seeking support.
Manufacturer: PreAsion