
CREWORKS WSM-N030-CA-1
CREWORKS Electric Wire Stripper User Manual
Model: WSM-N030-CA-1
1. Important Safety Instructions
Read and understand all safety warnings and instructions before operating this electric wire stripper. Failure to follow the warnings and instructions may result in electric shock, fire, and/or serious injury.
- Personal Safety: Always wear appropriate personal protective equipment, including safety glasses and work gloves, when operating the machine. Keep hands and fingers clear of moving parts, especially the stripping blades and feed channels.
- Work Area Safety: Ensure the work area is clean, well-lit, and free from clutter. Do not operate the machine in damp or wet conditions. Keep children and bystanders away.
- Electrical Safety: Ensure the power supply matches the machine's requirements. Do not operate with damaged cords or plugs. Disconnect power before making adjustments or performing maintenance.
- Machine Operation: Use the correct feed channel for the wire size. Do not force wires into channels. Utilize the emergency stop button in case of malfunction or danger.

Figure 1: CREWORKS Electric Wire Stripper with included gloves and user manual. Always wear protective gloves during operation.
2. Product Overview
The CREWORKS Electric Wire Stripper is designed for efficient removal of insulation from various copper wires. It features multiple feed channels and an adjustable blade system to accommodate different wire sizes.
Key Features:
- Automatic Stripping: Processes wires at speeds up to 30 m/min (98 ft./min) with a quiet 25 dB operation.
- Wide Application: Five distinct feed channels accommodate copper wires from 1.5 mm to 30 mm (0.06-1.2 inches).
- Durable Construction: Reinforced aluminum alloy frame and alloy steel blades ensure longevity and consistent performance.
- Efficient Motor: Powered by an 180W motor for reliable stripping.
- Cooling System: Integrated cooling fan prevents overheating during extended use.

Figure 2: Overview highlighting the CREWORKS Automatic Wire Stripper's key specifications: 1.5-30 mm cable compatibility, 30 m/min stripping speed, and 180W rated power.

Figure 3: The electric wire stripper in operation, demonstrating its capability to process various cables and wires.
3. Setup
Before operating the wire stripper, ensure it is properly set up in a safe and stable environment.
- Unpacking: Carefully remove the wire stripper and all accessories from its packaging. Inspect for any shipping damage.
- Placement: Place the machine on a sturdy, level, and non-slip surface. The machine can be anchored down for enhanced stability during operation.
- Power Connection: Connect the power cord to a suitable electrical outlet. Ensure the voltage matches the machine's requirements (AC power source).
- Initial Inspection: Verify that all components are securely fastened and that the blades are free from obstructions.

Figure 4: The compact dimensions of the wire stripper (22 cm width, 17 cm depth, 27 cm height) allow for placement in various workshop settings.
4. Operation
Follow these steps for safe and effective wire stripping:
- Adjust Blade Height: Rotate the adjustment knobs located on top of the machine to set the blade height. The goal is to cut through the insulation without damaging the inner copper wire. Test with a scrap piece of wire first.
- Select Feed Channel: Identify the appropriate feed channel for your wire's diameter. The machine features five distinct channels for various sizes, including flat wires.
- Power On: Press the green 'ON' button to start the machine. The red 'OFF' button serves as an emergency stop.
- Feed Wire: Carefully feed the insulated wire into the selected channel. The machine will automatically pull the wire through and strip the insulation.
- Collect Stripped Wire: Collect the stripped insulation and copper wire from the rear outlet.

Figure 5: Visual guide to the operation process: 1. Adjust blades, 2. Turn on power, 3. Feed wire, 4. Collect stripped wire.
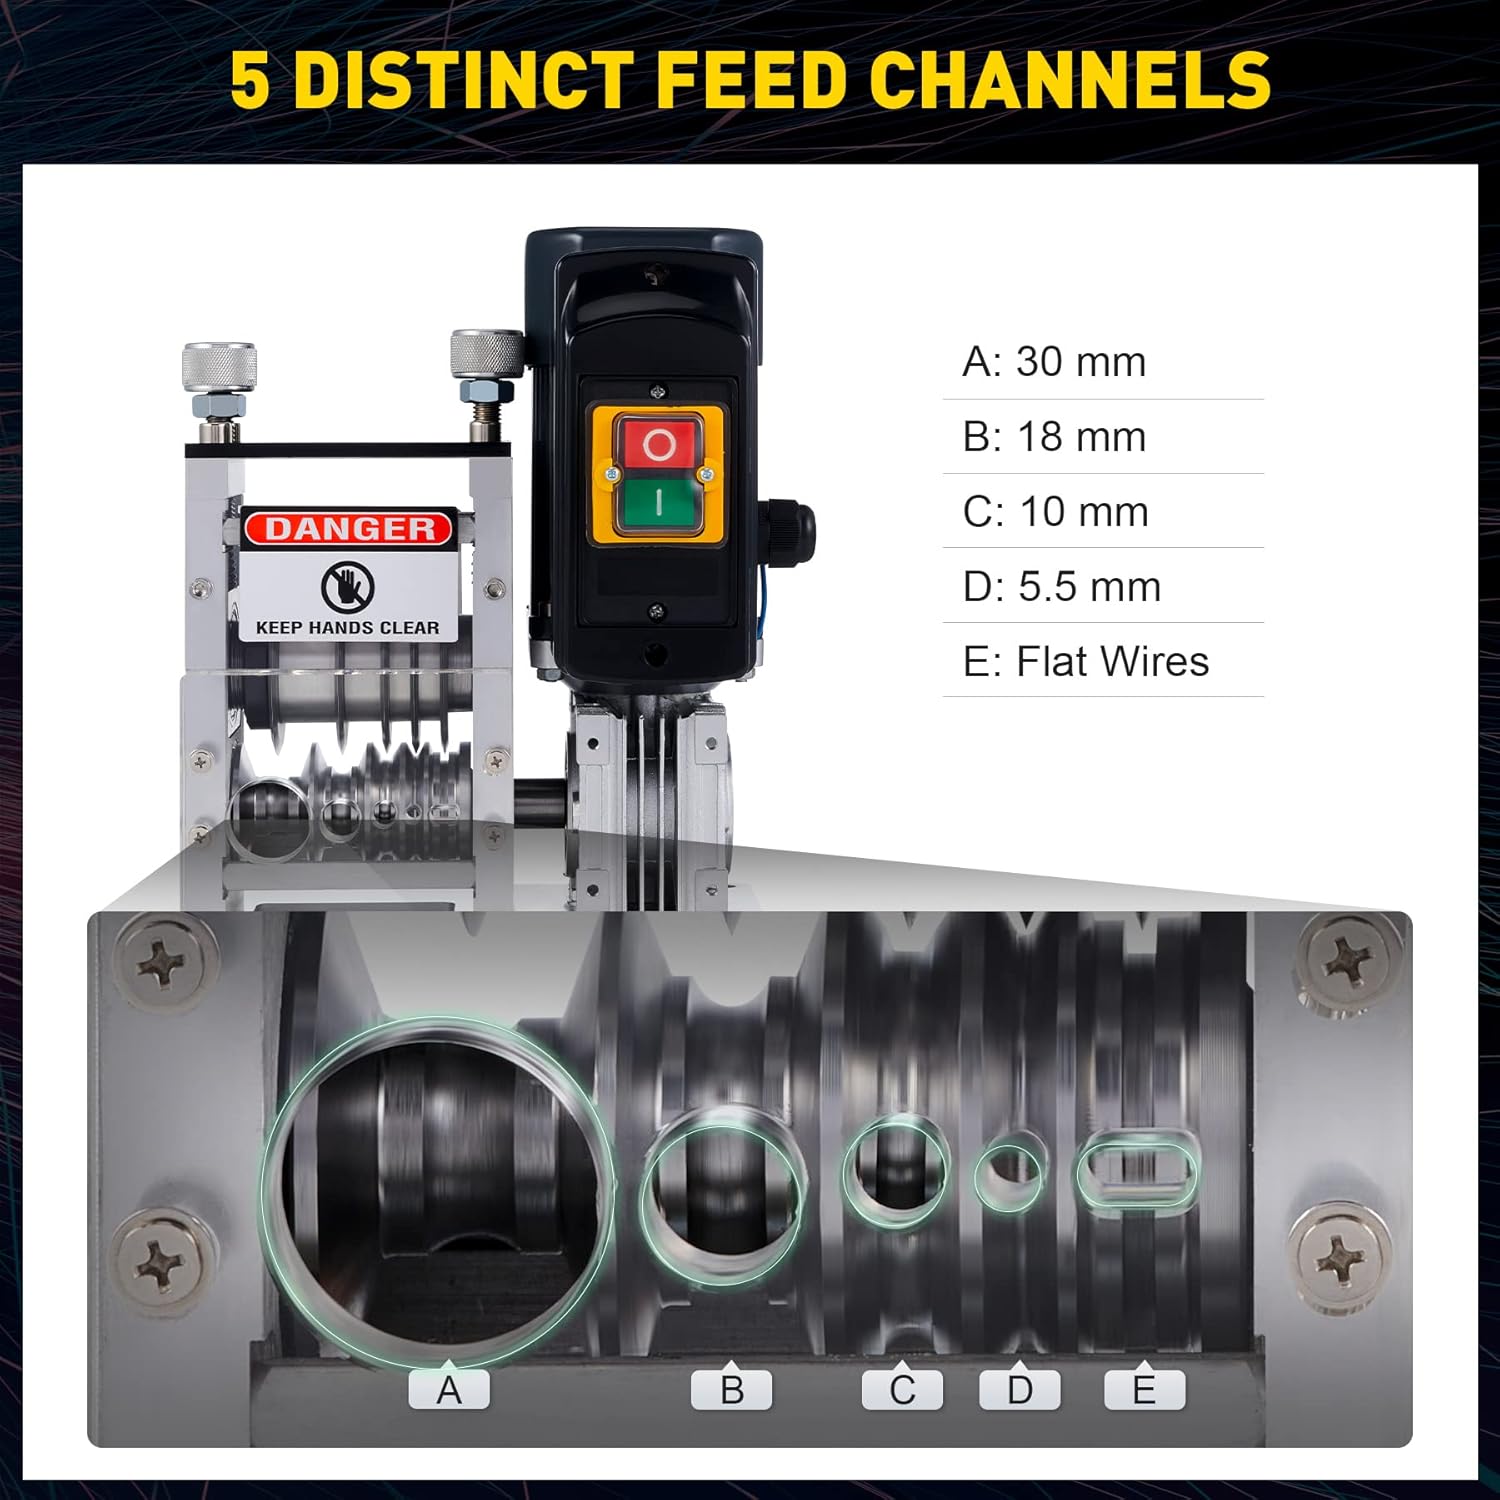
Figure 6: The five distinct feed channels (A: 30 mm, B: 18 mm, C: 10 mm, D: 5.5 mm, E: Flat Wires) for various cable sizes.

Figure 7: Detail of the adjustment knob for precise blade height setting.

Figure 8: Close-up view of the multiple wire feed channels.

Figure 9: Detail of the power switch with 'ON' (green) and 'OFF' (red) buttons.
5. Maintenance
Regular maintenance ensures the longevity and optimal performance of your wire stripper.
- Cleaning: After each use, disconnect the power and clean any accumulated insulation debris from the blades and feed channels using a brush or compressed air.
- Blade Inspection: Periodically inspect the alloy steel blades for wear or damage. Sharp blades are crucial for effective stripping. Replace blades if they become dull or chipped.
- Cooling Fan: Ensure the cooling fan vents are clear of dust and debris to maintain proper airflow and prevent motor overheating.
- Lubrication: Apply a small amount of machine oil to moving parts as needed to ensure smooth operation.
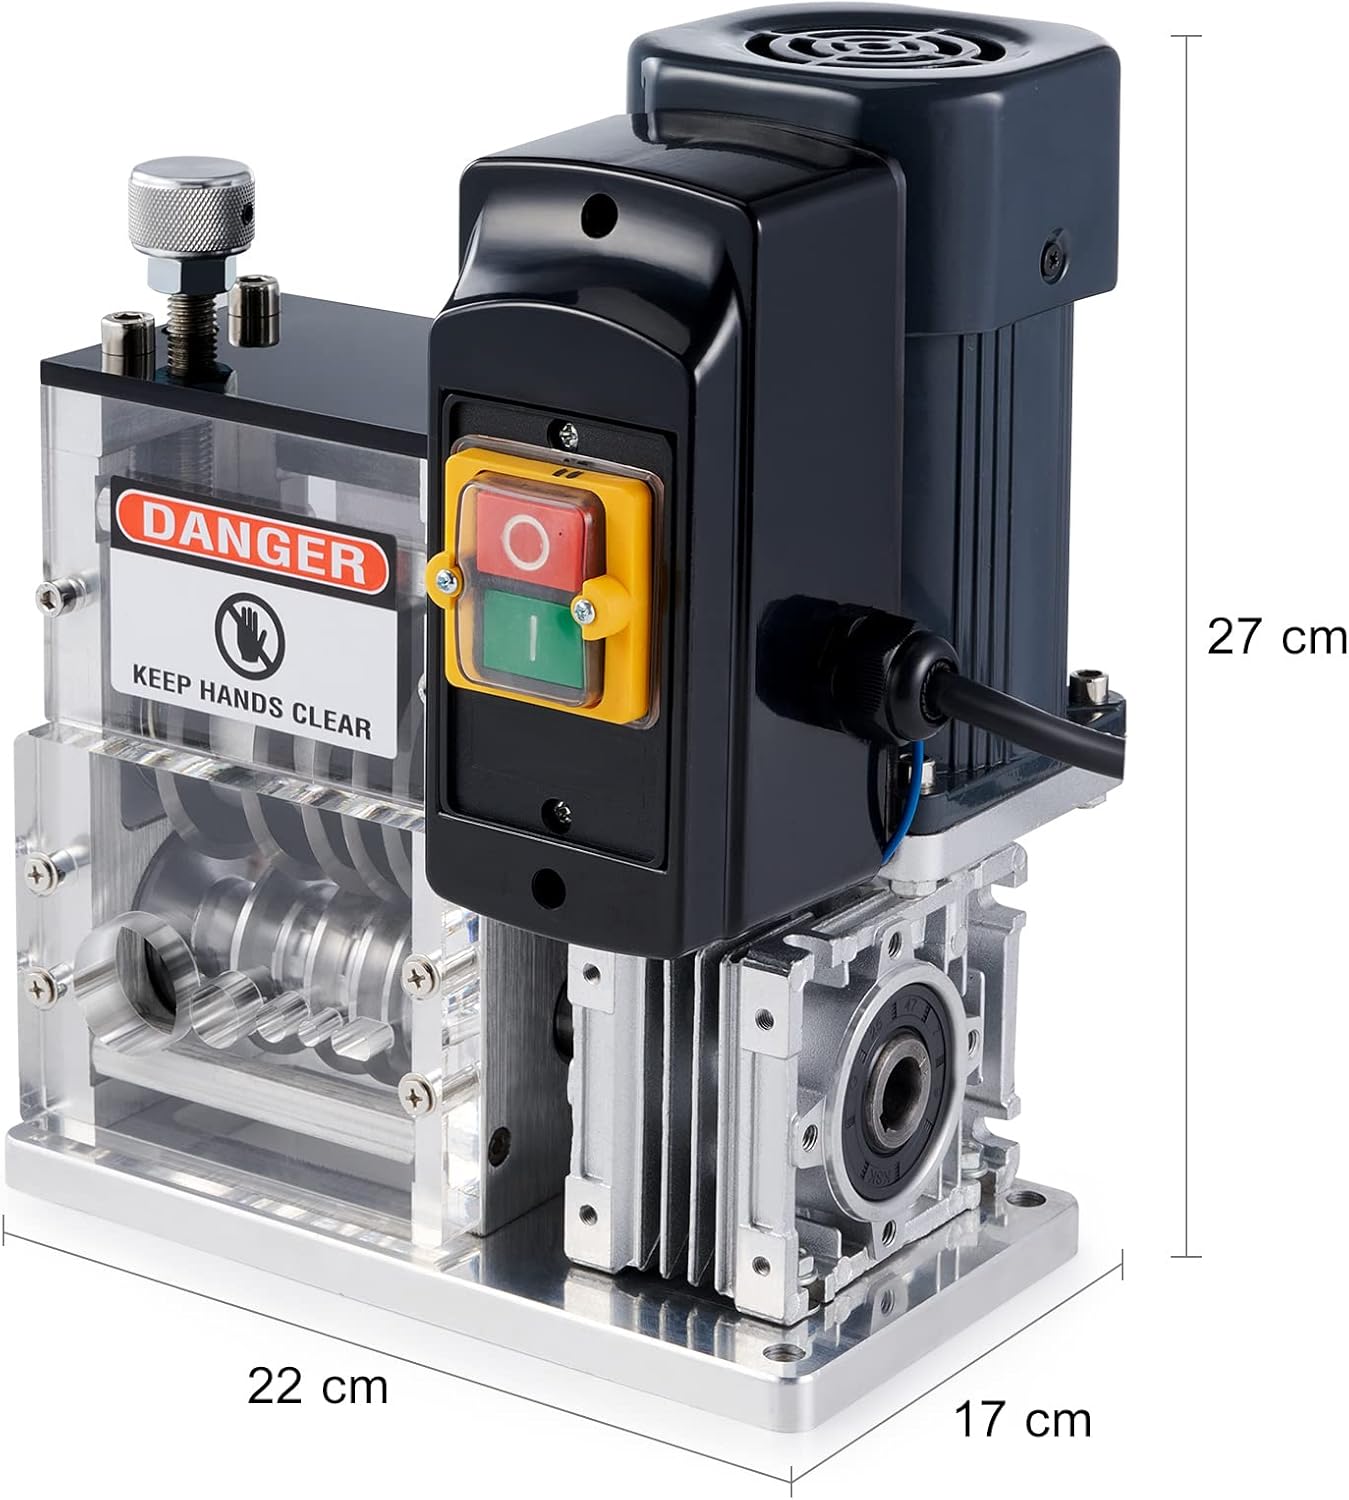
Figure 10: The powerful cooling fan, essential for dissipating heat and maintaining machine performance.
6. Troubleshooting
If you encounter issues with your wire stripper, refer to the following common problems and solutions:
| Problem | Possible Cause | Solution |
|---|---|---|
| Machine does not turn on. | No power supply; power cord damaged; emergency stop engaged. | Check power connection; inspect power cord; ensure emergency stop is disengaged. |
| Wire is not stripping properly or blades are not cutting insulation. | Incorrect blade height adjustment; dull or damaged blades; wrong feed channel selected; wire too small/large for machine. | Adjust blade height (refer to Section 4); inspect and replace blades if necessary; ensure correct feed channel is used; verify wire diameter is within 1.5-30 mm range. |
| Machine jams or wire gets stuck. | Wire fed incorrectly; excessive force applied; debris in channels. | Turn off machine immediately; remove jammed wire carefully; clean feed channels. |
| Motor overheats. | Blocked cooling fan vents; continuous heavy use. | Clean cooling fan vents; allow machine to cool down during prolonged operation. |
7. Specifications
| Feature | Detail |
|---|---|
| Model Number | WSM-N030-CA-1 |
| Wire Stripping Range | 1.5 - 30 mm (0.06 - 1.2 inches) |
| Feed Channels | 5 (including flat wire channel) |
| Stripping Speed | Up to 30 m/min (98 ft./min) |
| Motor Power | 180W |
| Noise Level | 25 dB |
| Material | Alloy Steel, Aluminum, Plastic |
| Item Weight | 10.8 kg (23.8 lbs) |
| Parcel Dimensions | 34.3 x 31 x 26.4 cm (13.5 x 12.2 x 10.4 inches) |
| Power Source | AC |
| Included Components | Wire Stripper Machine, A Pair of Gloves |

Figure 11: The 180W high-speed motor, providing power for efficient cable stripping.

Figure 12: Examples of various insulated wires that can be processed by the machine.
8. Warranty and Support
This CREWORKS Electric Wire Stripper (Model WSM-N030-CA-1) comes with a 1-year warranty from the date of purchase.
For technical support, warranty claims, or any questions regarding the operation or maintenance of your product, please contact CREWORKS customer service. Refer to the contact information provided with your purchase documentation or visit the official CREWORKS website.
Manufacturer: CREWORKS
Place of Business: Memphis, Tennessee 38118, US
Related documentsWSM-N030-CA-1

Ask a question about this manual
Ask about setup, troubleshooting, compatibility, parts, safety, or missing instructions. Manuals+ will review the question and use this page’s manual context to help answer it.