
1. Introduction
This manual provides detailed instructions for the safe and effective use of your Creliver EMS Foot Massager and TENS Unit. This device is designed to provide electrical muscle stimulation (EMS) and Transcutaneous Electrical Nerve Stimulation (TENS) to help improve foot blood circulation, relieve muscle soreness, and reduce pain in the feet and other body parts.
Please read this manual thoroughly before first use and keep it for future reference.
2. Important Safety Information and Warnings
Failure to follow these safety instructions may result in injury or damage to the device.
- Do not use if you have a cardiac pacemaker or other implanted metal and electronic device.
- Do not use if you are being treated for, or suspect you have, a Deep Vein Thrombosis (DVT).
- Do not use if you are pregnant.
- Consult your physician before use if you have any pre-existing medical conditions.
- Keep out of reach of children.
- This product is not water resistant. Avoid contact with water.
3. Package Contents
Verify that all items are present in the package:
- 1 x Creliver Foot Stimulator Unit
- 1 x Remote Control (AAA batteries not included)
- 1 x Power Adapter
- 4 x TENS Unit Electrode Pads
- 1 x DC Outlet Cable
- 2 x Electrode Cables
- 1 x User Manual
4. Product Overview
The Creliver EMS Foot Massager and TENS Unit is a dual-system device designed for both foot and body stimulation. It features a central display, foot pads with integrated red light therapy, and ports for connecting external electrode pads.

Image: Creliver EMS Foot Massager and TENS Unit with remote, electrode pads, and cables.
Key Components:
- Main Unit: Central control panel with display, foot pads, and connection ports.
- Foot Pads: Textured surfaces for direct foot contact, often with red light therapy elements.
- Electrode Ports: For connecting TENS unit pads for body application.
- Remote Control: Allows convenient adjustment of settings.
- TENS Unit Pads: Adhesive pads for targeted body stimulation.
5. Setup
- Power Connection: Connect the power adapter to the DC outlet on the main unit and plug it into a wall socket.
- Remote Control Batteries: Insert 2 AAA batteries (not included) into the remote control.
- Optional: Connect Electrode Pads: If using the body stimulation feature, connect the electrode cables to the ports on the main unit and attach the TENS pads to the desired body areas. Ensure skin is clean and dry for optimal adhesion.
6. Operating Instructions
6.1 Powering On/Off
The device can be powered on or off using either the main unit's power button or the remote control.
- To Power On: Press the "ON/OFF" button on the main unit or the remote control. The display will illuminate.
- To Power Off: Press the "ON/OFF" button again.
6.2 Using the Foot System
For foot stimulation, place both bare feet on the designated foot pads on the main unit. Ensure full contact with the pads for effective stimulation.
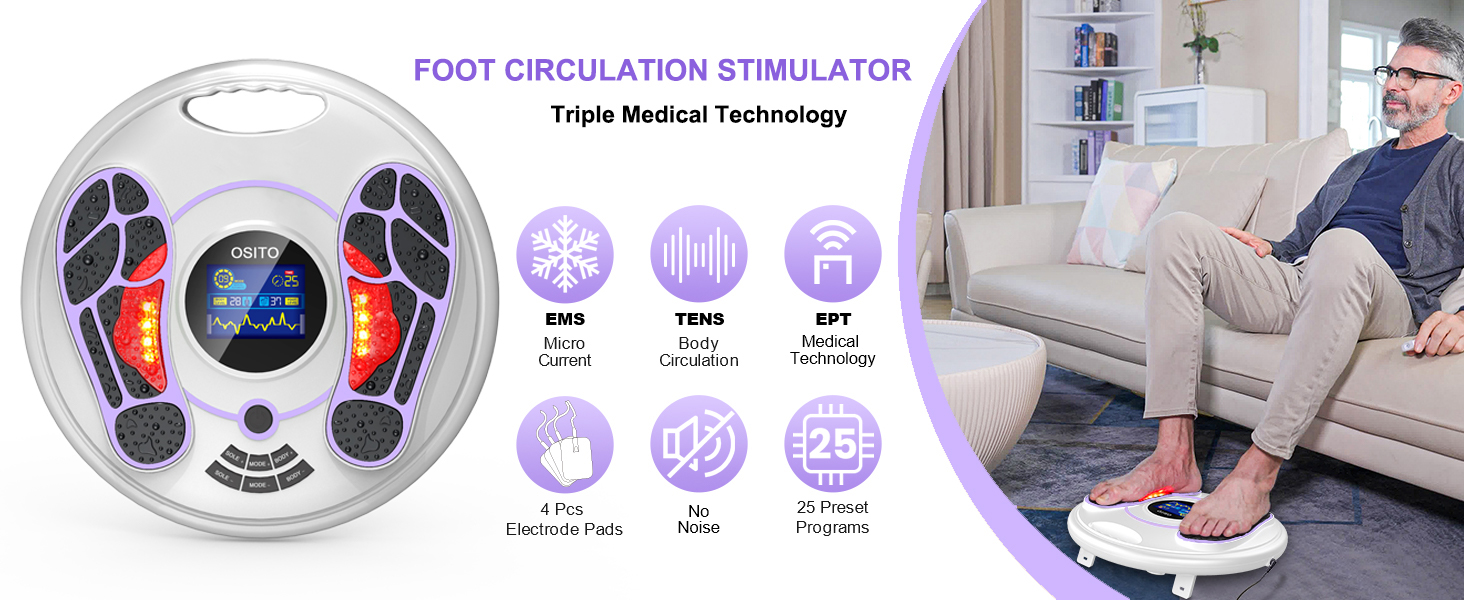
Image: A person's feet placed on the Creliver EMS Foot Massager pads, showing the device in use and thermal images indicating improved circulation.
The device will begin stimulating the muscles in your feet. You can adjust the mode and intensity as described in section 6.4.
6.3 Using the Body System (TENS Pads)
For body stimulation, attach the electrode pads to the desired areas of your body. Ensure the pads are securely adhered to clean, dry skin. Connect the electrode cables from the pads to the main unit.

Image: A woman demonstrating the use of TENS unit pads on her arm and leg, connected to the main unit.
The device will deliver electrical impulses through the pads to the targeted body areas. Adjust the mode and intensity using the controls.
6.4 Adjusting Modes and Intensity
The Creliver EMS Foot Massager offers 25 different massage modes and 99 intensity levels for a customizable experience. You can adjust these settings using the buttons on the main unit or the remote control.
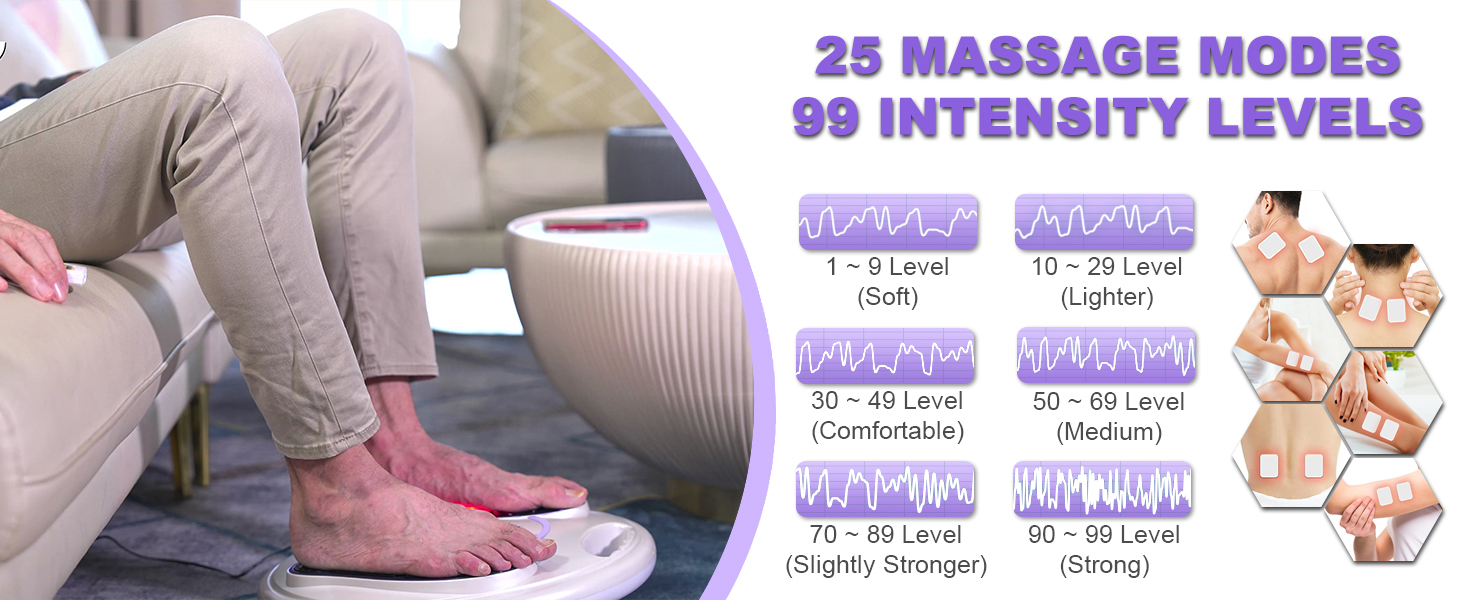
Image: Visual representation of the 25 massage modes and 99 intensity levels available on the device, with examples of application areas.
- Mode Selection: Press the "MODE" button (Foot Mode or Body Mode) to cycle through the available 25 modes. The current mode number will be displayed on the screen.
- Intensity Adjustment: Use the "+" and "-" buttons for Foot Level or Body Level to increase or decrease the intensity. Start with a low intensity and gradually increase it until you feel a comfortable, tingling sensation.
- Timer: The device typically has a preset timer. Refer to the display for the remaining time.
7. Maintenance
- Cleaning: Wipe the main unit and foot pads with a soft, damp cloth. Do not use abrasive cleaners or immerse the device in water.
- Electrode Pads: Replace electrode pads when they lose their adhesiveness. Store them on their protective film when not in use.
- Storage: Store the device in a cool, dry place away from direct sunlight and extreme temperatures.
8. Troubleshooting
| Problem | Possible Cause | Solution |
|---|---|---|
| Device does not power on. | No power, loose connection, dead remote batteries. | Check power adapter connection. Ensure wall outlet is functional. Replace remote control batteries. |
| No sensation during use. | Poor contact with foot pads/electrode pads, intensity too low, device not active. | Ensure feet are fully on pads or electrode pads are firmly attached. Increase intensity gradually. Confirm device is powered on and a mode is selected. |
| Sensation is uncomfortable or too strong. | Intensity too high. | Decrease intensity using the "-" button. |
9. Specifications
- Model Number: 676327817654
- Product Dimensions: 14.37 x 14.37 x 9.84 inches
- Item Weight: 5.2 Pounds
- Power Source: Corded Electric
- Special Features: Heat, Rechargeable (for remote control), Speed Control
- Target Use Body Part: Feet, Body
- Product Benefits: Relaxation, Pain Relief
- Water Resistance Level: Not Water Resistant
- Material Type: Metal
10. Warranty and Support
For warranty information or technical support, please refer to the contact details provided on the product packaging or visit the official Creliver website. Keep your purchase receipt as proof of purchase.