1. Introduction
Thank you for choosing the Atletica R7-Cage Power Rack. This comprehensive fitness station is designed to provide a versatile and effective strength training experience in your home gym. It features a robust construction and integrates multiple training options, including a lat pull-down, rowing station, multi-grip pull-up bar, dip station, spotter arms, J-hooks, and a landmine attachment. This manual provides essential information for safe assembly, operation, and maintenance of your R7-Cage Power Rack.
2. Safety Information
WARNING: Failure to follow these safety instructions may result in serious injury or death.
- Read all instructions in this manual before assembling or using the equipment. Keep this manual for future reference.
- Consult a physician before starting any exercise program.
- Ensure all bolts, nuts, and connections are securely tightened before each use. Regularly inspect the equipment for wear and tear. Replace worn parts immediately.
- Do not exceed the maximum weight capacity of the rack or its attachments.
- Always use spotter arms when performing heavy lifts, especially squats and bench presses, without a spotter.
- Keep children and pets away from the equipment during use.
- Use the equipment on a level, stable surface. Place a protective mat underneath to prevent floor damage and enhance stability.
- Wear appropriate athletic footwear and clothing during exercise.
- Stop exercising immediately if you feel pain, dizziness, or shortness of breath.
3. Package Contents
The Atletica R7-Cage Power Rack (200cm height) includes the following main components:
- Power Rack Frame (Uprights, Crossmembers, Base)
- Lat Pull-Down Station with integrated Rowing Station
- Multi-Grip Pull-Up Bar
- Dip Station Attachment
- Spotter Arms (Pair)
- J-Hooks (4 pieces)
- Landmine Attachment
- Long Lat Pull-Down Handle
- Short Rowing Handle
- Adapters for 30mm and 50mm weight plates (for weight sled)
- Assembly Hardware (bolts, washers, nuts, tools)
4. Setup and Assembly
Assembly requires at least two people. Ensure you have sufficient space and all parts are present before beginning. Refer to the included assembly diagram for detailed steps.
- Unpack and Identify Parts: Lay out all components and hardware. Compare with the parts list in your separate assembly diagram to ensure everything is accounted for.
- Assemble the Base Frame: Connect the base crossmembers to the uprights. Ensure all bolts are finger-tightened initially.
- Install Uprights: Attach the vertical uprights to the base frame. The R7-Cage is available in 200cm and 220cm heights; this model is the 200cm version, suitable for lower ceilings.
- Attach Top Crossmembers and Pull-Up Bar: Secure the top crossmembers and the multi-grip pull-up bar to the uprights.
- Assemble Lat Pull-Down/Rowing Station: Follow the specific instructions for attaching the cable system, pulleys, and weight sled mechanism. Ensure cables run smoothly through all pulleys.
- Install Attachments: Secure the J-hooks, spotter arms, dip station, and landmine attachment to the desired positions on the uprights. Ensure they are properly seated and locked.
- Final Tightening: Once all components are in place, systematically tighten all bolts and nuts using the provided tools. Do not overtighten.
- Stability Check: Gently shake the assembled rack to ensure it is stable and all connections are secure.
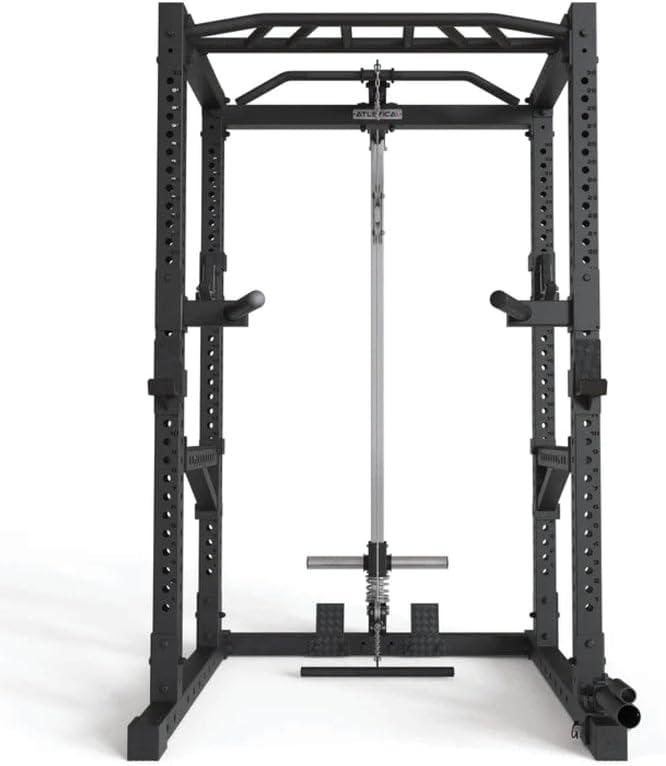
Figure 1: Front view of the Atletica R7-Cage Power Rack, showing the lat pull-down system and J-hooks.

Figure 2: Side view of the Atletica R7-Cage Power Rack, illustrating the lat pull-down, rowing station, and integrated weight plate storage pins.
5. Operating Instructions
The R7-Cage Power Rack offers a variety of exercises. Always ensure attachments are securely installed before use.
5.1. Lat Pull-Down and Rowing Station
- Weight Loading: Use the included adapters to load either 30mm or 50mm weight plates onto the weight sled. Fine adjustments can be made with 1.25kg or 2.5kg plates.
- Lat Pull-Down: Attach the long lat pull-down handle to the upper cable. Adjust the seat (if applicable) and knee pads for proper form.
- Rowing: Attach the short rowing handle to the lower cable. Sit on the floor or a bench with feet braced, maintaining a straight back.
5.2. Multi-Grip Pull-Up Bar
The multi-grip pull-up bar allows for various grip positions (wide, narrow, neutral) to target different muscle groups. Ensure the bar is securely fastened to the rack.
5.3. Dip Station
Attach the dip bars to the desired height on the uprights. Ensure both bars are at the same height and fully inserted into the rack holes before performing dips.
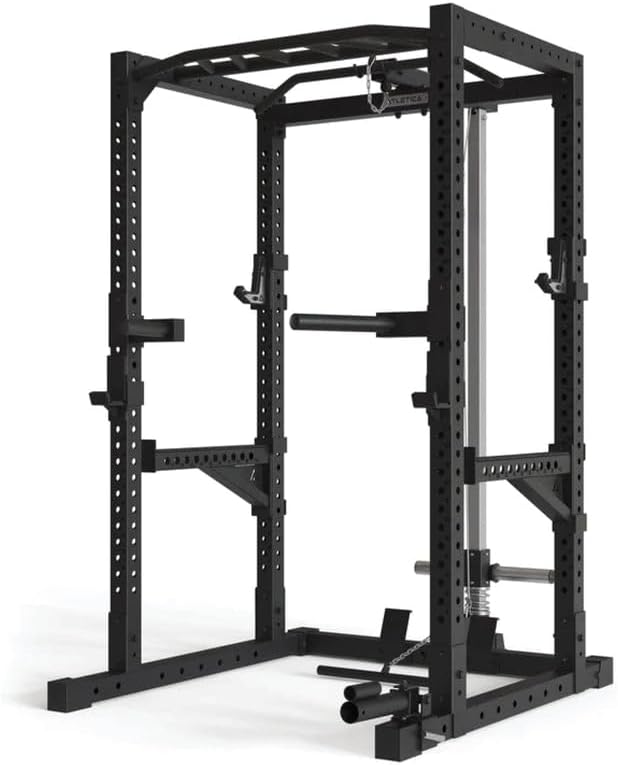
Figure 3: Angled view of the Atletica R7-Cage Power Rack, showcasing the dip bars and J-hooks in position.
5.4. Spotter Arms and J-Hooks
- J-Hooks: Use the J-hooks to hold barbells for squats, bench presses, and overhead presses. Adjust them to an appropriate height for safe racking and unracking.
- Spotter Arms: Install the spotter arms below your lowest intended range of motion for exercises like squats and bench presses. These act as a safety catch. Ensure they are securely pinned.
5.5. Landmine Attachment
Insert one end of a barbell into the landmine attachment. This allows for rotational exercises, rows, and presses with a pivot point. Ensure the landmine is securely attached to the rack base.

Figure 4: Illustrative diagram of a power rack setup, highlighting key components such as J-hooks, spotter arms, and barbell placement for various exercises.
6. Maintenance
Regular maintenance ensures the longevity and safe operation of your Atletica R7-Cage Power Rack.
- Daily: Wipe down the equipment with a damp cloth after each use to remove sweat and dust.
- Weekly: Inspect all bolts, nuts, and pins for tightness. Retighten as necessary. Check cables for fraying or wear; replace immediately if damaged.
- Monthly: Lubricate moving parts of the lat pull-down system (pulleys, guide rods) with a silicone-based lubricant to ensure smooth operation.
- General: Keep the area around the rack clean and free of obstructions. Store weight plates and accessories properly.
7. Troubleshooting
If you encounter issues with your R7-Cage Power Rack, refer to the following common problems and solutions:
| Problem | Possible Cause | Solution |
|---|---|---|
| Rack feels unstable or wobbly | Loose bolts or uneven floor | Ensure all bolts are tightened. Place shims under the base if the floor is uneven. |
| Lat pull-down cable is stiff or noisy | Lack of lubrication, worn pulleys, or misaligned cable | Lubricate pulleys and guide rods. Inspect pulleys for damage and replace if necessary. Check cable routing. |
| Attachments (J-hooks, spotter arms) do not fit securely | Incorrect installation or obstruction | Ensure attachments are fully inserted and pins are engaged. Check for any debris in the rack holes. |
8. Specifications
| Feature | Detail |
|---|---|
| Brand | Atletica |
| Model | R7-Cage (R7_Cage_Low) |
| Height | 200 cm |
| Package Dimensions | 220 x 156 x 122 cm |
| Product Weight | 155 kg |
| Included Attachments | Lat Pull-Down, Rowing Station, Multi-Grip Pull-Up Bar, Dip Station, Spotter Arms, 4 J-hooks, Landmine |
| Weight Plate Compatibility | 30mm and 50mm (with adapters) for weight sled |
| ASIN | B0BNGRB4K8 |
| First Available Date | June 7, 2023 |
9. Warranty and Support
For warranty information, please refer to the documentation provided with your purchase or contact Atletica customer service directly. If you require assistance with assembly, operation, or troubleshooting that is not covered in this manual, please reach out to Atletica support through their official website or the retailer where the product was purchased.
Please have your model number (R7-Cage) and ASIN (B0BNGRB4K8) ready when contacting support.