1. Introduction
This user manual provides comprehensive instructions for the installation, operation, and maintenance of your HUNSN RJ05f Mini Firewall Appliance. Please read this manual thoroughly before using the device to ensure proper functionality and to prevent damage. Keep this manual for future reference.
2. Safety Information
- Ensure the power supply voltage matches the device's requirements (12V/5A).
- Do not expose the device to moisture, extreme temperatures, or direct sunlight.
- Avoid blocking ventilation openings to prevent overheating. This device is fanless, but proper airflow is still recommended.
- Do not attempt to open or repair the device yourself. Refer all servicing to qualified personnel.
- Use only the provided power adapter and cables.
3. Package Contents
Verify that all items are present in the package:
- HUNSN RJ05f Mini Firewall Appliance
- Power Adapter (12V/5A)
- Power Cord
- Warranty Card
4. Product Overview
4.1 Front Panel

The front panel features essential connectivity and control options:
- DP (DisplayPort): For connecting to a display.
- Power Button: To power the device on or off.
- HDMI: For connecting to a display.
- USB 3.0 Ports (x2): For high-speed peripheral connections.
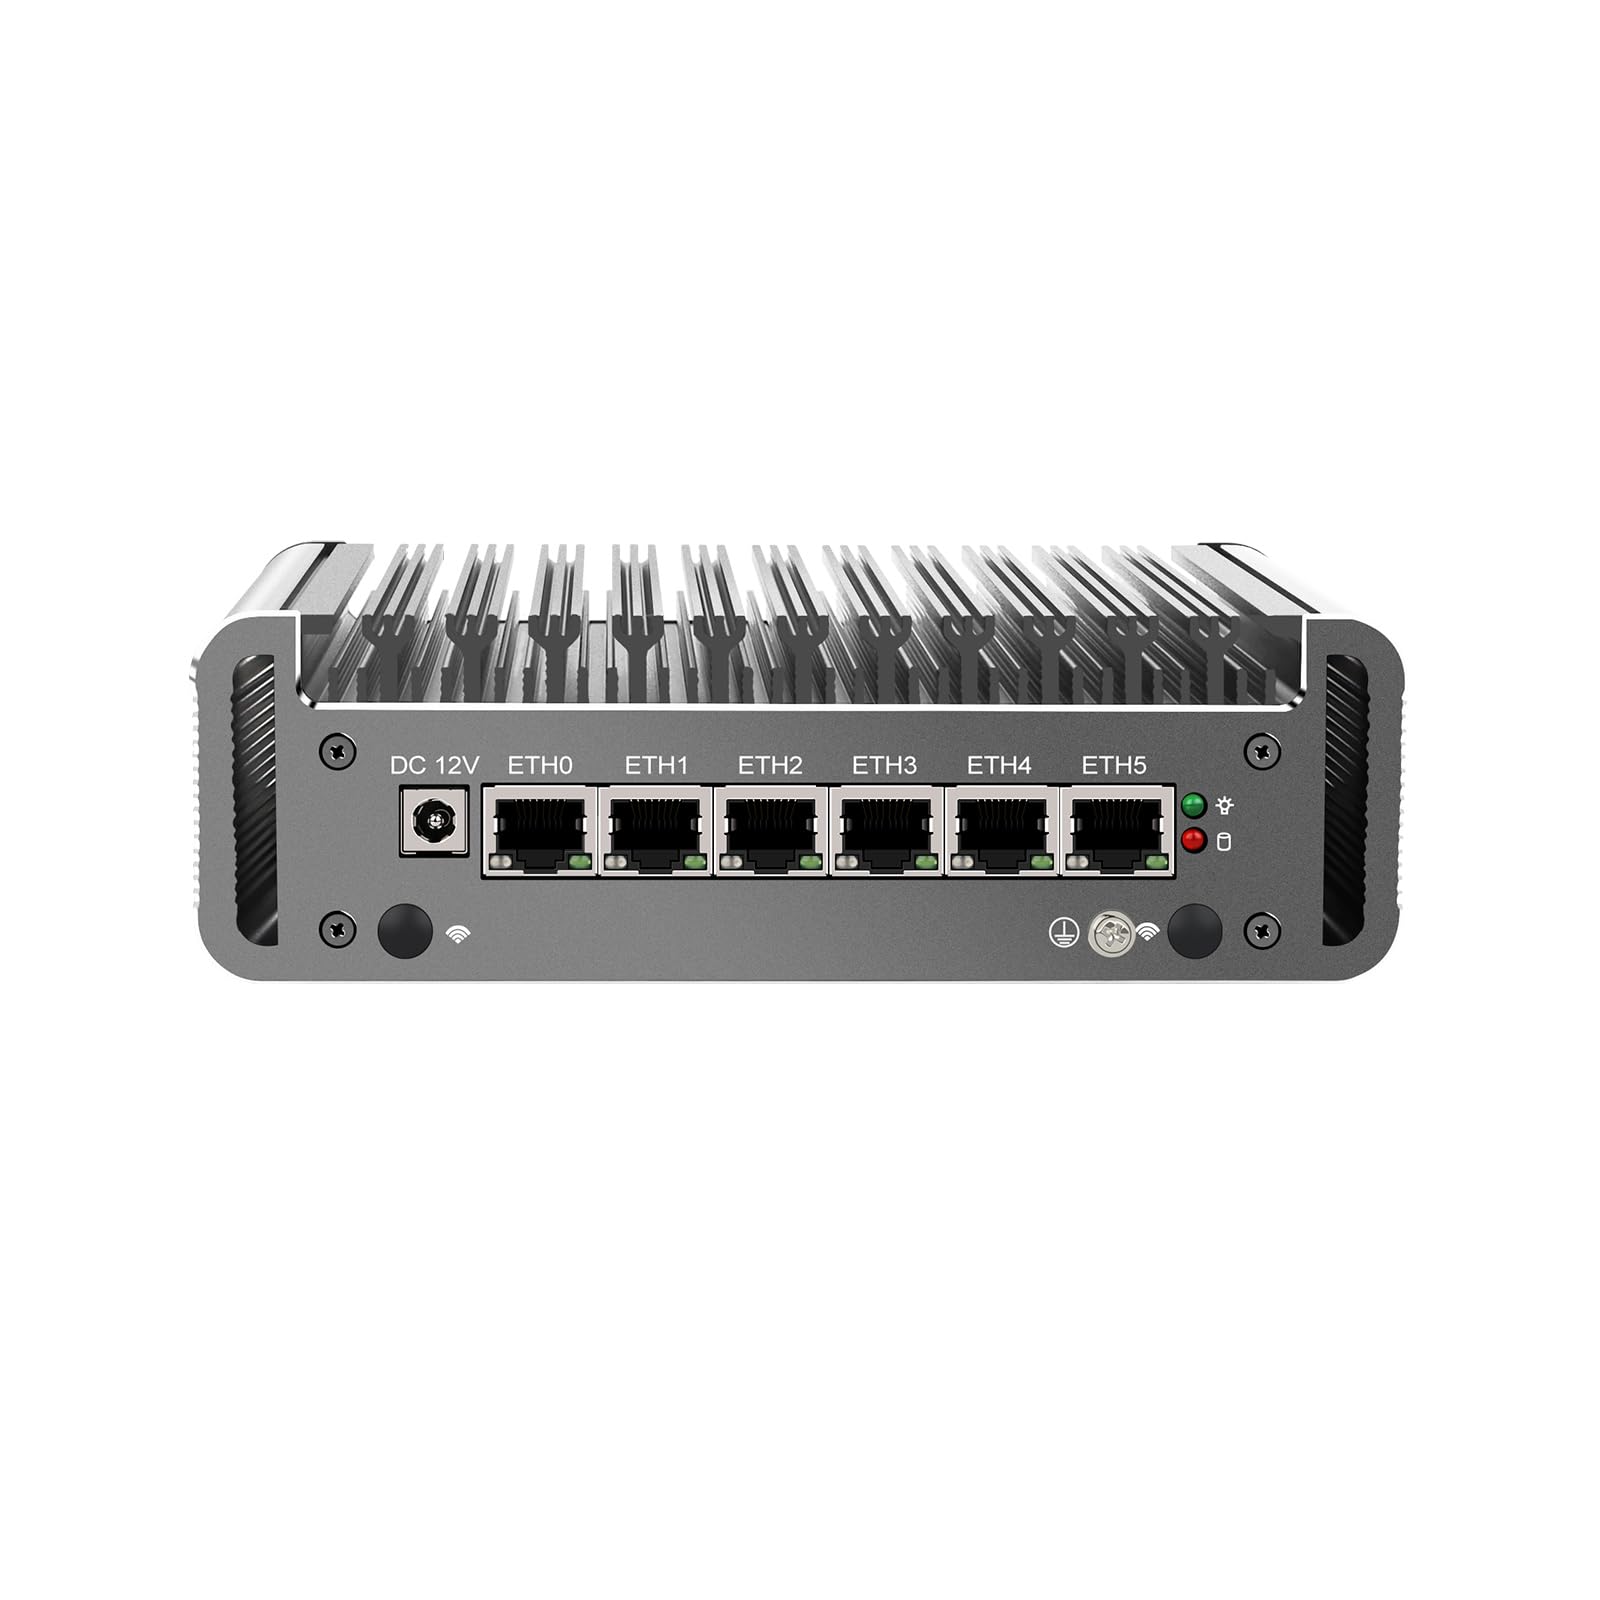
4.2 Rear Panel
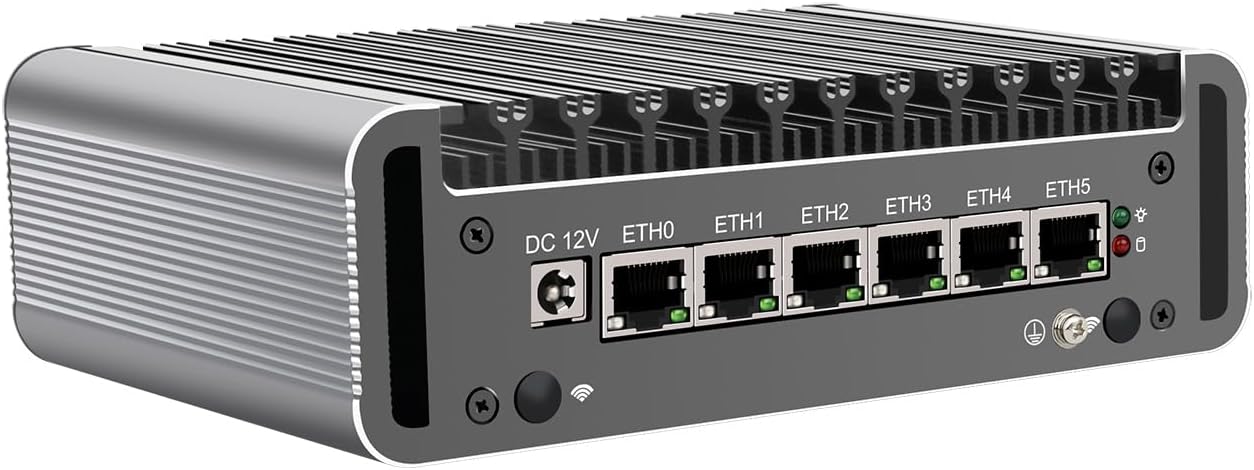
The rear panel provides network and additional peripheral connections:
- DC 12V: Power input jack.
- ETH0 - ETH5 (x6): Intel 2.5GbE I226-V LAN ports for network connections.
- USB 2.0 Ports (x2): For standard peripheral connections.
4.3 General View
A general view of the appliance highlights its compact, fanless design, which ensures silent operation and efficient heat dissipation through its aluminum chassis.
5. Specifications
| Feature | Description |
|---|---|
| Model | HUNSN RJ05f |
| Chassis Material | Aluminum |
| CPU | Intel Celeron N5105 (Quad-Core, 4M Cache, up to 2.90 GHz) |
| AES-NI Support | Yes |
| Memory | 2 x SODIMM DDR4 2933 MHz, Max. 32GB |
| Storage | 1 x M.2 2280 NVMe, 1 x 2.5 inch SATA SSD/HDD |
| Network Card | 6 x Intel 2.5GbE I226-V |
| I/O Interface | DP, Power ON/OFF, HDMI, 2 x USB 3.0, 2 x USB 2.0, DC_IN, 6 x LAN |
| Expansion | Mini PCIe slot for WiFi/4G (with SIM slot) |
| Power | DC 100-240V AC/50-60Hz, 12V/5A |
| Operating Temperature | 0 ~ 70°C (32 ~ 140°F) |
| Storage Temperature | -20 ~ 80°C (-130 ~ 176°F) |
| Relative Humidity | 10%~90% (non-condensing) |
| TDP | 10W |
| Cooling System | Fanless |
| Dimensions | 155 × 126 × 53 mm |
| Weight | 1.5 kg |
| OS Compatibility | FreeBSD-based router systems (e.g., pfSense Plus, OPNsense), Linux distributions, Windows OS (UEFI only) |
| Functions | Auto Power-On (default enabled), Wake-on-LAN, System Power Management, Temperature Management |
6. Setup
6.1 Hardware Installation (Optional)
The RJ05f may require installation of RAM, M.2 NVMe SSD, 2.5-inch SATA SSD/HDD, or a Mini PCIe WiFi/4G module. Follow these general steps:
- Prepare the Device: Disconnect the power adapter. Place the device on a clean, static-free surface.
- Open the Chassis: Carefully remove the screws securing the bottom cover.
- Install Components:
- RAM: Insert DDR4 SODIMM modules into the slots until they click into place.
- M.2 NVMe SSD: Insert the M.2 SSD into its slot and secure it with the provided screw.
- 2.5-inch SATA SSD/HDD: Mount the drive into the designated bay and connect the SATA data and power cables.
- Mini PCIe Module: Insert the WiFi/4G module into the Mini PCIe slot and connect any necessary antenna cables. If installing a 4G module, insert the SIM card into the SIM slot.
- Close the Chassis: Replace the bottom cover and secure it with the screws.
6.2 Connecting Peripherals
- Display: Connect a monitor to the DP or HDMI port.
- Keyboard/Mouse: Connect USB keyboard and mouse to the USB ports.
- Network: Connect Ethernet cables from your modem/router and to your internal network devices to the 2.5GbE LAN ports (ETH0-ETH5).
- Power: Connect the power adapter to the DC 12V input and plug it into a power outlet.
6.3 Powering On
Press the power button on the front panel to turn on the device. The power indicator light will illuminate.
7. Operating System Installation
The HUNSN RJ05f does not come with a pre-installed operating system. You will need to install a compatible OS such as pfSense Plus, OPNsense, a Linux distribution, or Windows OS (UEFI only).
- Create Bootable Media: Prepare a USB drive with the desired operating system's installation image.
- Access BIOS: Power on the device and repeatedly press the DEL or F2 key to enter the BIOS/UEFI setup.
- Configure Boot Order: In the BIOS/UEFI settings, navigate to the Boot menu and set the USB drive as the primary boot device. Save changes and exit.
- Install OS: The device will boot from the USB drive. Follow the on-screen instructions to install your chosen operating system.
- Post-Installation: After installation, remove the USB drive and restart the device. Configure your network settings and firewall rules according to your OS documentation.
8. Basic Operation
- Power On/Off: Press the front panel power button. For a controlled shutdown, use the operating system's shutdown function.
- BIOS Settings: To access BIOS settings, press DEL or F2 during startup. Here you can configure boot options, system time, and other hardware settings.
- Auto Power-On: The device supports auto power-on (default enabled) which can be configured in the BIOS.
- Wake-on-LAN (WoL): This feature allows the device to be powered on remotely via a network signal. Ensure WoL is enabled in the BIOS and configured in your operating system.
9. Maintenance
- Cleaning: Use a soft, dry cloth to clean the exterior of the device. Do not use liquid cleaners or aerosols. Ensure the heat fins are free from dust accumulation to maintain optimal cooling performance.
- Firmware Updates: Periodically check the manufacturer's website for BIOS/UEFI firmware updates. Follow the provided instructions carefully when performing updates.
- Software Updates: Keep your operating system and installed software up to date to ensure security and performance.
10. Troubleshooting
- No Power: Check the power adapter and power cord connections. Ensure the power outlet is functional.
- No Display: Verify that the monitor is connected correctly to the DP or HDMI port and is powered on. Try a different display cable or monitor.
- Operating System Not Booting: Check BIOS boot order settings. Ensure the installed OS is compatible and correctly installed.
- Network Connectivity Issues: Verify Ethernet cable connections. Check network adapter drivers and configurations within your operating system.
- Overheating: Ensure the device is placed in a well-ventilated area and that the heat fins are not obstructed by dust or other objects.
11. Warranty and Support
Your HUNSN RJ05f Mini Firewall Appliance comes with a warranty. Please refer to the included warranty card for details regarding coverage and duration. For technical support, product inquiries, or warranty claims, please contact your vendor or the manufacturer's official support channels. Keep your purchase receipt as proof of purchase.
