1. Product Overview
This manual provides detailed instructions for the DUMBORC X6F and X6FG 6-channel RC receivers. These receivers are designed for use with DUMBORC X4, X5, and X6 series transmitters, suitable for various RC vehicles including cars, boats, tanks, and drifting cars.
Key Features:
- X6FG: 6-channel receiver with integrated gyroscope (Normal Mode/Gyro Mode).
- X6F: 6-channel receiver without gyroscope.
- Easy binding process.
- Circuit safety protection with reverse polarity protection.
- Supports 4.8-10V DC high voltage servos.
- Stable long-distance control with FHSS spread spectrum, offering 400m control distance and 12ms fast response speed.

Image: DUMBORC X6FG 6-channel receiver highlighting features like built-in gyro, 3ms fast response, high voltage servo support, and over 400m control range.

Image: DUMBORC X6F 6-channel receiver highlighting features like 3ms fast response, high voltage servo support, over 400m control range, and reverse polarity protection.
2. Setup and Binding
2.1 Receiver Connection
Connect the receiver to your RC vehicle's components. Channel 1 is for steering, and Channel 2 is for throttle. Ensure correct polarity: the white wire is for signal (left), and the black wire is for negative (right).

Image: Labeled diagram of the DUMBORC X6FG receiver showing antenna, signal, VCC, GND, CH1 (Steering), CH2 (Throttle), CH3-CH6 (AUX), Binding Button, and Mode LED Indicator.
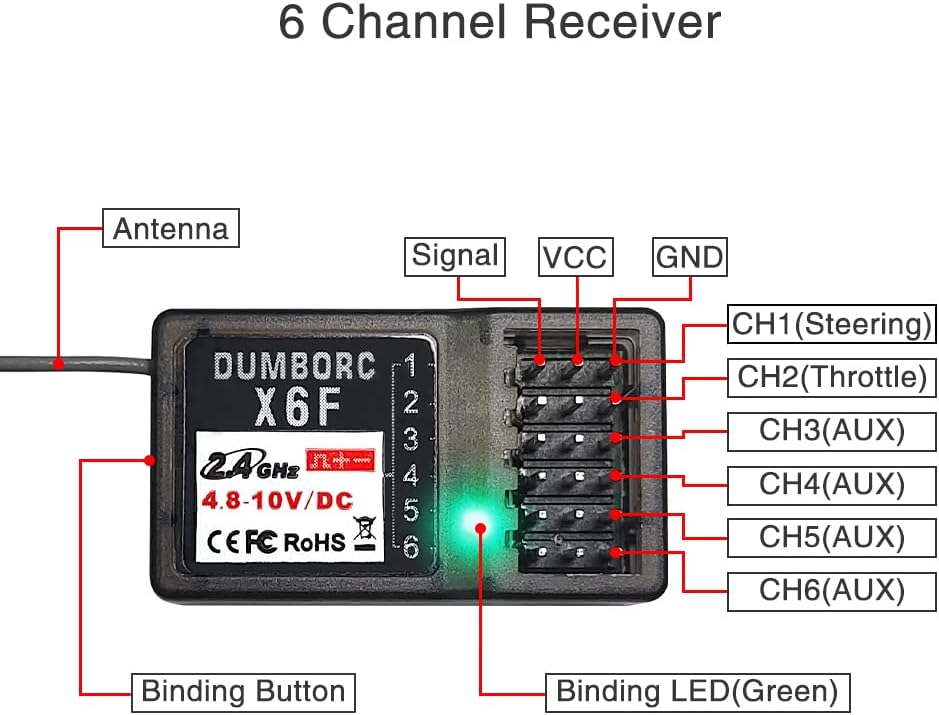
Image: Labeled diagram of the DUMBORC X6F receiver showing antenna, signal, VCC, GND, CH1 (Steering), CH2 (Throttle), CH3-CH6 (AUX), Binding Button, and Binding LED (Green).

Image: Illustration of correct and incorrect cable connections for the receiver, emphasizing reverse polarity protection.
2.2 Binding Procedure
If your DUMBORC transmitter and receiver are from a standard pack, they are usually pre-bound. If you are binding a new transmitter or receiver, follow these steps:
- Ensure the distance between the transmitter and receiver is about 30-50 cm.
- Power on the receiver. The LED indicator will flash.
- Power on the transmitter.
- Using a small tool (like a pen tip), long press the tiny black binding button on the receiver.
- The green LED on the receiver will change from fast flashing to always on, indicating successful binding.
Video: Demonstrates the binding method for DUMBORC X4 Radio and X6F Receiver. It shows connecting the receiver, powering on the transmitter and receiver, and long-pressing the binding button until the LED is solid green.
Video: Illustrates the binding process for DUMBORC X6FG with an X6 Transmitter, showing the connection of the receiver to the RC car, powering up, and pressing the bind button.

Image: Visual guide on how to perform the binding method, showing a hand pressing the binding button on the receiver.
3. Operating Instructions
3.1 Gyro Mode (X6FG Receiver Only)
The X6FG receiver features a built-in gyroscope to help correct the car's direction and prevent deviation or skidding. It has two working modes: Normal Mode (Green LED) and Gyro Mode (Yellow LED).
- To switch to Gyro Mode, fast press the binding button 3 times within 1 second. The green LED will turn yellow.
- To change the gyro direction, short press the binding button twice within 1 second.

Image: Diagram illustrating how to switch between Green-Normal Mode and Yellow-Gyro Mode by pressing the binding button three times quickly.
Video: Explains how to activate and adjust the Gyro Mode on the DUMBORC X6FG 6CH Receiver, including changing gyro direction.
3.2 Mixed Mode Setting (DUMBORC X4/X6 Transmitters)
For advanced control, DUMBORC X4 and X6 transmitters support mixed mode settings. Refer to the specific video tutorials for detailed instructions on configuring mixed mode.
Video: Demonstrates the mixed mode setting method for DUMBORC X6 transmitters.
Video: Provides instructions for DUMBORC X4/X6 Mixed Mode Setting Method.
4. Troubleshooting
4.1 Throttle or Steering Not Working
If the steering works but the throttle does not respond, or vice versa, ensure the throttle sub-trim on your transmitter is set to zero. An incorrect sub-trim setting can prevent the Electronic Speed Controller (ESC) from recognizing the throttle input.
- Locate the throttle sub-trim knob on your DUMBORC transmitter.
- Adjust the knob to the '0' position.
- Test the throttle. If it still doesn't work, reset the transmitter, check the ESC, calibrate it, and ensure it is in two-way ESC mode with the correct working mode.
Video: Addresses common issues where the throttle or steering may not work, providing solutions such as adjusting the throttle sub-trim to zero.
5. Specifications
| Feature | Description |
|---|---|
| Model | X6F, X6FG |
| Channels | 6 Channels |
| Compatibility | DUMBORC X4/X5/X6 Transmitters |
| Voltage Range | 4.8-10V DC |
| Gyroscope | X6FG: Built-in Gyro (Normal Mode/Gyro Mode) X6F: No Gyro |
| Control Distance | Up to 400 meters |
| Response Speed | 12ms |
| Safety Features | Reverse Polarity Protection |

Image: Dimensions of the DUMBORC X6F receiver (35mm x 20mm x 13mm).

Image: Dimensions of the DUMBORC X6FG receiver (35mm x 20mm x 13mm).
6. Compatibility
The DUMBORC X6F and X6FG receivers are compatible with DUMBORC X4, X5, and X6 series transmitters. They are suitable for a wide range of RC vehicles.

Image: Shows DUMBORC X6/X6P/X6A, X5/X5A, and X4 transmitters, indicating compatibility with the receivers.

Image: DUMBORC X6FG receiver shown with compatible DUMBORC X4, X5/X5A, and X6/X6P/X6A transmitters.

Image: DUMBORC X6F receiver shown with compatible DUMBORC X4, X5/X5A, and X6/X6P/X6A transmitters.

Image: Collage of various RC vehicles (crawler, boat, tank, buggy, truck, drifting car) demonstrating the wide compatibility of the receivers.
7. Warranty and Support
For warranty information or technical support, please refer to the official ATA HOBBY website or contact your retailer. Keep your purchase receipt for warranty claims.


