
1. Introduction
This manual provides detailed instructions for the safe and efficient operation, setup, and maintenance of the U.S. Solid Pneumatic Strapping Tool, Model USS-ESM00002. This tool is designed for industrial packaging applications using PP (Polypropylene) and PET (Polyester) strapping belts. Please read this manual thoroughly before operating the tool to ensure proper usage and to prevent injury or damage.

Figure 1: Main view of the U.S. Solid Pneumatic Strapping Tool.
2. Safety Information
Always observe the following safety precautions to reduce the risk of injury or damage to the tool.
- Wear appropriate personal protective equipment (PPE), including safety glasses and gloves.
- Ensure the air compressor is properly maintained and provides the correct air pressure (0.5-0.8 MPa).
- Disconnect the air supply before performing any maintenance, adjustments, or when the tool is not in use.
- Keep hands and loose clothing away from moving parts during operation.
- Do not operate the tool in explosive atmospheres or near flammable materials.
- Use only strapping materials within the specified width and thickness ranges.
- Do not modify the tool or use it for purposes other than its intended use.
3. Product Components
Familiarize yourself with the main components of the strapping tool:

Figure 2: The strapping tool shown with its included accessories.
- Handle: For gripping and maneuvering the tool.
- Air Inlet: Connection point for the air compressor hose.
- Tensioning Lever: Engages the tensioning mechanism.
- Welding/Cutting Lever: Activates the friction weld and strap cutting.
- Strap Feed Wheel: Pulls the strap to apply tension.
- Strap Guide: Ensures proper strap alignment.
- Base Plate: Provides stability during operation.
4. Setup
4.1 Connecting to Air Compressor
- Ensure your air compressor is capable of providing 0.5-0.8 MPa (72.5-116 PSI) air pressure.
- Attach the air hose from your compressor to the tool's air inlet connector. Ensure a secure connection to prevent air leaks.

Figure 3: Air inlet connection point.
4.2 Strap Loading
- Open the strap guide or release mechanism (if applicable, refer to specific tool design).
- Insert the strapping material (PP or PET) into the strap path, ensuring it passes through all guides and under the tensioning wheel.
- Close the strap guide or engage the release mechanism to secure the strap.
5. Operating Instructions
Follow these steps for effective strapping:
- Positioning the Strap: Place the strapping material around the item to be packaged. Overlap the two ends of the strap.
- Inserting the Strap into the Tool: Insert the bottom strap end into the tool first, then the top strap end, ensuring both are correctly aligned in the strap guides.
- Tensioning: Press and hold the tensioning lever (typically the orange lever). The tool will pull the strap, applying tension to the package. Release the lever once the desired tension is achieved.
- Welding and Cutting: After tensioning, press and hold the welding/cutting lever (typically the grey lever). The tool will perform a friction weld to seal the strap ends and then automatically cut the excess strap. Hold the lever until the cycle is complete (usually indicated by a change in sound or a visual cue).
- Removing the Tool: Once the weld is complete and the strap is cut, release the welding/cutting lever. Carefully remove the tool from the strapped package.
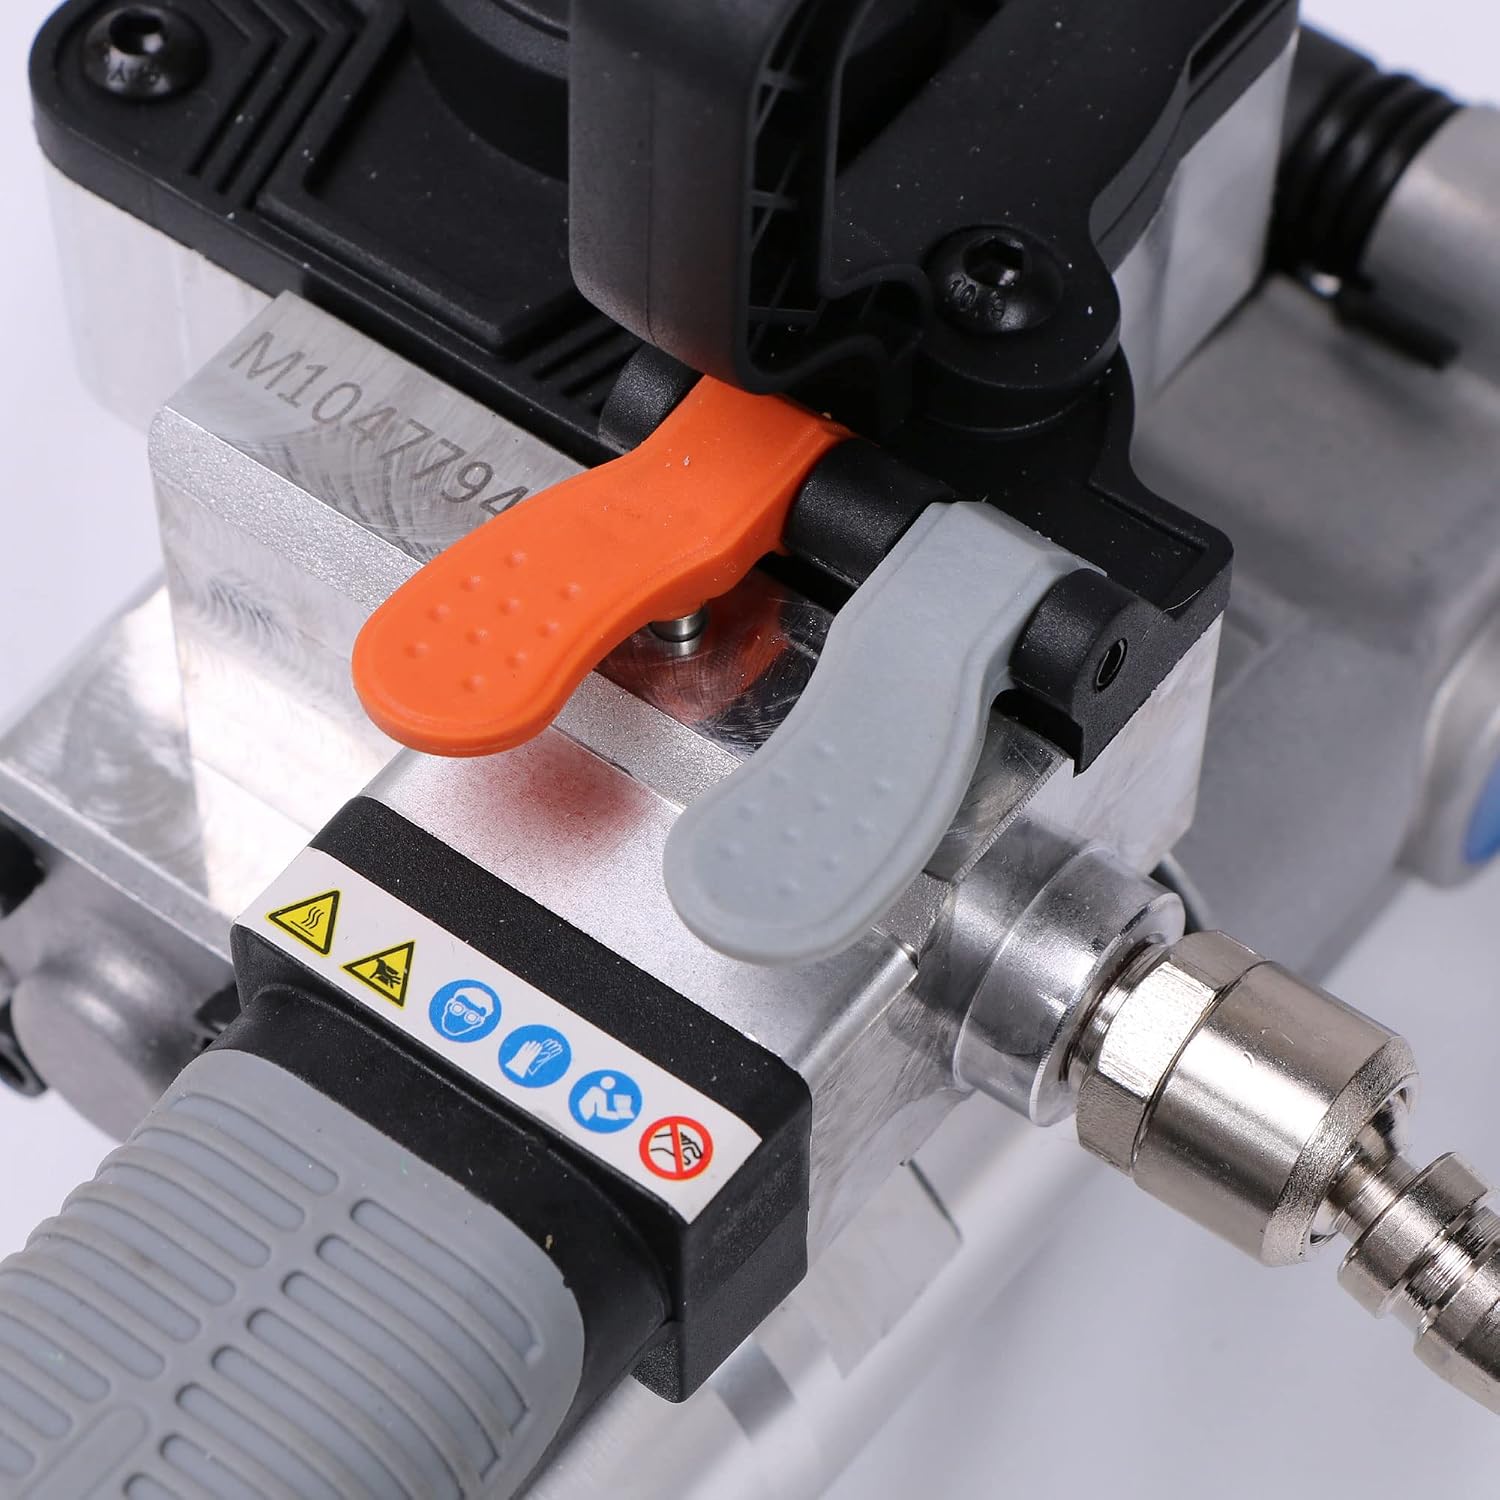
Figure 4: Tensioning and welding levers.
6. Maintenance
Regular maintenance ensures the longevity and optimal performance of your strapping tool.
- Cleaning: Regularly clean the tool, especially the strap path, tensioning wheel, and welding area, to remove dust, strap residue, and debris. Use a dry cloth or compressed air.
- Lubrication: Apply a few drops of pneumatic tool oil to the air inlet daily or before each use to lubricate internal components.
- Air Filter: Check and clean the air filter on your air compressor regularly to ensure a clean air supply to the tool.
- Inspection: Periodically inspect the tool for any signs of wear, damage, or loose fasteners. Address any issues promptly.
7. Troubleshooting
Refer to the table below for common issues and their solutions:
| Problem | Possible Cause | Solution |
|---|---|---|
| Tool does not tension strap | Low air pressure; Strap not inserted correctly; Worn tensioning wheel | Check air supply and pressure; Re-insert strap; Inspect/replace tensioning wheel |
| Poor weld strength | Incorrect welding time; Contaminated welding area; Incorrect strap material | Ensure full welding cycle; Clean welding surfaces; Use correct PP/PET strap |
| Strap not cutting | Dull cutting blade; Strap jammed | Inspect/replace cutting blade; Clear any strap jams |
| Air leaks | Loose connections; Damaged O-rings/seals | Tighten connections; Inspect/replace O-rings/seals |
8. Specifications
| Feature | Detail |
|---|---|
| Model | USS-ESM00002 |
| Applicable Strap Material | PP (Polypropylene) / PET (Polyester) |
| Strap Width | 13mm - 19mm (1/2 inch - 3/4 inch) |
| Strap Thickness | 0.4mm - 1.2mm |
| Maximum Tension Force | 3500 N |
| Air Pressure Required | 0.5 - 0.8 MPa (72.5 - 116 PSI) |
| Tool Dimensions (L x W x H) | Approx. 29.01 x 15.49 x 18.01 cm |
| Tool Weight | Approx. 4.51 kg |
| Material | Metal |
9. Warranty and Support
For warranty information and technical support, please refer to the documentation included with your product packaging or contact U.S. Solid customer service directly. Contact details can typically be found on the manufacturer's official website or on your purchase receipt.