
HYEPIVOT CB01-NJ400
Contents
HYEPIVOT Motorcycle Clip-On Handlebars
Instruction Manual
Model: CB01-NJ400
1. Introduction
Thank you for choosing HYEPIVOT Motorcycle Clip-On Handlebars. This product is designed to provide a lower riding position for enhanced control and aesthetics. Manufactured from high-quality 6061 Aluminum with a CNC machined anodized finish, these handlebars are built for durability and performance.
This manual provides essential information for the proper installation, operation, and maintenance of your new handlebars. Please read it thoroughly before proceeding with installation or use.
Key Features:
- CNC Machine Anodized Color for enhanced durability and aesthetics.
- Specifically designed for Kawasaki Ninja 400 models from 2018 to 2021.
- Features black bars with integrated measurement scales for precise adjustment.
- Constructed from robust 6061 Aluminum.
- Lower height design for a more aggressive riding posture.
2. Product Overview and Components
The HYEPIVOT Clip-On Handlebars consist of two main components: the handlebar tubes and the fork clamps. These components are designed for a precise fit on compatible motorcycle models.

Figure 2.1: Overview of the HYEPIVOT Clip-On Handlebars, showing both the left and right side assemblies.

Figure 2.2: Top view of the handlebars, highlighting the sleek design and integrated clamps.

Figure 2.3: Detailed view of the handlebar clamps and the textured grip section, designed for secure hand placement.
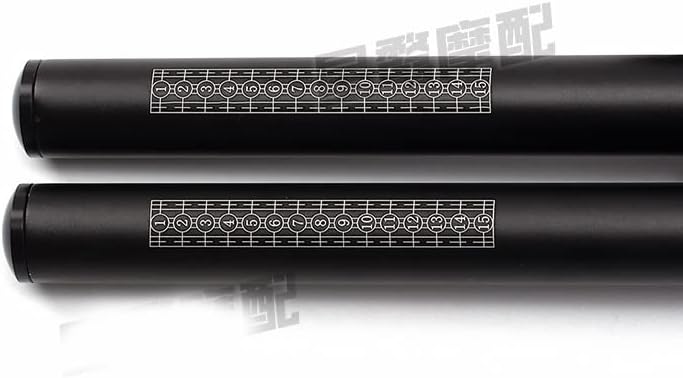
Figure 2.4: Close-up of the laser-etched measurement scales on the handlebar tubes, aiding in precise setup and alignment.
3. Setup and Installation
Important Safety Note: Installation of motorcycle handlebars requires specific mechanical knowledge and tools. If you are not a professional motorcycle modifier or lack experience with such installations, it is strongly recommended to seek assistance from a qualified local professional. Improper installation can lead to serious injury or damage to your motorcycle.
3.1. Package Contents:
Verify that your package contains the following items:
- 1 Pair of Clip-On Handlebars (Left + Right side)
3.2. Pre-Installation Checks:
- Ensure your motorcycle is a Kawasaki Ninja 400 model from 2018-2021.
- Confirm all components are present and undamaged.
- Gather necessary tools (e.g., wrenches, torque wrench, hex keys).
3.3. Installation Steps (General Guidance):
- Secure the motorcycle on a stand to ensure stability.
- Carefully remove the existing handlebars and associated controls (throttle, brake/clutch levers, switches). Note their original positions and cable routing.
- Install the new clip-on clamps onto the fork tubes. Ensure they are positioned correctly and tightened to the manufacturer's recommended torque specifications for your motorcycle's forks.
- Slide the handlebar tubes into the clamps. Adjust the angle and position of the handlebars to your desired riding posture. Utilize the integrated measurement scales for symmetrical alignment.
- Reinstall all controls onto the new handlebars. Ensure all cables and wires have sufficient slack and are not pinched. Test the full range of motion for steering and control operation without interference.
- Tighten all handlebar and control fasteners to the appropriate torque specifications.
- Perform a thorough check of all installed components for security and proper function before riding.
Note: Specific installation instructions for your motorcycle model are not included with this product. Refer to your motorcycle's service manual for detailed torque specifications and procedures.
4. Operating Considerations
Once installed, these clip-on handlebars will alter your motorcycle's ergonomics, typically resulting in a more forward-leaning and aggressive riding position. This can improve aerodynamic efficiency and front-end feel for sport riding.
- Riding Posture: Be aware of the change in riding posture. It may take some time to adapt to the new feel, especially during low-speed maneuvers and long rides.
- Clearance: Always check for full steering lock clearance with the fuel tank, fairings, and any other components after installation and before riding. Ensure no cables or hoses are stretched or pinched.
- Control Accessibility: Confirm that all controls (brakes, clutch, throttle, switches) are easily accessible and operate smoothly throughout the full range of handlebar motion.
5. Maintenance
To ensure the longevity and optimal performance of your HYEPIVOT Clip-On Handlebars, follow these maintenance guidelines:
- Regular Inspection: Periodically inspect all fasteners for tightness, especially after the first few rides. Vibrations can cause bolts to loosen over time.
- Cleaning: Clean the handlebars with a soft cloth and mild, non-abrasive cleaner. Avoid harsh chemicals or abrasive materials that could damage the anodized finish.
- Corrosion Prevention: While aluminum is corrosion-resistant, regular cleaning and occasional application of a protective wax or sealant can help maintain the finish, especially in harsh environments.
- Damage Check: In case of a fall or impact, thoroughly inspect the handlebars for any bends, cracks, or damage. Damaged handlebars should be replaced immediately.
6. Troubleshooting
Most issues related to handlebar installation stem from incorrect positioning or insufficient tightening. If you encounter problems, consider the following:
- Loose Handlebars: If handlebars feel loose or shift during riding, re-check all clamp bolts and ensure they are torqued to the motorcycle manufacturer's specifications.
- Interference with Tank/Fairings: If the handlebars hit the tank or fairings at full lock, adjust their angle or position within the clamps. Ensure this adjustment does not compromise control accessibility or cable routing.
- Stretched Cables/Hoses: If cables or hoses appear stretched or pinched, re-route them to ensure adequate slack. This is critical for safe operation of brakes, clutch, and throttle.
- Difficulty with Installation: As noted in the Setup section, if you are not confident in your ability to install these handlebars safely and correctly, please consult a professional motorcycle mechanic.
7. Specifications
| Attribute | Value |
|---|---|
| Brand | HYEPIVOT |
| Model | lowering |
| Item Model Number | ninja400 |
| Manufacturer Part Number | CB01-NJ400 |
| Material | 6061 Aluminum |
| Color | Black |
| Finish | CNC Machine Anodize |
| Item Weight | 2.25 pounds |
| Country of Origin | China |
| Package Dimensions | 5.91 x 3.15 x 2.76 inches |

Figure 7.1: Dimensional diagram of the HYEPIVOT Clip-On Handlebars, indicating key measurements.
8. Warranty and Support
This product is subject to the standard return policy, which typically allows for returns or replacements within 30 days of purchase, provided the item is in its original condition and packaging.
For any questions regarding installation, product defects, or general support, please contact the seller directly through the platform where the purchase was made. The seller for this product is US-Alege.
Always refer to the product listing and your purchase records for the most accurate and up-to-date warranty and support information.
Ask a question about this manual
Ask about setup, troubleshooting, compatibility, parts, safety, or missing instructions. Manuals+ will review the question and use this page’s manual context to help answer it.