1. Product Overview
The Estink LCD GD01 Display is a versatile cycling computer designed for electric bicycles and scooters. It provides essential riding data and control functions, compatible with 36V and 48V systems. This display is specifically designed for handlebars with a 22.2mm (0.9in) diameter.

Image: Front view of the Estink LCD GD01 Display, showing the screen and control buttons (+, M, -).
Key Features:
- Applicable Model: Designed for JN controllers and electric bike motor kits, supporting both 36V and 48V voltage systems.
- LCD Display Data: Provides clear and easy-to-read data including remaining battery power, real-time speed, mileage, and other critical parameters.
- Real-Time Monitoring: Accurately reflects battery power and records power consumption to help ensure optimal riding mileage.
- Wide Compatibility: Suitable for handlebars with a 22.2mm (0.9in) diameter, making it ideal for various electric bikes and scooters.
- Durable Construction: Features a plastic shell with good toughness and waterproof performance, protecting the internal circuitry.
- Functionality: Includes two-way communication protocol, Km/mile display, headlight control, three-level backlight brightness adjustment, five-gear control, fault code display, and 6km/h assist mode.
2. Setup and Installation
Proper installation is crucial for the optimal performance of your LCD GD01 Display. Please follow these steps carefully.
2.1 Package Contents:
- 1 x LCD GD01 Display Unit
2.2 Installation Steps:
- Mounting the Display:
Secure the LCD GD01 Display onto your bicycle's handlebar. The display is designed for handlebars with a 22.2mm (0.9in) diameter. Use the integrated clamp and screw to firmly attach it. Ensure the display is positioned for easy viewing while riding.

Image: Close-up view of the display's mounting bracket, showing the screw for securing it to the handlebar.
- Connecting the Wiring:
The display features a 5-pin waterproof interface. Connect this interface to the corresponding port on your JN controller or electric bike motor kit. Ensure the connection is secure and fully seated to prevent water ingress and ensure proper communication.
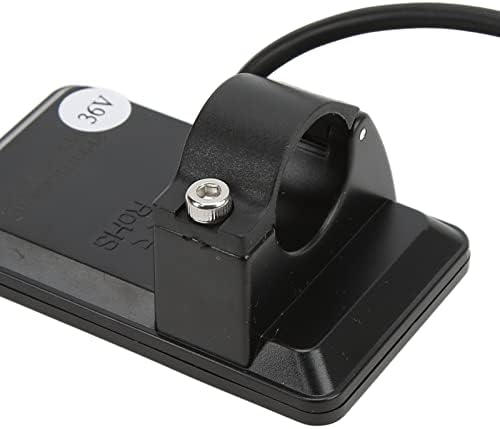
Image: Detailed view of the 5-pin waterproof connector cable extending from the display unit.
Refer to the wiring diagram below for pin assignments:

Image: Standard connector type and arrangement, showing the 5-pin waterproof interface with wire colors and their corresponding functions (VCC, K, GND, RX, TX).
Connector Arrangement Sequence No. Wire Colour Functions 1 Red (VCC) Display Power Cable 2 Blue (K) Controller Power On/Off Cable 3 Black (GND) Display Ground Cable 4 Green (RX) Display Data Receiving Wire 5 Yellow (TX) Display Data Sending Wire - Power On: Once connected, power on your electric bike system. The display should illuminate and show initial data.
3. Operating Instructions
The GD01 display provides various functions to enhance your riding experience. Familiarize yourself with the buttons and their operations.
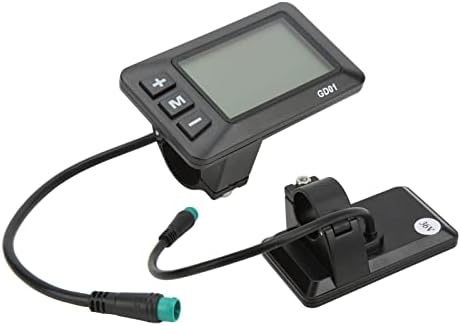
Image: Close-up view of the GD01 display, highlighting the '+', 'M', and '-' buttons.
3.1 Button Functions:
- '+' Button: Typically used to increase values, navigate up in menus, or increase assist level.
- '-' Button: Typically used to decrease values, navigate down in menus, or decrease assist level.
- 'M' (Mode) Button: Used to cycle through display modes (e.g., Odometer, Trip Distance, Max Speed), enter/exit settings, or confirm selections.
3.2 Displayed Information:
The LCD GD01 display provides the following real-time data:
- Real-Time Speed: Current riding speed.
- Km/mile Display: Unit of speed and distance can be switched.
- Smart Battery Display: Indicates remaining battery power.
- Mileage Display: Total odometer and trip distance.
- Assist Level: Current power assist level (typically 5 gears).
- Headlight Indicator: Shows if headlights are on/off (if connected and controlled by the display).
- Fault Code Display: Alerts to system errors.
3.3 Basic Operations:
- Power On/Off: Press and hold the 'M' button (or specific power button if available on your controller) to turn the display on or off.
- Changing Assist Level: Use the '+' and '-' buttons to adjust the power assist level (e.g., from 1 to 5).
- Cycling Display Modes: Short press the 'M' button to cycle through different data displays (e.g., ODO, TRIP, MAX Speed, AVG Speed).
- Headlight Control: Long press the '+' button (or specific combination) to turn the headlights on or off.
- 6km/h Assist Mode: Long press the '-' button to activate the 6km/h walk assist function. Release the button to exit.
3.4 Parameter Settings:
The display allows for various parameter settings. Typically, these are accessed by holding a combination of buttons (e.g., '+' and '-' simultaneously) or the 'M' button for an extended period while the display is on. Consult your e-bike controller's manual for specific parameter adjustment procedures, as these can vary.
- Backlight Brightness: Adjust the screen backlight to one of three levels for optimal visibility in different lighting conditions.
- Unit Switching: Change between kilometers (Km) and miles (Mi) for speed and distance readings.
- Voltage Setting: The display supports 36V and 48V systems. Ensure the voltage setting on the instrument matches your battery voltage. This is usually set during initial setup or through advanced settings.
4. Maintenance and Care
To ensure the longevity and optimal performance of your LCD GD01 Display, follow these maintenance guidelines:
- Cleaning: Wipe the display screen and body with a soft, damp cloth. Do not use abrasive cleaners, solvents, or excessive water, as this can damage the electronics.
- Water Resistance: The display has a waterproof interface, but it is not designed for submersion. Avoid exposing the display to heavy rain or direct water jets. Ensure the 5-pin connector is always securely sealed.
- Temperature: Store and operate the display within recommended temperature ranges. Extreme heat or cold can affect its performance and lifespan.
- Physical Protection: Avoid dropping the display or subjecting it to strong impacts. The plastic shell provides protection, but excessive force can cause damage.
- Cable Inspection: Periodically check the connection cable for any signs of wear, cuts, or damage. Ensure the connector remains clean and free of debris.
5. Troubleshooting
If you encounter issues with your LCD GD01 Display, refer to the following common problems and solutions:
| Problem | Possible Cause | Solution |
|---|---|---|
| Display does not power on. | Loose connection, no power from controller, incorrect voltage setting. | Check all cable connections, especially the 5-pin interface. Ensure your e-bike battery is charged and the controller is powered. Verify the display's voltage setting matches your battery (36V/48V). |
| Display shows "Communication Error" or no data. | Loose or damaged data wires (RX/TX), incompatible controller. | Inspect the green (RX) and yellow (TX) wires for damage. Ensure the display is compatible with your JN controller. Re-seat the 5-pin connector firmly. |
| Incorrect speed or mileage readings. | Incorrect wheel diameter setting, sensor issue. | Access parameter settings to verify and adjust the wheel diameter. Check the speed sensor on your e-bike for proper function and alignment. |
| Buttons are unresponsive. | Stuck buttons, internal fault. | Gently press buttons to ensure they are not stuck. If unresponsive, try powering off and on the display. If the issue persists, contact support. |
| Display backlight is too dim/bright. | Backlight setting. | Adjust the backlight brightness through the display's parameter settings. |
If the problem persists after attempting these solutions, please contact customer support for further assistance.
6. Specifications
Detailed technical specifications for the Estink LCD GD01 Display:
- Item Type: LCD GD01 Display
- Material: Plastic
- Color: Black
- Weight: Approximately 88g (3.1oz)
- Interface: 5 Pin Waterproof Interface
- Applicable Handlebar Diameter: 22.2mm (0.9in)
- Voltage Compatibility: 36V / 48V (user-settable)
- Meter Dimensions: Approx. 82x48mm (3.2x1.9in)
- Connector Cable Length: Approx. 20.5cm (8.1in)
- Application: For JN Controller and Electric Bike Motor Kit
- Package Dimensions: 4.13 x 2.83 x 2.48 inches
- Manufacturer: Estink
- Country of Origin: China
7. Warranty and Support
For warranty information and technical support, please refer to the documentation provided with your purchase or contact Estink customer service directly. Keep your purchase receipt as proof of purchase for any warranty claims.
For further assistance, you may visit the Estink Store on Amazon.


