1. Product Overview
The CITOLEN Motorized Blinds SM100 offer an advanced solution for window treatments, combining convenience with modern design. These smart roller shades feature upgraded grasscloth fabric for durability and 100% blackout capability, ensuring privacy and light control. Equipped with a quiet motor (less than 35dB), they can be operated via remote control or integrated into smart home systems like Alexa and Google Home with an optional smart hub. The cordless design enhances safety and provides a clean aesthetic.
- Quiet Operation: Upgraded motor reduces noise to less than 35dB for undisturbed rest.
- Smart Home Ready: Compatible with Alexa and Google Home via an optional smart hub for voice and app control.
- Durable Blackout Fabric: Upgraded grasscloth fabric offers 100% blackout, improved wear resistance, and color retention for 6-8 years.
- Cordless & Safe: Eliminates cords for enhanced child and pet safety, providing a cleaner look.
- Valance Cover: Includes a valance to cover the top rail, ensuring complete light blockage.
2. Package Contents
Please ensure all components are present before proceeding with installation:
- Motorized Roller Shade with Valance Cover
- Remote Control
- Mounting Brackets (for inside or outside mount)
- Installation Screws and Anchors
- Small Screwdriver
- Quick Installation Guide
- Battery Pack (pre-installed or separate, depending on model)
3. Safety Information
Your safety is paramount. Please read and follow all instructions carefully.
- Cordless Design: The cordless operation eliminates the risk of entanglement for children and pets, making it a safer choice for your home.
- Battery Safety: Ensure correct battery polarity when inserting. Do not mix old and new batteries. Dispose of batteries responsibly.
- Installation: Always use appropriate tools and ensure mounting brackets are securely fastened to a stable surface. If unsure, consult a professional.
- Operation: Keep hands clear of moving parts during operation.
4. Setup & Installation
4.1 Measuring Your Window
Accurate measurements are crucial for proper fit and function. Choose between Inside Mount or Outside Mount based on your preference and window type.

Image: Diagram illustrating how to measure for an inside mount, showing measurements for top, middle, and bottom width, and left, middle, and right height. It specifies a minimum window frame depth of 2 inches.

Image: Diagram illustrating how to measure for an outside mount, showing measurements for top, middle, and bottom width, and left, middle, and right height. It specifies adding 4 inches to the window width for the order width.
Inside Mount:
- Window Frame Depth: Should be ≥ 2 inches.
- Order Width: Measure the inside surface horizontally in 3 places (top, middle, bottom). Take the shortest measurement and subtract 1/4 inch.
- Order Height: Measure the inside surface vertically in 3 places (left, middle, right). Take the longest measurement. The height can be adjusted from 0 to 72 inches.
Outside Mount:
- Order Width: Measure the outside surface horizontally in 3 places (top, middle, bottom). Take the longest measurement and add at least 4 inches.
- Order Height: Measure the outside surface vertically in 3 places (left, middle, right). Take the longest measurement. The height can be adjusted from 0 to 72 inches.
Video: This video demonstrates how to accurately measure windows for both inside and outside mount installations, ensuring a perfect fit for your motorized blinds.
4.2 Battery Installation
The motorized blinds are powered by a battery pack. Locate the battery compartment, typically at one end of the headrail. Insert the batteries, ensuring correct polarity. The battery life is approximately 4-6 months.

Image: Close-up view of the motorized blind's headrail, showing the battery compartment and the upgraded motor mechanism. This illustrates where to insert the batteries for operation.
4.3 Mounting the Blinds
Installation is designed to be quick and easy, often taking only a few minutes per window.
- Step 1: Mark Bracket Positions: Hold the blind in place and mark the positions for the mounting brackets. Ensure they are level and spaced appropriately.
- Step 2: Install Brackets: Use a drill to secure the mounting brackets with the provided screws and anchors.
- Step 3: Attach Blinds: Snap the headrail of the motorized blind into the installed brackets. Ensure it is securely fastened.
- Step 4: Install Valance Cover: Attach the valance cover to the front of the headrail to conceal the mechanism and enhance the blackout effect.
Video: A user demonstrates the quick and easy installation process of the motorized blinds, highlighting how to attach the brackets and snap the blind into place.
Video: This review video shows the installation of the motorized blinds, including securing the brackets and attaching the blind, emphasizing the string-free design for safety.
5. Operating Instructions
5.1 Remote Control Operation
The included remote control allows for easy adjustment of your blinds.
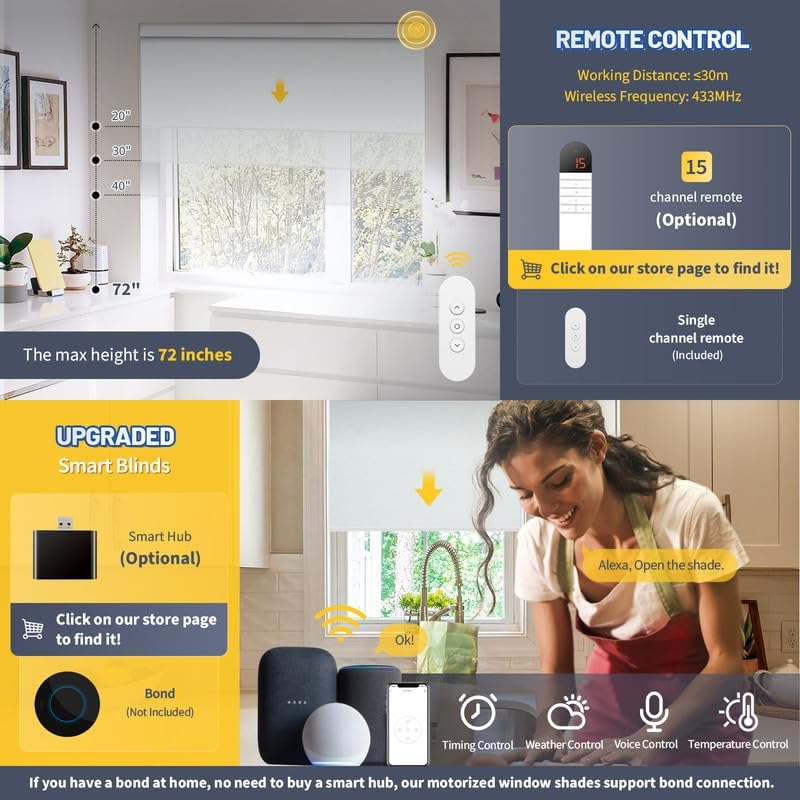
Image: A single-channel remote control is shown, indicating buttons for raising, lowering, and stopping the blinds. It also highlights the working distance of less than 30m and a wireless frequency of 433MHz.
- Raise Blinds: Press the 'Up' button.
- Lower Blinds: Press the 'Down' button.
- Stop Blinds: Press the 'Stop/Pause' button.
- Set Limits: After installation, use the small button on the back of the remote (accessed by removing the screw) to set the desired upper and lower limits for the blind's travel. Hold for 2 seconds to confirm.
5.2 Smart Home Integration (Optional)
For enhanced control, integrate your motorized blinds with smart home systems like Alexa or Google Home using an optional smart hub.

Image: Diagram showing how a smart hub connects voice control devices (like Alexa or Google Home) and a mobile app to the motorized blinds, enabling smart functionality.
- Smart Hub: A smart hub (not included) is required to enable voice control and app control features. Refer to the smart hub's instructions for setup.
- Voice Control: Once connected to a smart hub, use voice commands (e.g., "Alexa, open the shade") to operate your blinds.
- App Control: Download the compatible app (e.g., Tuya app) to control your blinds from your smartphone, set schedules, and manage multiple blinds.
- Scheduling: Use the app to set custom schedules for your blinds to open or close automatically at specific times.
6. Maintenance
6.1 Cleaning
To maintain the appearance and longevity of your blinds:
- Spot Clean Only: Use a soft, damp cloth to gently spot clean any marks or dirt on the fabric. Avoid harsh chemicals or abrasive cleaners.
- Dusting: Regularly dust the blinds with a soft brush or vacuum cleaner with a brush attachment.
6.2 Battery Replacement
When the motor performance decreases or the remote control becomes unresponsive, it may be time to replace the batteries.
- Access Battery Compartment: Carefully open the battery compartment on the headrail.
- Replace Batteries: Remove old batteries and insert new ones, ensuring correct polarity.
- Dispose Responsibly: Dispose of used batteries according to local regulations.
7. Troubleshooting
If you encounter any issues, refer to the following common problems and solutions:
| Problem | Possible Cause | Solution |
|---|---|---|
| Blinds not responding to remote. | Low battery in remote or blind; remote not paired; signal interference. | Replace remote batteries. Check blind battery level. Re-pair remote with blind (refer to remote instructions). Ensure no obstructions between remote and blind. |
| Blinds not stopping at desired position. | Upper/lower limits not set correctly. | Re-set the upper and lower limits using the remote control's programming button. |
| Fabric edges fraying. | Blind tracking unevenly. | Unroll the blind completely. Apply a small piece of masking tape (1-2 inches) to the side it is tracking away from, on the roller tube. Roll up and check, adjusting as needed. |
| Bottom rail getting stuck. | Bottom rail too light. | Open the end caps of the bottom bar and insert a 3/16" or 1/4" steel rod (not included) to add weight. |
| Smart home integration not working. | Smart hub not connected or configured correctly. | Ensure the smart hub is properly set up and connected to your home network. Verify blind pairing with the smart hub. |
8. Specifications
- Model Number: SM100
- Material: Polyester (Grasscloth Fabric)
- Product Dimensions: 72"L x 32"W (for this specific variant)
- Color: Bright White (for this specific variant)
- Opacity: Blackout
- Operation Mode: Automatic
- Special Features: Motorized, Cordless Design, Valance Design, Smart Home Compatibility
- Item Weight: 4.39 pounds
- Product Care Instructions: Spot Clean Only
- Control Type: Multiple (Remote, App, Voice with Smart Hub)
- Manufacturer: CITOLEN
9. Warranty and Support
CITOLEN is committed to providing high-quality products and excellent customer service. This product comes with a warranty. For any problems or questions, please do not hesitate to seek help. We provide online assistance for all customers and will respond within 24 hours.
For support, please visit the official CITOLEN store or contact customer service through your purchase platform.


