
1. Introduction
This manual provides detailed instructions for the assembly, installation, operation, and maintenance of your Tecmojo 12U Wall Mount Server Cabinet. Please read this manual thoroughly before proceeding with installation to ensure proper setup and safe operation. Retain this manual for future reference.
Safety Information
- Always ensure the cabinet is securely mounted to a structurally sound wall capable of supporting the cabinet's weight plus the weight of all installed equipment.
- Do not exceed the maximum weight capacity of 110 lbs (50 kg).
- Use appropriate tools and safety gear during assembly and installation.
- Ensure proper grounding to prevent electrical hazards.
- Keep children and pets away from the installation area.
2. Product Features
The Tecmojo 12U Wall Mount Server Cabinet is designed for organizing and securing IT network equipment. Key features include:
- Space-Saving Design: 12U wall mount form factor with dimensions of 24.25" H x 21.65" W x 17.72" D. Maximum mounting depth is 14.2".
- Enhanced Security: Lockable glass front door and side panels prevent unauthorized access. The front door can be reversed to open from either the left or right.
- Easy Equipment Configuration: Features fully adjustable mounting rails with numbered U positions and square holes for straightforward equipment mounting.
- Durable Construction: Made of high-quality cold-rolled steel, supporting up to 110 lbs (50 kg).
- Optimized Cooling: Includes a built-in top cooling fan to increase airflow and prevent equipment overheating. Side ventilation holes further enhance temperature balance.
- Cable Management: Top and bottom punch-out panels allow for easy cable access and management.
- Compliance: PCI & HIPPA and EIA/ECA-310-E compliant.

Figure 2.1: Overview of cabinet features including cooling fan, cover panels, lockable door, side ventilation, and reversible front door.
3. Package Contents
Verify that all components listed below are present in your package. If any items are missing or damaged, please contact customer support.
- Server Cabinet Frame (unassembled)
- Glass Front Door
- Side Panels (2)
- Cooling Fan (1)
- Keys (2)
- 10-32 Screws (10)
- 10-32 Cage Nuts (10)
- Mounting Hole Drilling Template
- Assembly Hardware (various screws, nuts, washers)

Figure 3.1: Included components: instruction manual, cooling fan, keys, 10-32 screws, and 10-32 cage nuts.
4. Setup and Installation
Follow these steps for assembling and mounting your server cabinet.
4.1 Assembly
- Unpack all components and verify against the package contents list.
- Assemble the main frame of the cabinet using the provided screws and hardware. Ensure all connections are secure.
- Install the cooling fan into the designated slot on the top panel of the cabinet.
- Attach the front glass door. The door can be installed to open from either the left or right side by adjusting the hinges.
- Install the side panels. These are typically secured with latches or screws.
- Ensure the grounding stud is accessible for electrical safety.
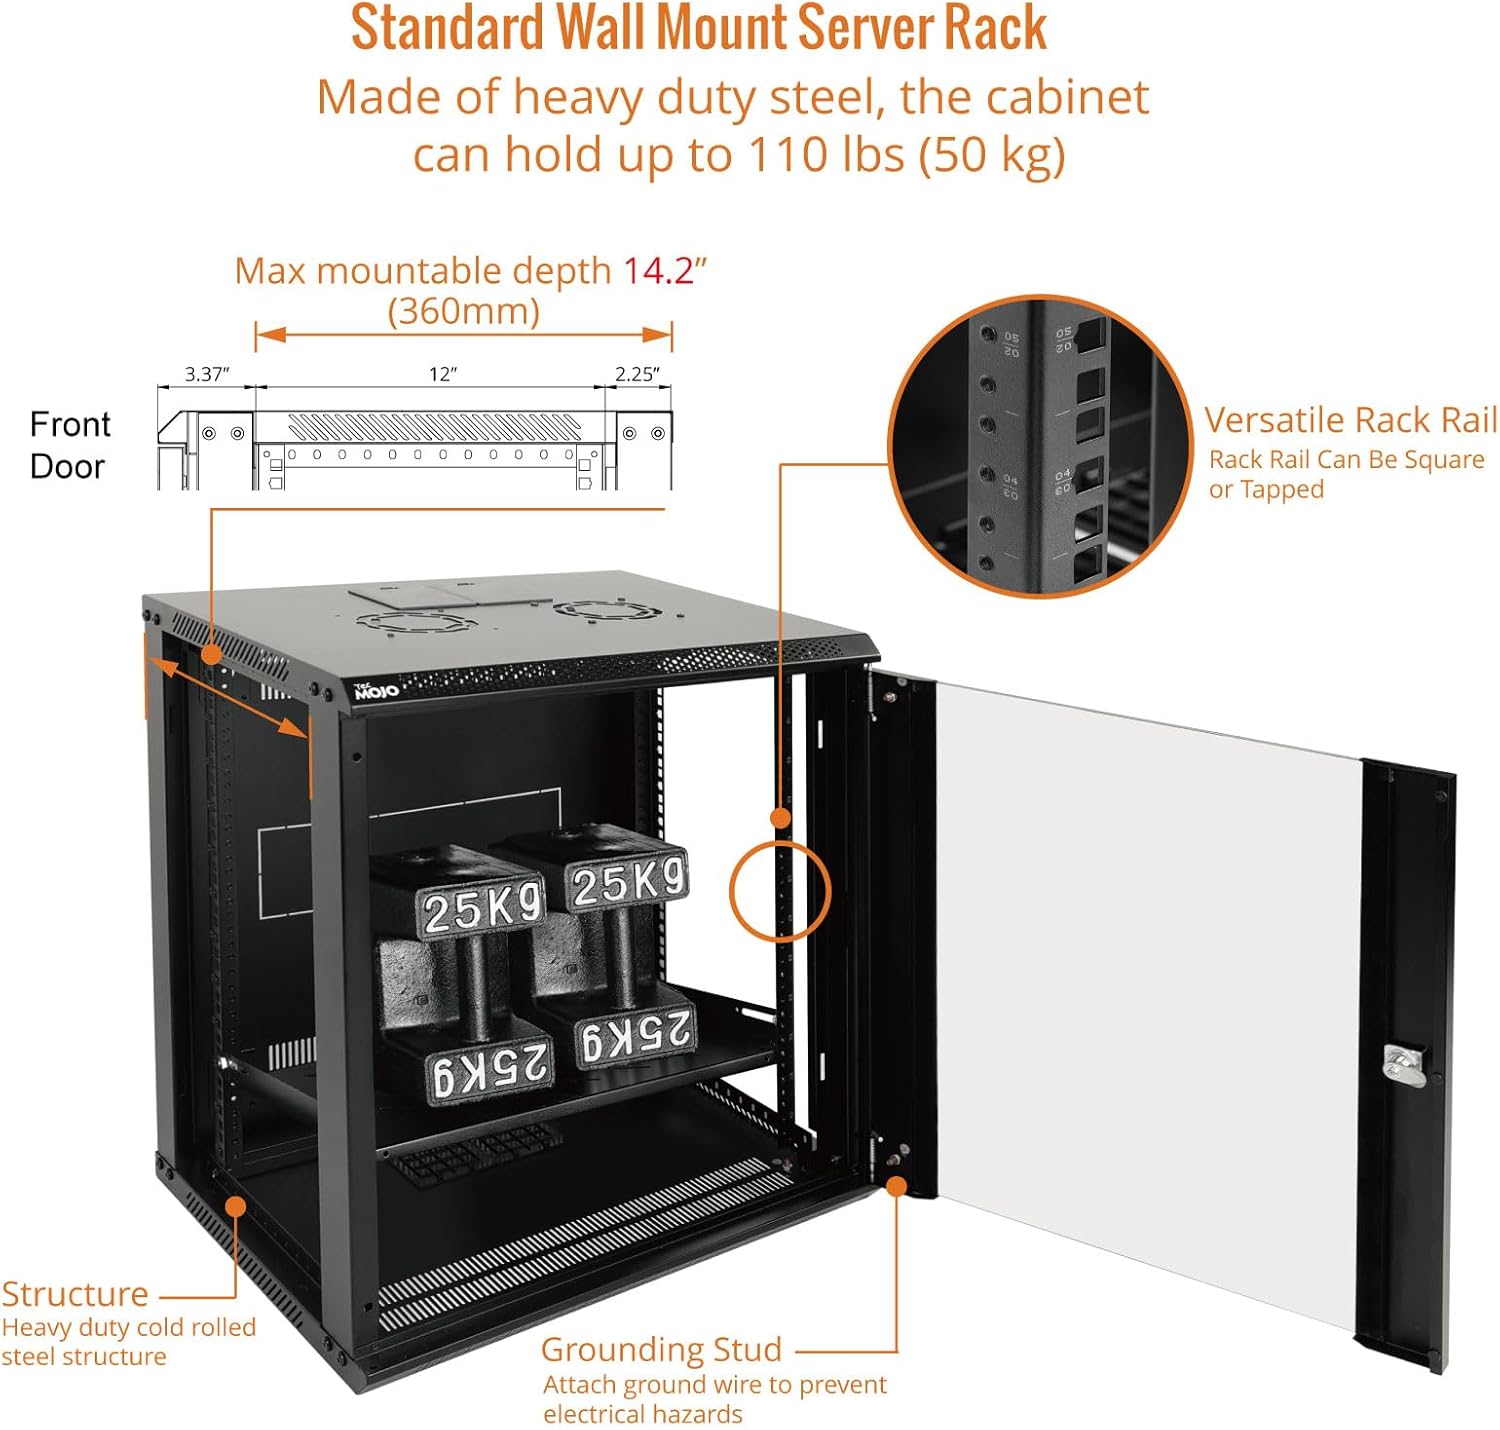
Figure 4.1: Cabinet structure with adjustable rack rails, maximum mountable depth of 14.2 inches (360mm), and grounding stud.
4.2 Wall Mounting
- Select Location: Choose a sturdy wall location capable of supporting the cabinet and its contents. Ensure there is sufficient space for door swing and cable access.
- Use Template: Utilize the included mounting hole drilling template to mark the drilling points on the wall. The mounting holes are 16 inches apart to accommodate standard stud placement.
- Drill Holes: Drill pilot holes at the marked locations. Use appropriate drill bits for your wall material (e.g., wood studs, concrete).
- Secure Cabinet: Lift the assembled cabinet and align its wall mount holes with the drilled holes. Secure the cabinet to the wall using appropriate mounting hardware (not included, as wall types vary). Ensure the cabinet is level and firmly attached.
- Cable Management: Remove the top or bottom punch-out panels as needed for cable routing.

Figure 4.2: Mounting hole guide showing 16-inch spacing for stud placement and the included drilling template.
5. Operating Instructions
The Tecmojo 12U Wall Mount Server Cabinet is designed for passive operation, providing a secure and organized environment for your IT equipment. Proper use involves:
- Equipment Installation: Install your 19-inch rack-mountable equipment using the provided 10-32 screws and cage nuts. Ensure equipment is evenly distributed to maintain balance and prevent excessive strain on the cabinet.
- Cable Routing: Utilize the top and bottom cable entry points to route cables neatly. This helps maintain airflow and prevents cable damage.
- Security: Always lock the front glass door and side panels to prevent unauthorized access to your critical network equipment.
- Cooling: The integrated top fan will operate to draw warm air out of the cabinet, promoting airflow. Ensure the fan is connected to a power source if it requires external power. Do not obstruct the side ventilation holes.
- Access: The removable side panels allow for easy access to equipment during installation or maintenance.
6. Maintenance
Regular maintenance ensures the longevity and optimal performance of your server cabinet.
- Cleaning: Periodically clean the exterior surfaces with a soft, damp cloth. Avoid abrasive cleaners. For the glass door, use a standard glass cleaner.
- Fan Inspection: Check the cooling fan periodically for dust accumulation. Clean the fan blades gently with compressed air or a soft brush to ensure efficient operation.
- Hardware Check: Annually inspect all mounting hardware and internal screws to ensure they remain tight and secure. Retighten if necessary.
- Lock Mechanism: Lubricate the lock mechanism with a small amount of graphite or silicone spray if it becomes stiff.
- Weight Distribution: Verify that equipment weight is still evenly distributed and within the cabinet's capacity.
7. Troubleshooting
This section addresses common issues you might encounter with your server cabinet.
7.1 Cabinet Stability Issues
- Issue: Cabinet appears to sag or is not level after installation.
- Solution: Ensure the wall mounting hardware is appropriate for the wall type and securely fastened. Verify that the total weight of the equipment does not exceed the 110 lbs (50 kg) capacity. Re-check that all assembly screws are tightened.
7.2 Cooling Fan Noise
- Issue: The cooling fan produces excessive noise.
- Solution: Inspect the fan for dust buildup and clean it. Ensure no cables or other objects are obstructing the fan blades. If the noise persists and is disruptive, consider replacing the fan.
7.3 Door/Panel Alignment
- Issue: The front door or side panels do not close or align properly.
- Solution: Check if the cabinet frame is square and level. Adjust hinges on the front door if necessary. Ensure side panels are correctly seated in their grooves before attempting to latch or screw them.
8. Specifications
| Attribute | Detail |
|---|---|
| Model | 12U Wall Mount Server Cabinet |
| Product Dimensions (D x W x H) | 17.7" x 21.7" x 24.3" (450mm D x 550mm W x 616mm H) |
| Maximum Mounting Depth | 14.2" (360mm) |
| Item Weight | 40.9 pounds |
| Weight Capacity | 110 lbs (50 kg) |
| Material | Alloy Steel |
| Door Type | Glass, Lockable, Reversible |
| Color | Black |
| Compliance | EIA/ECA-310-E |

Figure 8.1: Detailed specifications and dimensions of the 12U Wall Mount Server Cabinet.
9. Warranty and Support
Tecmojo products are manufactured to high-quality standards. For specific warranty details, please refer to the warranty card included with your product or visit the official Tecmojo website.
For technical support, troubleshooting assistance, or to inquire about replacement parts, please contact Tecmojo customer service through the official brand store:


