1. Important Safety Information
Please read this manual carefully before using your TILLELOT Voopoo Argus P1 Pod Kit. Keep it for future reference.
- This product is intended for adult use only. Age verification is required on delivery.
- Keep this product out of the reach of children and pets.
- The device contains a built-in lithium battery. Do not expose to extreme temperatures, direct sunlight, or water.
- Use only the provided charging cable and a compatible power adapter.
- The pod cartridge has a 2ml capacity. Do not overfill.
- While this kit is sold without nicotine, the health warning "This product contains nicotine which is a highly addictive substance" applies only when the device is used with nicotine-containing e-liquids.
2. Product Overview
The TILLELOT Voopoo Argus P1 Pod Kit is a compact and efficient pod system designed for ease of use and consistent performance. It features a futuristic mechanical style with a transparent section showcasing internal components.

Image 2.1: The TILLELOT Voopoo Argus P1 Pod Kit, showcasing its silver finish and transparent design elements.
Key Features:
- Built-in 800mAh Battery: Provides reliable power for extended use.
- 20W Max Output: Delivers consistent vapor production.
- Type-C Fast Charging: Reaches 80% charge in 12 minutes and 100% in 18 minutes.
- 2ml Pod Cartridge Capacity: Complies with TPD regulations.
- Adjustable Airflow: Allows customization from tight to loose draw.
- ITO Atomization Technology: Enhances flavor delivery.
- Patented Leakage-Proof Design: Minimizes e-liquid leakage.
- Automatic Power Adjustment: Optimizes power output for energy efficiency and battery longevity.

Image 2.2: Visual representation of the Argus P1's core features, including its charging capabilities, intelligent power adjustment, and design elements.
3. Setup
3.1. Initial Charging
Before first use, fully charge the device. The Argus P1 supports fast charging via its Type-C port.
- Connect the Type-C charging cable to the charging port located on the device.
- Connect the other end of the cable to a suitable USB power adapter (not included).
- The LED indicators on the device will illuminate to show charging status.
- Charging typically takes approximately 12 minutes to reach 80% and 18 minutes for a full 100% charge.

Image 3.1: Fast charging feature of the Argus P1, highlighting quick charge times.
3.2. Filling the Pod Cartridge
The Argus P1 uses refillable 2ml pod cartridges. Ensure the pod is properly filled before use.
- Remove the pod cartridge from the device by gently pulling it upwards.
- Locate the silicone stopper on the side of the pod.
- Lift the silicone stopper to reveal the filling port.
- Insert the nozzle of your e-liquid bottle into the filling port and slowly fill the pod. Do not overfill.
- Securely close the silicone stopper to prevent leaks.
- Important: If using a new pod, allow it to stand for 5-10 minutes after filling to ensure the coil is fully saturated with e-liquid. This prevents dry hits and extends coil life.
3.3. Installing the Pod Cartridge
After filling, re-install the pod into the device.
- Align the filled pod cartridge with the pod slot on the device.
- Gently push the pod downwards until it clicks securely into place. The magnets will hold it firmly.
4. Operating Instructions
4.1. Vaping
The Argus P1 is an auto-draw device, meaning there are no buttons to press for activation.
- Simply place the mouthpiece to your lips and inhale to activate the device and produce vapor.
- The device automatically adjusts the matching power to optimize your vaping experience and conserve battery life.
4.2. Airflow Adjustment
Customize your draw preference using the adjustable airflow slider.
- Locate the airflow adjustment slider on the side of the device.
- Slide it up or down to increase or decrease the airflow.
- A tighter airflow provides a more restricted, mouth-to-lung (MTL) draw, while a looser airflow offers a more open, restricted direct-to-lung (RDTL) experience.
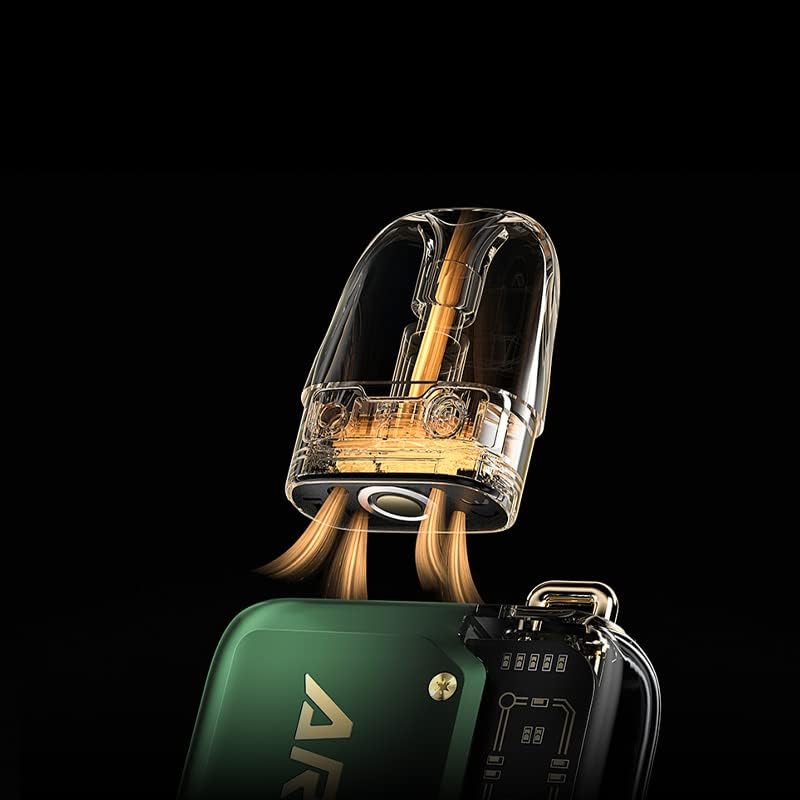
Image 4.1: The pod cartridge and its interaction with the device's airflow system.
4.3. Battery Level Indication
The transparent section of the device features four small LEDs that indicate the battery charge level and the draw amount.
- The number of illuminated LEDs corresponds to the remaining battery charge.
- During charging, the LEDs will progressively light up until fully charged.

Image 4.2: The internal 800mAh battery and its charging status indication.
5. Maintenance
5.1. Cleaning the Device
Regular cleaning helps maintain optimal performance and hygiene.
- Wipe the exterior of the device with a soft, dry cloth.
- If any e-liquid condensation accumulates in the pod slot, gently wipe it with a cotton swab or tissue.
- Ensure the charging port is free from dust and debris.
- Do not use harsh chemicals or abrasive cleaners.
5.2. Pod Cartridge Replacement
The pod cartridge contains a built-in coil that will eventually need replacement. You will notice a decrease in flavor or vapor production, or a burnt taste, when it's time to replace the pod.
- Remove the old pod cartridge from the device.
- Dispose of the old pod responsibly.
- Fill a new Argus Pod Cartridge (0.7Ω or 1.2Ω) with your preferred e-liquid as described in Section 3.2.
- Allow the new pod to sit for 5-10 minutes after filling to ensure proper saturation.
- Insert the new pod into the device until it clicks into place.
6. Troubleshooting
If you encounter issues with your Argus P1, refer to the following common problems and solutions:
| Problem | Possible Cause | Solution |
|---|---|---|
| No vapor production |
|
|
| Burnt taste |
|
|
| Leaking from pod |
|
|
| Device not charging |
|
|
7. Specifications
| Feature | Detail |
|---|---|
| Brand | TILLELOT |
| Model | Argus P1 |
| Battery Capacity | Built-in 800mAh |
| Max Wattage Output | 20W |
| Charging Port | Type-C |
| Fast Charging | 80% in 12 minutes, 100% in 18 minutes |
| Pod Cartridge Capacity | 2ml |
| Compatible Pods | Argus Pod Cartridge 0.7Ω / 1.2Ω |
| Airflow | Adjustable (sideway slider) |
| Filling System | Side-filling |
| Special Features | ITO Atomization Technology, Patented Leakage-Proof Design, Automatic Power Adjustment |
| Included Components | Battery (device) |
8. Warranty and Support
For warranty information and customer support, please refer to the packaging or contact the retailer where you purchased the TILLELOT Voopoo Argus P1 Pod Kit.
You may also visit the official TILLELOT brand store for additional resources and contact options: TILLELOT Store on Amazon.