
1. Important Safety Instructions
Always observe basic safety precautions when using electrical tools to reduce the risk of fire, electric shock, and personal injury. Read and understand all instructions before operating this tool.
General Power Tool Safety
- Work Area Safety: Keep the work area clean and well-lit. Cluttered or dark areas invite accidents. Do not operate power tools in explosive atmospheres, such as in the presence of flammable liquids, gases, or dust.
- Electrical Safety: Power tool plugs must match the outlet. Never modify the plug in any way. Do not use any adapter plugs with earthed (grounded) power tools. Avoid body contact with earthed or grounded surfaces such as pipes, radiators, ranges, and refrigerators.
- Personal Safety: Always wear eye protection. Use hearing protection when operating for extended periods. Dress properly; do not wear loose clothing or jewelry. Keep hair, clothing, and gloves away from moving parts.
- Tool Use and Care: Do not force the power tool. Use the correct power tool for your application. Disconnect the plug from the power source before making any adjustments, changing accessories, or storing power tools.
Polisher Specific Safety
- Ensure the backing plate and polishing pad are securely attached before operation.
- Do not apply excessive pressure, especially at lower speeds, as this can cause the machine to stop and potentially damage the motor or surface.
- Keep hands and fingers clear of the rotating pad during operation.
- Always hold the polisher firmly with both hands to maintain control.
- Allow the polisher to cool down during extended use to prevent overheating.
2. Product Overview
Package Contents
The AOBEN AT3501-7 Car Buffer Polisher package includes the following items:
- 1 x AOBEN Car Polisher (Model AT3501-7)
- 1 x 6-inch Polishing Disc (Backing Plate)
- 3 x 6.5-inch Foam Pads (various densities)
- 1 x Synthetic Wool Polishing Pad
- 1 x Wrench
- 1 x User Manual

Image: The AOBEN AT3501-7 Car Buffer Polisher shown with its complete set of accessories, including foam pads, a wool pad, and a wrench.
Key Features and Components
Familiarize yourself with the main parts and features of your polisher:
- Dual Action Random Orbital Motion: Provides a swirl-free finish by preventing concentrated heat buildup.
- 6-Inch Polishing Disc: Standard size for various detailing tasks.
- 6 Variable Speed Settings (1000-4500 RPM): Allows precise control for different materials and applications.
- Detachable Handle: Can be fixed on either side for ergonomic use and reduced fatigue.
- Ergonomic Design: Features a comfortable hand grip and a plastic head shell for heat insulation.
- 700W Motor: Provides sufficient power for polishing, waxing, and sanding.
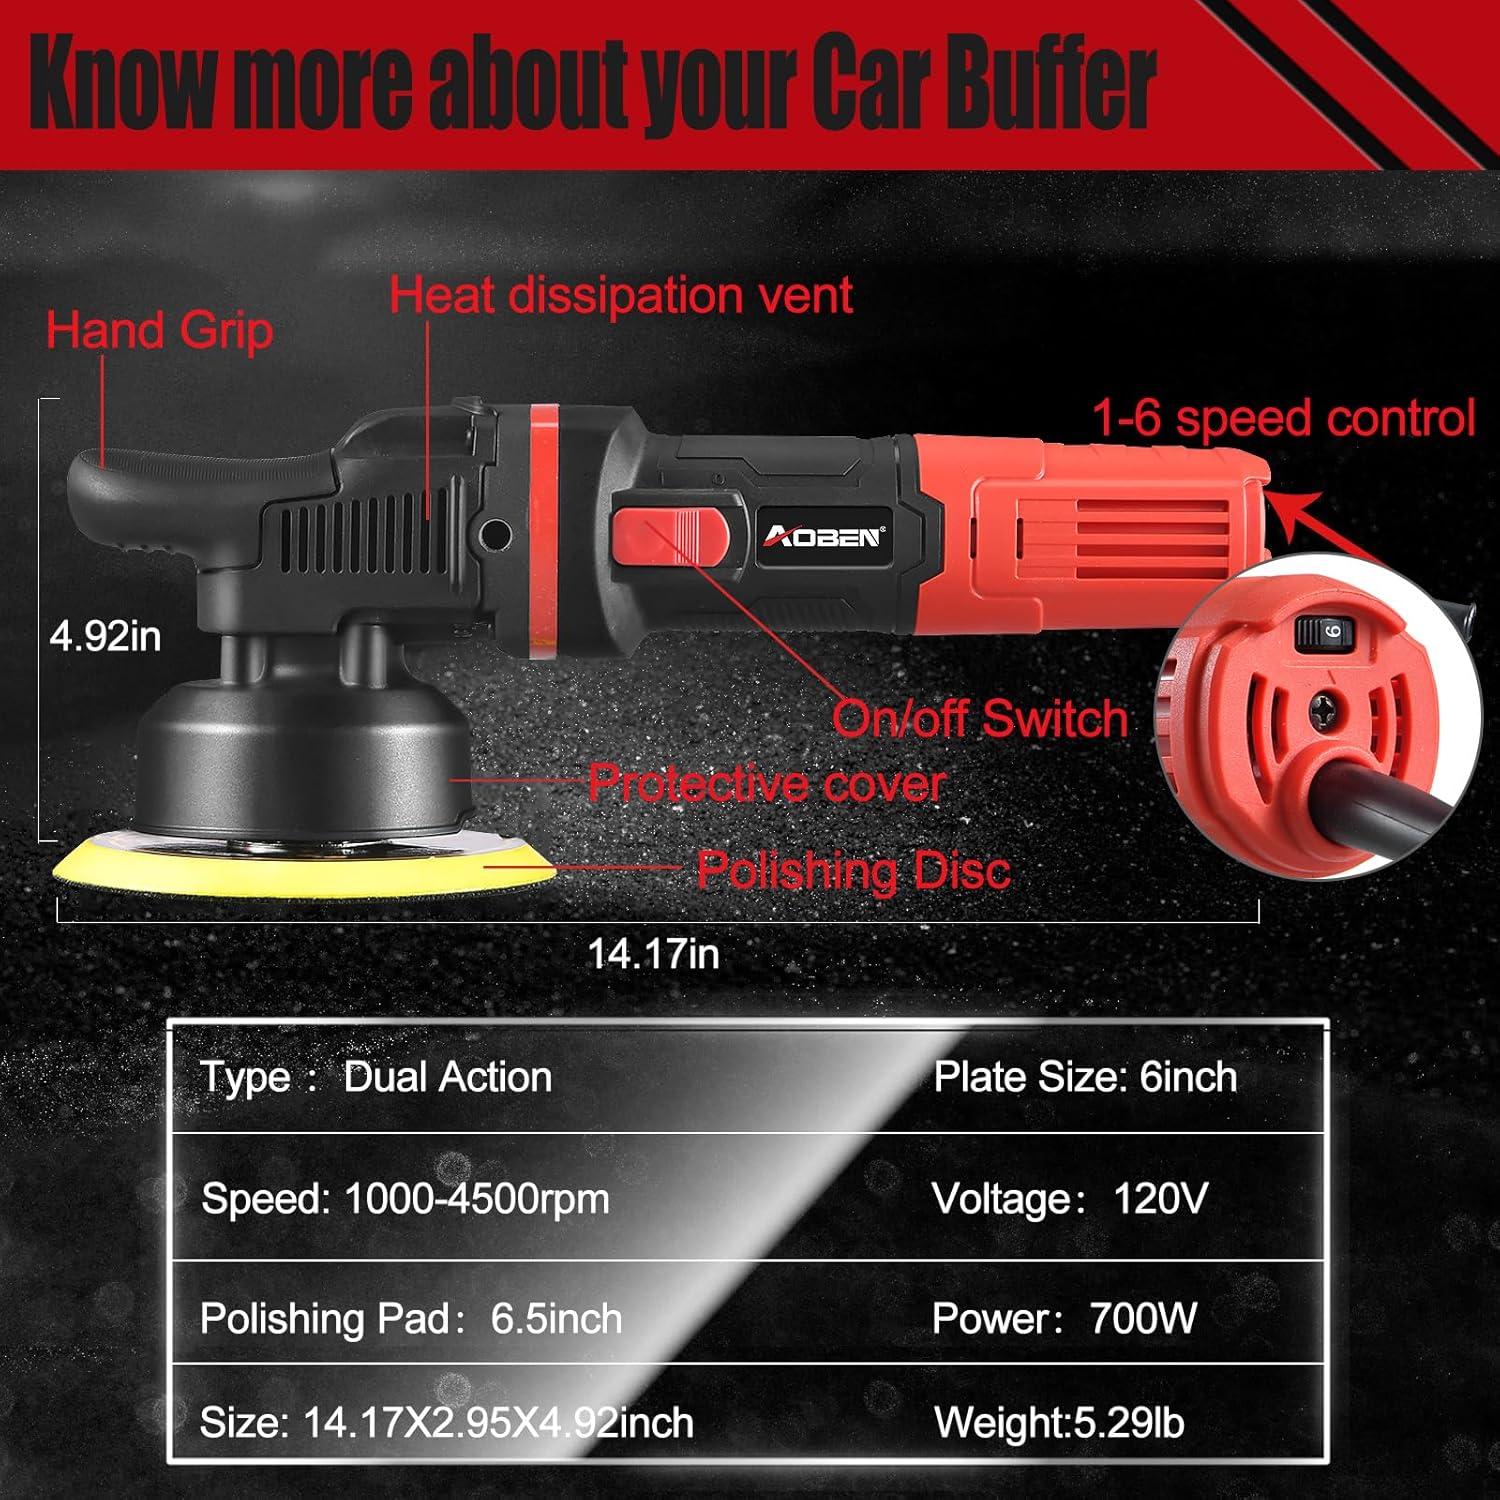
Image: A detailed diagram illustrating the components of the AOBEN polisher, including the hand grip, heat dissipation vent, on/off switch, 1-6 speed control, protective cover, and polishing disc. Key specifications are also listed.
3. Setup and Assembly
Attaching the Detachable Handle
The auxiliary handle can be attached to either side of the polisher head to suit your preference and improve control.
- Identify the threaded holes on both sides of the polisher's head.
- Screw the detachable handle into the desired threaded hole until it is securely fastened.

Image: This illustration demonstrates the flexibility of the detachable handle, showing how it can be securely attached to either the right or left side of the polisher for user comfort and control.
Installing the Backing Plate and Pads
Follow these steps to correctly install the backing plate and attach the polishing pads:
- Attach the Backing Plate: The backing plate cannot be rotated onto the polisher by hand. Use the provided wrench to securely fasten the 6-inch polishing disc (backing plate) to the polisher's spindle. Ensure it is tightened properly to prevent detachment during operation.
- Attach the Foam/Wool Pad: The polishing pads (foam or wool) attach to the backing plate via a hook-and-loop (Velcro-style) system. Align the pad with the backing plate and press firmly to secure it.

Image: A four-panel guide demonstrating the correct method for attaching the backing plate using a wrench and subsequently securing a foam pad to the backing plate.
4. Operating Instructions
Power and Speed Control
The polisher features a 6-speed variable control dial, allowing you to adjust the RPM from 1000 to 4500 to match the task and material.
- On/Off Switch: Located on the top of the polisher, press to turn the tool on or off.
- Speed Dial: Rotate the dial to select the desired speed setting (1-6).

Image: A close-up view of the 6-variable speed control dial, indicating recommended speed ranges for different applications such as waxing, buffing, polishing, cleaning, and removing paint defects or oxidation.
Recommended Speed Settings
| Speed Setting | RPM Range | Application |
|---|---|---|
| 1-2 | 1000-2000 RPM | Waxing and Buffing |
| 3-4 | 2000-3500 RPM | Polishing and Cleaning |
| 5-6 | 3500-4500 RPM | Removing Paint Defects and Oxidation |
Application Guidelines
This polisher is suitable for various tasks including car detailing, polishing, waxing, and sealing glaze. It can also be used on boats, furniture, pianos, flooring, and metal objects.
- Prepare the Surface: Ensure the surface is clean and dry before applying any compounds or waxes.
- Apply Product: Apply a small amount of polishing compound or wax directly to the pad or the surface area to be worked on.
- Start Polishing: Place the pad flat on the surface before turning the polisher on. Start at a low speed and gradually increase as needed. Move the polisher in a consistent back-and-forth or cross-hatch pattern, overlapping each pass.
- Work in Sections: Work on small sections at a time (e.g., 2x2 feet) to ensure even coverage and optimal results.
- Remove Residue: After polishing, turn off the tool, lift it from the surface, and wipe away any residue with a clean microfiber towel.

Image: A visual guide demonstrating the four key steps of the car polishing process: washing and drying the car, applying polishing wax, using the polisher in a back-and-forth motion to remove defects, and finally removing residue with a microfiber towel.
Holding Positions
The ergonomic design allows for multiple comfortable holding positions to reduce fatigue during extended use.

Image: Three different images illustrating various ergonomic ways to hold the AOBEN polisher, showcasing flexibility for user comfort and control during operation.
5. Maintenance
Cleaning the Polisher
- Always disconnect the polisher from the power source before cleaning.
- Wipe the exterior of the tool with a clean, damp cloth. Do not use harsh chemicals or abrasive cleaners.
- Ensure the heat dissipation vents are clear of dust and debris to maintain proper airflow and prevent overheating.
Pad Care
- Clean polishing pads immediately after use to prevent product buildup from hardening.
- Foam pads can be washed with warm water and a mild detergent, then rinsed thoroughly and air-dried.
- Wool pads may require specialized cleaning solutions.
- Ensure pads are completely dry before storage or next use.
Storage
- Store the polisher and its accessories in a clean, dry place, away from direct sunlight and extreme temperatures.
- Keep out of reach of children.
6. Troubleshooting
Common Issues
- Polisher stops when excessive pressure is applied (Speed 1-3): This is a normal safety feature of dual-action polishers at lower speeds. If more power is needed for the task, restart the polisher and select a higher speed setting (4-6).
- Poor polishing results: Ensure the correct pad and compound are being used for the specific task. Verify that the pad is clean and not saturated with old product. Adjust speed settings as necessary.
- Excessive vibration or noise: Check that the backing plate and pad are securely attached and not damaged. Ensure there are no loose components.
7. Specifications
| Specification | Value |
|---|---|
| Model Number | AT3501-7 |
| Power Source | Corded Electric |
| Voltage | 120 Volts |
| Maximum Power | 700 Watts |
| Speed | 1000-4500 RPM (6 Variable Speeds) |
| Polishing Disc Size | 6 inches |
| Polishing Pad Size | 6.5 inches |
| Item Weight | 6.79 Pounds (approx. 3.08 kg) |
| Cord Length | 9.8 Feet (approx. 3 meters) |
| Material | Plastic |
| Manufacturer | AOBEN |
8. Warranty and Support
Warranty Information
This AOBEN product comes with a 12-month warranty from the date of purchase. This warranty covers defects in materials and workmanship under normal use. Please retain your proof of purchase for warranty claims.
Customer Support
For technical assistance, warranty claims, or general inquiries, please contact AOBEN customer support. You can find more information and contact details by visiting the official AOBEN store: