Introduction
The Hamilton Beach® Artisan Dough & Bread Maker is designed to simplify the process of making homemade bread and dough. This appliance allows you to create a variety of baked goods with minimal effort, offering convenience and fresh results. Simply add your ingredients, select the desired cycle, and initiate the process to enjoy made-from-scratch bread.

Image: The Hamilton Beach Digital Electric Bread Maker Machine, showcasing its sleek black and stainless steel design.
Important Safety Information
Please read all instructions carefully before using this appliance to ensure safe operation and to prevent injury or damage. Keep this manual for future reference.
- Always unplug the bread maker from the outlet when not in use, before putting on or taking off parts, and before cleaning.
- Do not immerse the cord, plug, or bread maker in water or other liquid.
- Close supervision is necessary when any appliance is used by or near children.
- Avoid contact with moving parts.
- Do not operate any appliance with a damaged cord or plug, or after the appliance malfunctions or has been dropped or damaged in any manner.
- The use of accessory attachments not recommended by the appliance manufacturer may cause injuries.
- Do not use outdoors.
- Do not let cord hang over edge of table or counter, or touch hot surfaces.
- Do not place on or near a hot gas or electric burner, or in a heated oven.
- Extreme caution must be used when moving an appliance containing hot oil or other hot liquids.
- Do not use the appliance for other than intended use.
- To disconnect, turn any control to "off," then remove plug from wall outlet.
- Do not touch hot surfaces. Use handles or knobs.
Product Features
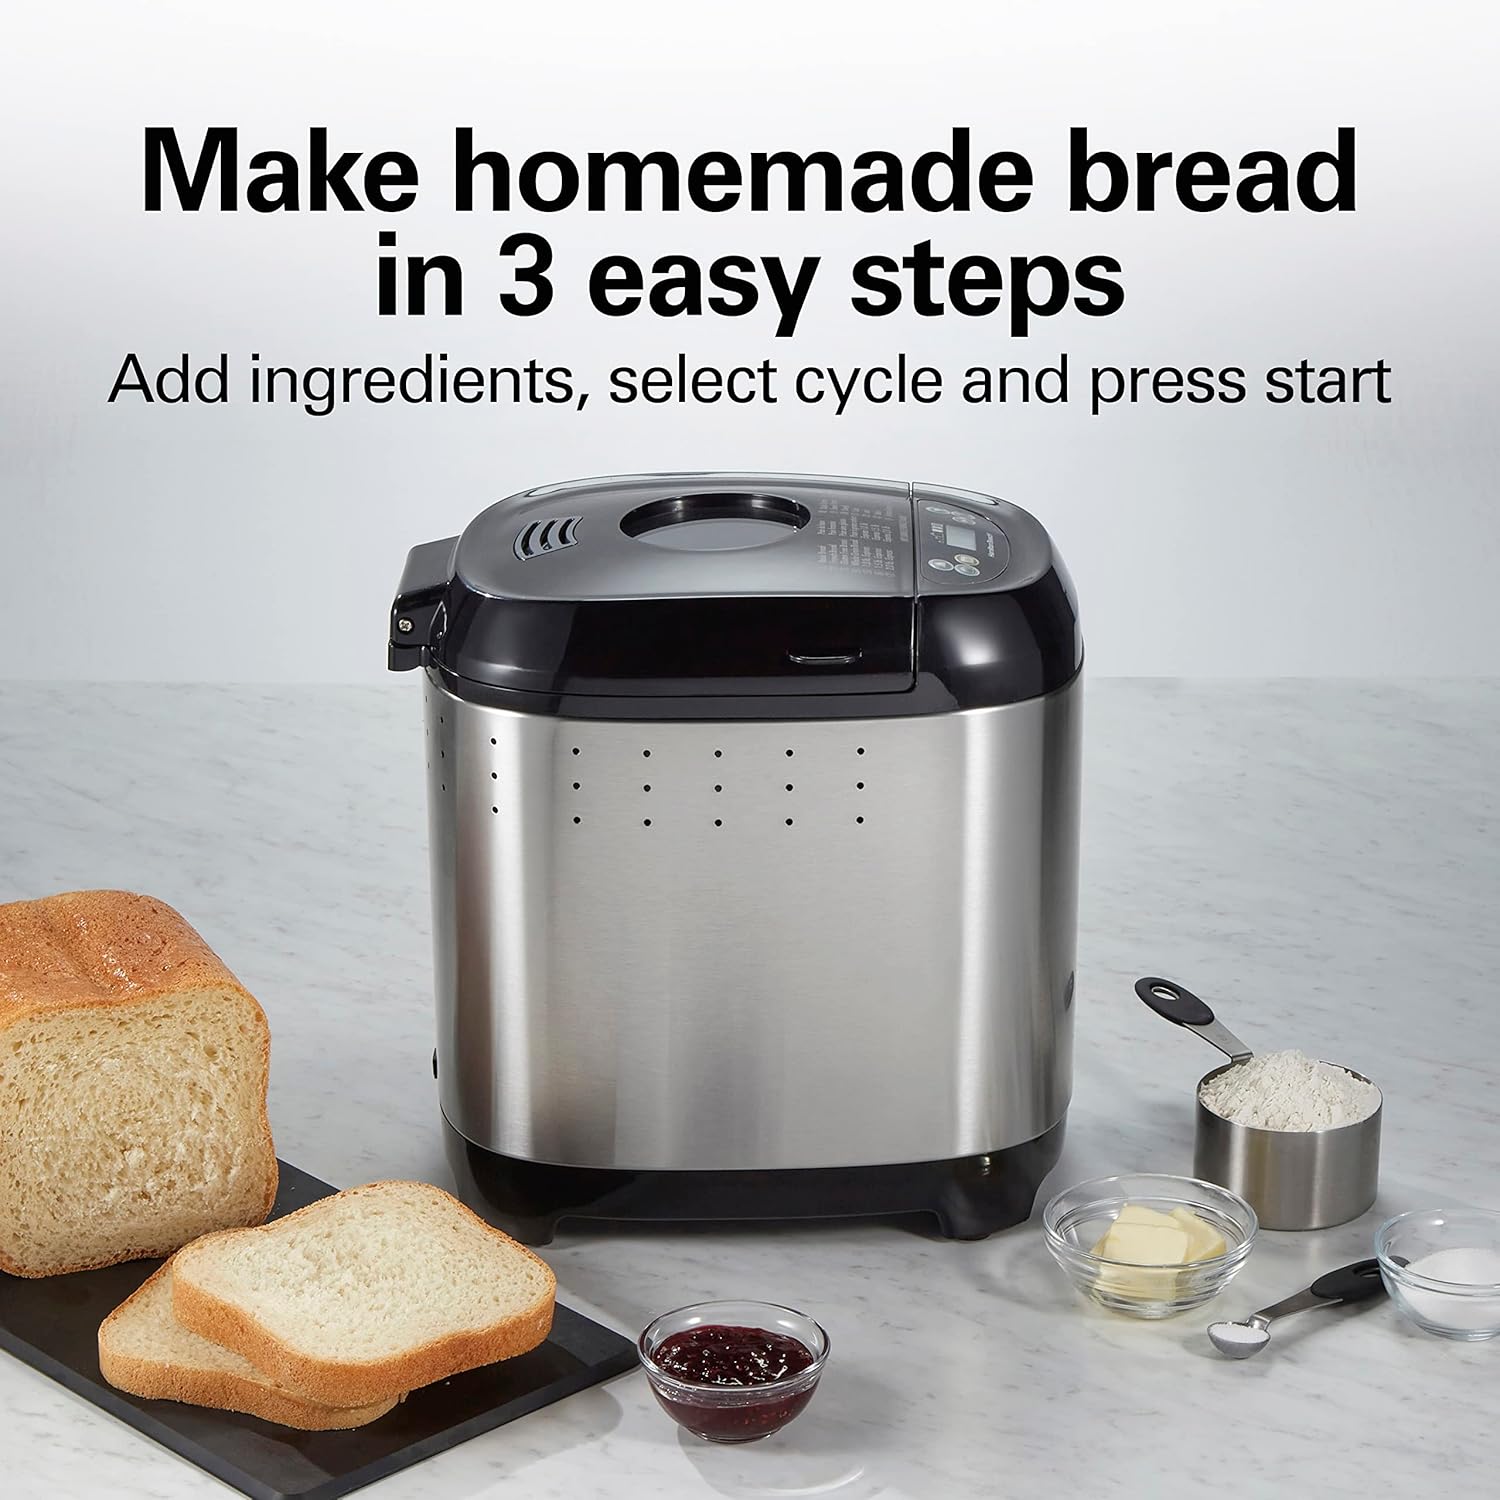
3 Easy Steps for Homemade Bread
Making fresh, homemade bread is simplified into three easy steps: just add ingredients to the bread machine, select the desired cycle, and press start. This streamlined process ensures a hassle-free baking experience.

14 Versatile Settings
The bread maker offers 14 distinct settings to accommodate a wide range of recipes. These include Basic, French, Gluten-Free, Whole Grain, 1 lb. Express, 1.5 lb. Express, 2 lb. Express, Package (Quick) Bread, Sweet, Dough, Cake, Jam Bake, and Artisan Dough. This variety allows for extensive culinary exploration.
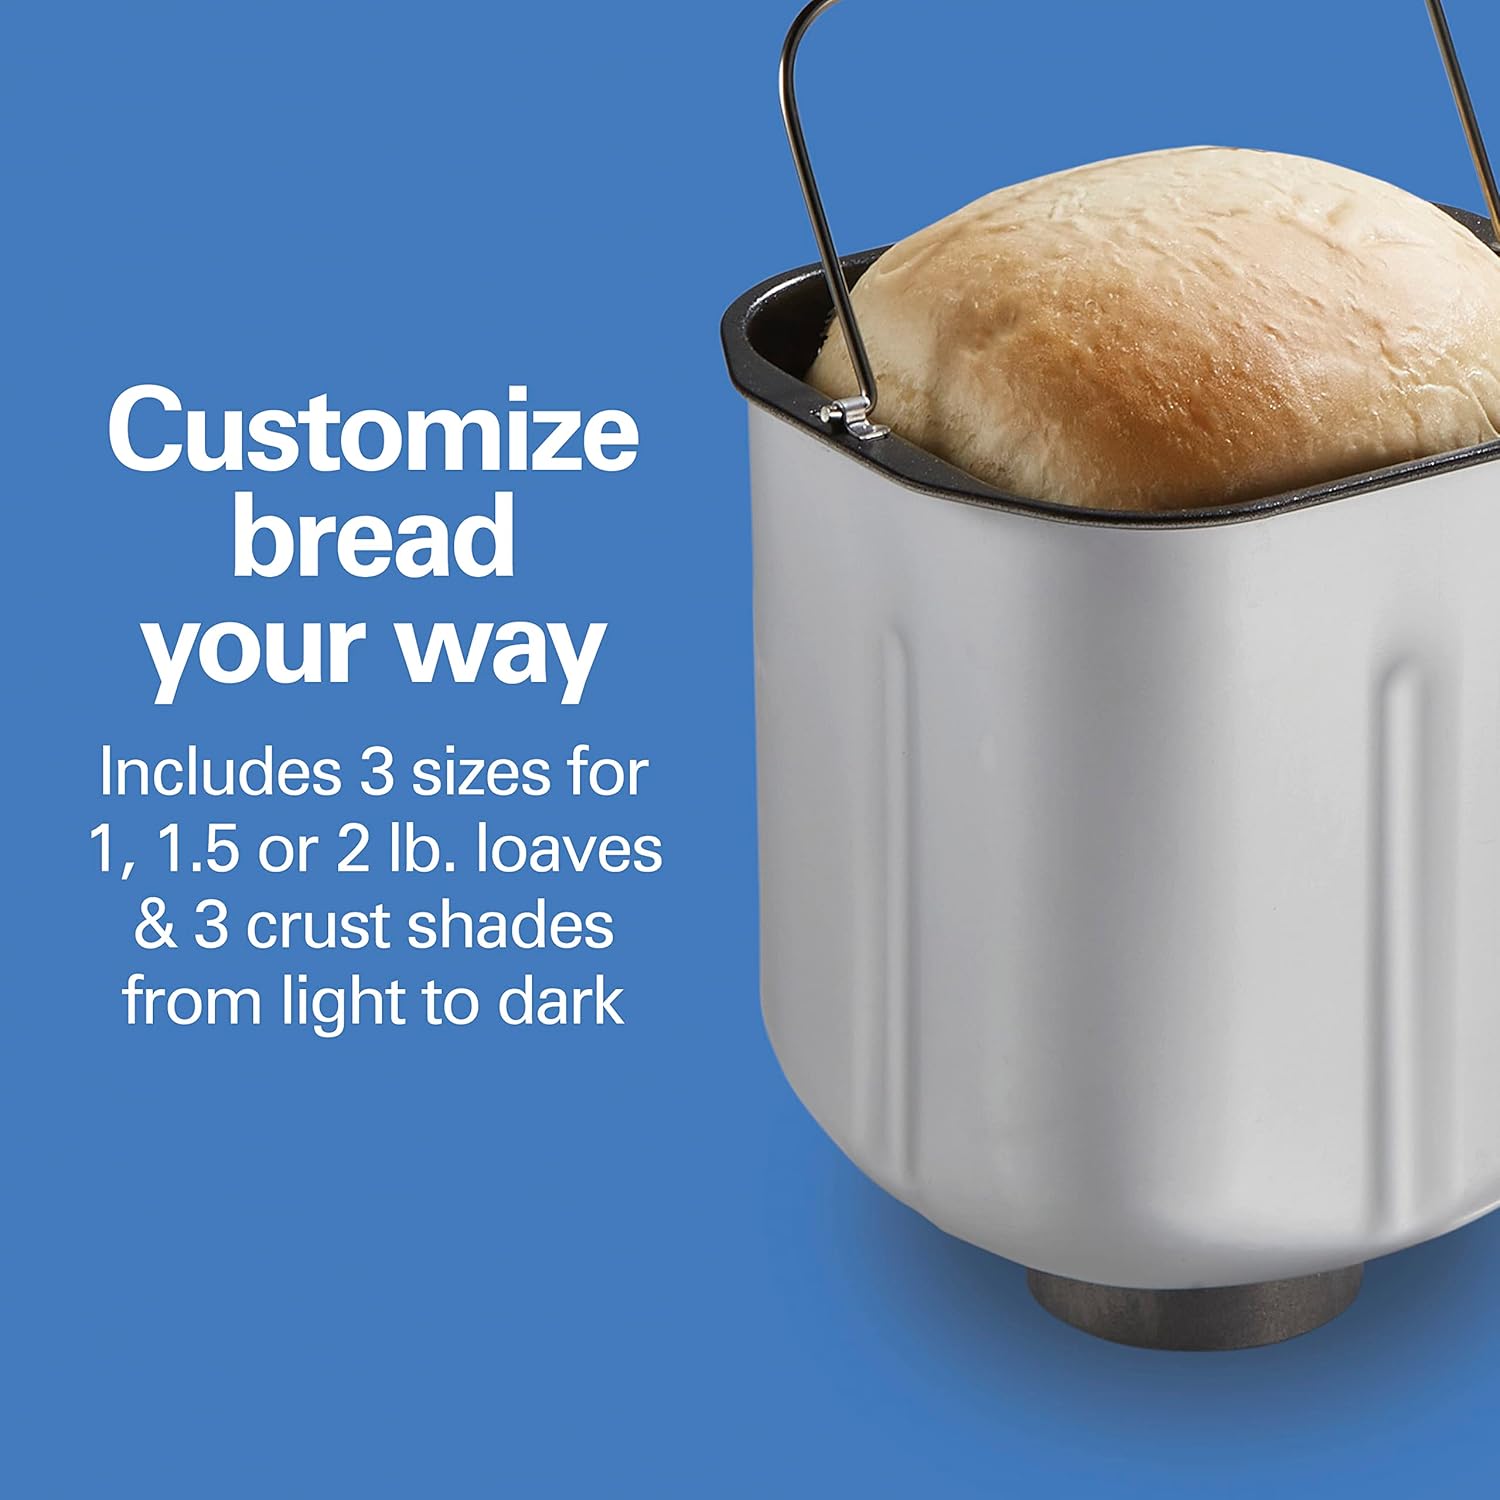
Customizable Loaf Sizes and Crust Shades
Tailor your bread to your preference with options for three loaf sizes: 1 lb., 1.5 lb., or 2 lb. Additionally, you can select from three crust shades—light, medium, or dark—to achieve the perfect texture and color for your bread.

Easy to Clean with Dishwasher-Safe Accessories
Cleanup is made simple with a removable nonstick bread pan and kneading paddle. These accessories are dishwasher safe, ensuring quick and easy maintenance after each use.

Convenient Delay Start Function
Utilize the convenient delay start feature to program the bread maker in advance. This allows you to set up your ingredients and have fresh, hot bread ready precisely when you desire it, perfect for breakfast or entertaining.
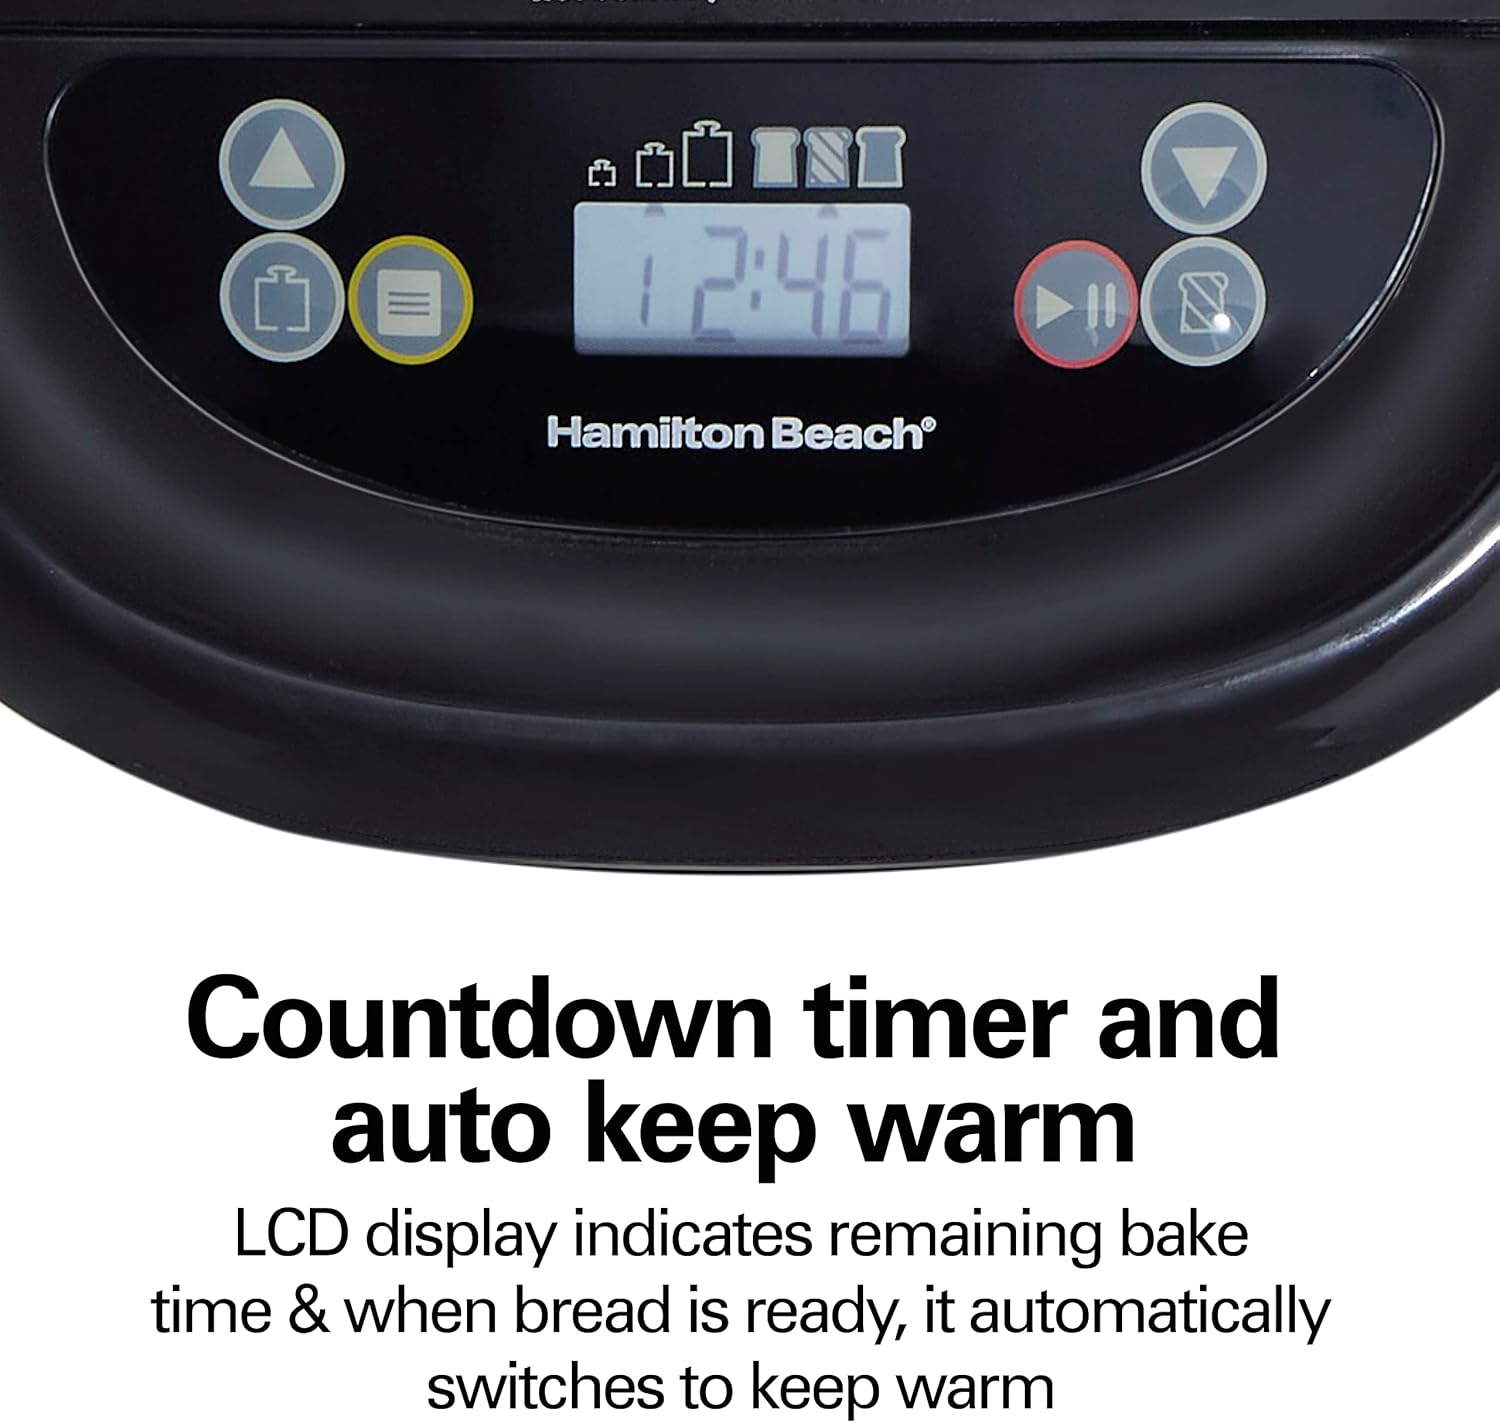
Countdown Timer and Auto Keep Warm
The integrated LCD display provides a countdown timer, indicating the remaining bake time. Once baking is complete, the machine automatically switches to a "keep warm" mode, ensuring your bread stays at an optimal serving temperature.
Setup Guide
- Unpacking: Carefully remove the bread maker and all accessories from the packaging. Ensure all packing materials, especially any styrofoam blocks located under the bread pan, are removed before first use.
- Initial Cleaning: Before first use, wash the bread pan, kneading paddle, measuring cup, and measuring spoon in warm, soapy water. Rinse thoroughly and dry completely. Wipe the exterior of the bread maker with a damp cloth.
- First Run (Odor Removal): It is recommended to run the bread maker empty for about 10 minutes on a bake cycle during its first use to eliminate any manufacturing odors. Ensure the area is well-ventilated.
- Placement: Place the bread maker on a stable, flat, heat-resistant surface, away from direct sunlight and heat sources. Ensure there is adequate ventilation around the unit. Consider placing it on a rubber mat to prevent movement during kneading cycles.
- Power Connection: Plug the bread maker into a grounded electrical outlet.
Operating Instructions
Basic Operation Steps:
- Add Ingredients: Place the kneading paddle onto the shaft inside the bread pan. Add ingredients to the bread pan in the order specified by your recipe (typically liquids first, then dry ingredients, with yeast last and separate from liquids/salt).
- Insert Bread Pan: Place the bread pan into the bread maker, ensuring it is securely locked in place. Close the lid.
- Select Program: Use the control panel to select your desired program (e.g., Basic, Gluten-Free, Dough). Refer to the program list for specific cycle details.
- Select Loaf Size and Crust Shade: Choose the appropriate loaf size (1 lb., 1.5 lb., or 2 lb.) and crust shade (light, medium, or dark) according to your recipe and preference.
- Start Cycle: Press the START/STOP button to begin the selected program. The display will show the remaining time.
- Monitoring (Optional but Recommended): During the kneading phase, especially for the first few uses or with new recipes, observe the dough consistency through the viewing window. If the dough appears too dry, add water one tablespoon at a time. If too wet, add flour one tablespoon at a time.
- Paddle Removal (Advanced): For loaves without a hole at the bottom, you may carefully remove the kneading paddle during the final rise cycle, typically before the last bake phase. This usually occurs around 1 hour and 40 minutes before the cycle ends. Use the provided paddle removal tool.
- Completion: Once the cycle is complete, the bread maker will beep and may switch to a "keep warm" function. Unplug the unit and carefully remove the bread pan using oven mitts.
- Cooling: Invert the bread pan to release the loaf onto a wire rack. Allow the bread to cool completely before slicing for best results.
Program Settings Overview:
| Program | Description | Typical Use |
|---|---|---|
| Basic | For white and mixed breads using basic bread ingredients. | Everyday sandwich bread. |
| French | For light breads made from fine flour. Typically has a crispier crust. | Baguettes, rustic loaves. |
| Gluten-Free | Specifically designed for gluten-free recipes. | Gluten-free bread. |
| Whole Grain | For breads using whole wheat flour or other whole grains. | Nutritious whole wheat bread. |
| Express (1 lb., 1.5 lb., 2 lb.) | Quick cycles for faster bread making. | When time is limited. |
| Package (Quick) Bread | For recipes using baking powder or soda, not yeast. | Muffins, quick breads. |
| Sweet | For breads with high sugar, fats, and proteins. | Brioche, cinnamon bread. |
| Dough | Prepares dough for baking in a conventional oven. No baking cycle. | Pizza dough, rolls, pastries. |
| Cake | Mixes and bakes cakes. | Various cake recipes. |
| Jam Bake | For making homemade jams and preserves. | Fruit jams. |
| Artisan Dough | Specialized cycle for artisan doughs, often with longer fermentation. | Sourdough, specialty bread doughs. |
Maintenance and Cleaning
Regular cleaning ensures the longevity and optimal performance of your bread maker.
- Before Cleaning: Always unplug the bread maker and allow it to cool completely before cleaning any part.
- Bread Pan and Kneading Paddle: The nonstick bread pan and kneading paddle are removable and dishwasher safe for convenient cleaning. For stubborn residue, soak them in warm, soapy water before washing. Rinse thoroughly and dry completely.
- Exterior: Wipe the exterior of the bread maker with a soft, damp cloth. Do not use abrasive cleaners or scouring pads, as they may damage the finish.
- Lid and Viewing Window: Clean the inside of the lid and the viewing window with a damp cloth. For any baked-on residue, a gentle, non-abrasive cleaner can be used. Ensure no water enters the internal components.
- Storage: Store the bread maker in a clean, dry place when not in use.
Troubleshooting
If you encounter issues with your bread maker, refer to the following common problems and their solutions:
| Problem | Possible Cause | Solution |
|---|---|---|
| Bread does not rise or rises poorly. | Expired yeast, incorrect water temperature, too much salt, or incorrect ingredient measurements. | Ensure yeast is fresh. Use lukewarm water (105-115°F / 40-46°C). Measure ingredients precisely. Add salt away from yeast. |
| Dough is too sticky or too dry. | Incorrect liquid to flour ratio. | During kneading, add 1 tablespoon of flour if too sticky, or 1 tablespoon of water if too dry, until dough forms a smooth ball. |
| Machine moves or "walks" during kneading. | Unstable surface or strong vibrations from kneading. | Place the bread maker on a stable, level surface. Consider using a non-slip mat underneath the unit to absorb vibrations. |
| Kneading paddle stuck in bread. | Paddle baked into the loaf. | Allow bread to cool slightly. Use the provided paddle removal tool to carefully extract the paddle. For future loaves, consider removing the paddle during the final rise cycle (refer to Operating Instructions). |
| Chemical smell during initial use. | Normal for new appliances due to manufacturing residues. | Run the bread maker empty for 10 minutes on a bake cycle in a well-ventilated area before first use with food. The smell should dissipate. |
| Machine overheats or stops working. | Continuous use without sufficient cooling time. | Unplug the unit and allow it to cool down completely (at least 30 minutes to an hour) before attempting to use it again. Avoid back-to-back cycles without a break. |
| Control panel display is hard to read. | Lack of backlighting. | Ensure adequate ambient lighting when operating the machine. |
Specifications
| Feature | Detail |
|---|---|
| Model Number | 29985 |
| Color | Black and Stainless Steel |
| Product Dimensions (D x W x H) | 13.98"D x 9.13"W x 11.89"H |
| Item Weight | 9.3 pounds |
| Brand | Hamilton Beach |
| Number of Programs | 14 |
| Product Care Instructions | Dishwasher Safe (for accessories) |
| UPC | 040094299850 |
| First Available Date | November 9, 2022 |
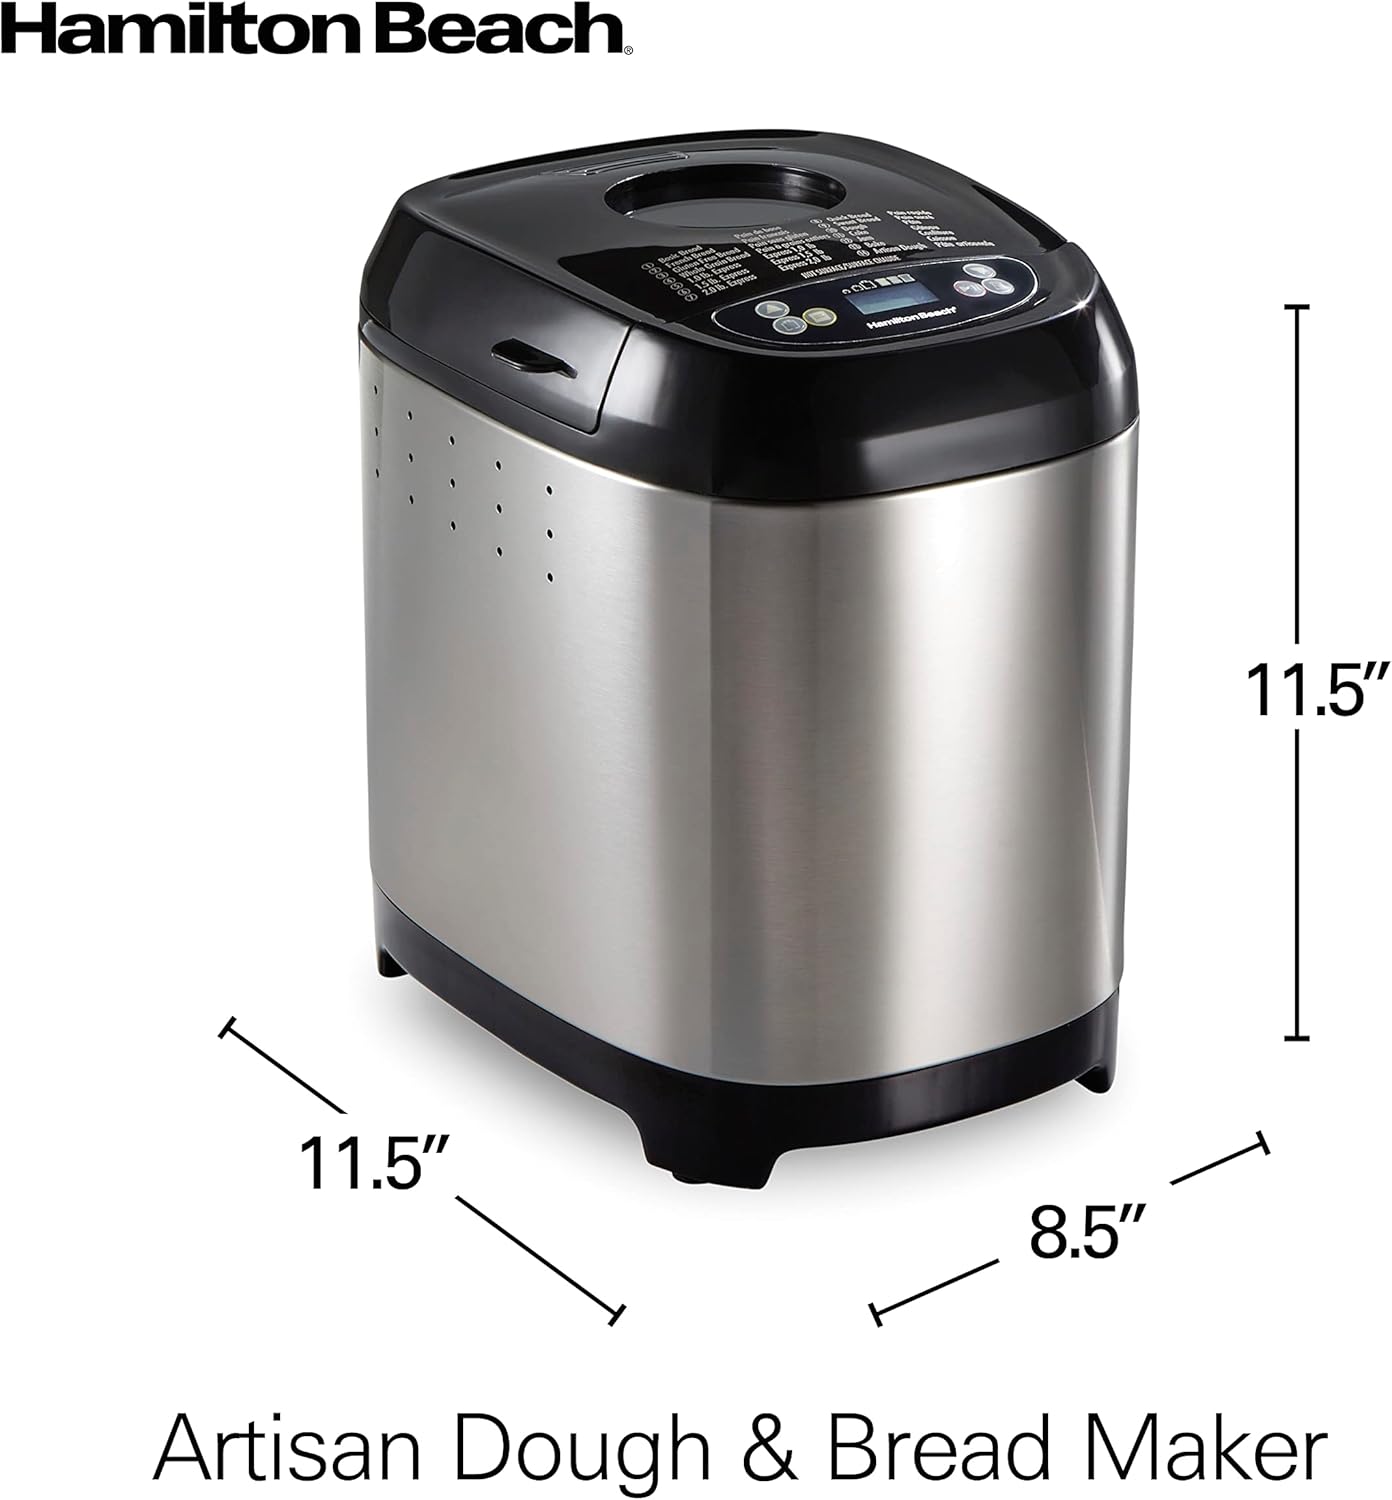
Image: Dimensional diagram of the Artisan Dough & Bread Maker, indicating its height, depth, and width.
Warranty and Support
For detailed warranty information and customer support, please refer to the official Hamilton Beach website or the warranty card included with your product. You can also access the official user manual for comprehensive guidance.
Official User Manual (PDF): Download Here
For further assistance, contact Hamilton Beach customer service through their official channels.


