1. Introduction
This manual provides detailed instructions for the installation, operation, and maintenance of your Tiskgg 2.8 Cu Ft Digital Home Safe Box. Please read this manual thoroughly before using the safe to ensure proper function and security. Keep this manual for future reference.

Image: The Tiskgg 2.8 Cu Ft Digital Home Safe Box, showcasing its spacious interior and electronic keypad.
2. Safety Information
To ensure safe operation and prevent unauthorized access, observe the following safety guidelines:
- Do not store the emergency keys inside the safe. Keep them in a secure, separate location.
- Do not share your digital codes with unauthorized individuals.
- Ensure the safe is securely mounted or placed to prevent removal.
- Regularly check battery levels to avoid being locked out.
- This safe is designed for security against theft and includes a fireproof document bag for limited fire protection. It is not a certified fireproof or waterproof safe for all contents.

Image: The safe is designed to secure items from unauthorized access, including children.
3. Package Contents
Verify that all items are present in the package:
- 1 x Tiskgg 2.8 Cu Ft Security Home Safe
- 1 x Fireproof Waterproof Document Bag (13.38" x 9.44" / 34 x 24 cm)
- 2 x Emergency Keys
- 1 x Emergency Battery Box
- 1 x Mounting Accessories (bolts)
- 1 x Instruction Manual
4. Product Overview
The Tiskgg 2.8 Cu Ft Digital Home Safe Box is constructed from alloy steel, featuring a robust design for enhanced security. It includes a digital keypad for programmable access codes, an emergency key override, and an external power supply option for battery failure. The interior is equipped with a removable shelf for organized storage.
Key Features:
- Pry-Resistant and Anti-Theft Design: Features a 78mm reinforced solid pry-resistant steel door, thickened 30mm triple high-strength solid core lock bolts, and dual anti-impact hinges.
- Digital Keypad: Programmable with up to 8-digit codes.
- Multiple Unlocking Methods: Digital code, emergency key, and external power supply with code.
- Alarm System: Activates after 3 incorrect entries.
- Silent Mode: Option to disable keypad sounds.
- Removable Shelf: For flexible interior organization.
- Fireproof Document Bag: Provides additional protection for sensitive documents.

Image: Overview of the safe's security features, including anti-prying, anti-drilling, and anti-theft design, alongside the included fireproof bag.

Image: Detailed view of the safe's robust construction, showing the 30mm lock bolts and 78mm door thickness.
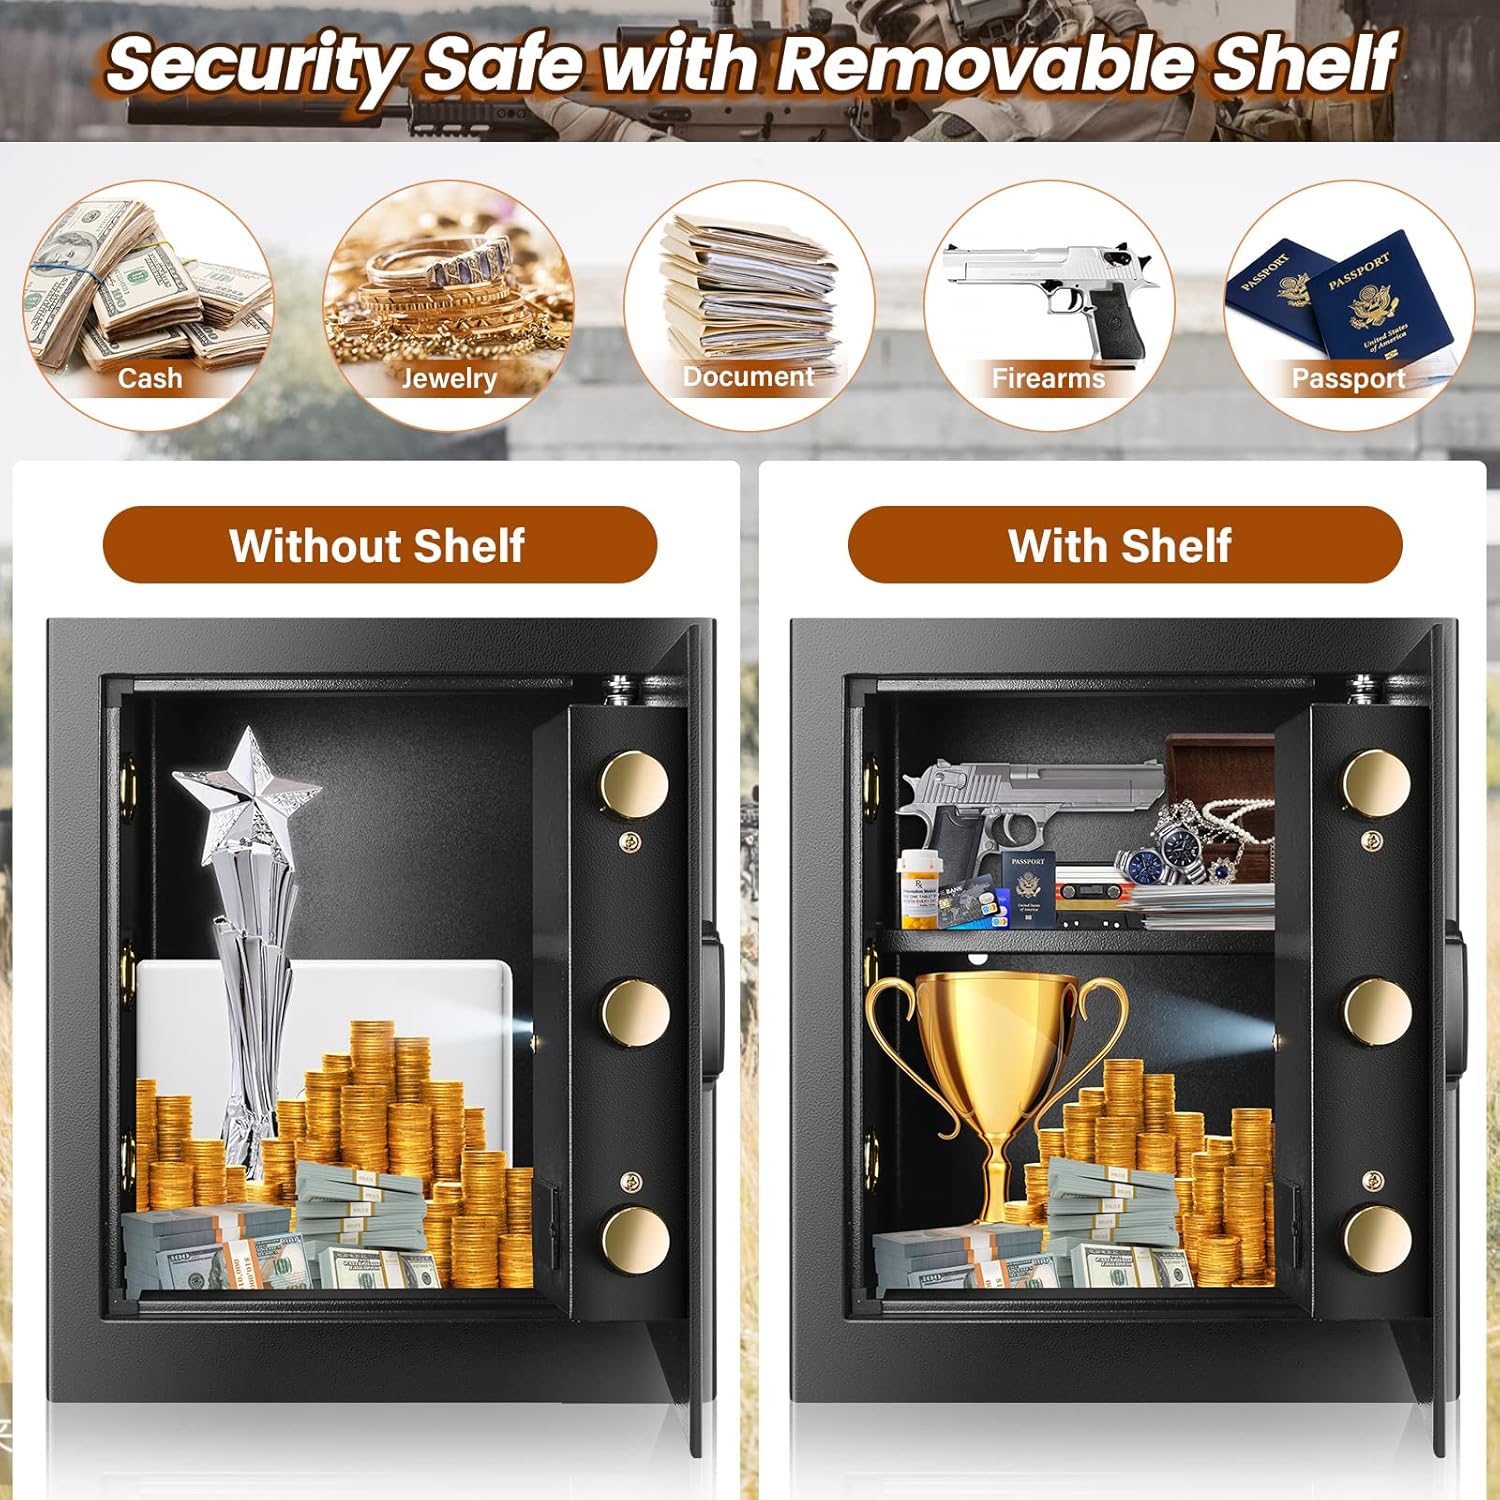
Image: The safe's interior, demonstrating storage capacity with and without the removable shelf for various valuables.
5. Setup
5.1. Battery Installation
- Locate the battery compartment on the inside of the safe door.
- Insert 4 AA batteries (not included) according to the polarity indicators.
- Close the battery compartment cover.
5.2. Initial Opening and Code Setting
Upon first use, open the safe using the emergency key:
- Insert the emergency key into the keyhole, usually located behind the keypad cover.
- Turn the key clockwise while simultaneously turning the knob clockwise to open the door.
- With the door open, press the red reset button located on the inside of the door. The keypad will beep, and the indicator light will flash.
- Enter your desired 3-8 digit code on the keypad, then press the '#' button to confirm.
- Test the new code with the door open before closing it.
5.3. Mounting the Safe
The safe can be mounted to a wall or floor for added security. Mounting hardware is included.
- Choose a suitable location, such as inside a closet or cabinet.
- Mark the drilling points through the pre-drilled holes at the back or bottom of the safe.
- Drill holes in the wall or floor using an appropriate drill bit.
- Align the safe with the drilled holes and secure it using the provided mounting bolts.

Image: Step-by-step guide for wall-mounted installation of the safe.
6. Operation
6.1. Opening the Safe
There are three methods to open the safe:
Method 1: Digital Pass Code
- Enter your 3-8 digit personal code or master code.
- Press the '#' button. The green light will illuminate.
- Within 5 seconds, turn the knob clockwise to open the door.
Method 2: Emergency Key
This method is used if you forget your code or if the batteries are completely drained.
- Remove the keypad cover to reveal the emergency keyhole.
- Insert the emergency key and turn it clockwise.
- Simultaneously turn the knob clockwise to open the door.
Method 3: External Power Supply (Battery Box)
Use this method if the internal batteries are dead and you do not have the emergency key readily available.
- Connect the emergency battery box to the external power port on the keypad.
- Enter your 3-8 digit personal code or master code.
- Press the '#' button. The green light will illuminate.
- Within 5 seconds, turn the knob clockwise to open the door.

Image: Visual guide to the three unlocking methods for the safe.
Video: Demonstration of opening the safe using the override key and the digital combination.
6.2. Closing and Locking the Safe
Close the door and turn the knob counter-clockwise until it locks securely.
6.3. Silent Mode
The safe features an optional silent mode to disable keypad sounds.
- To Turn On Silent Mode: Enter "*633" on the keypad.
- To Turn Off Silent Mode: Enter "*66" on the keypad.

Image: Features of the safe's alarm system and optional silent mode.
Video: Demonstration of activating and deactivating the silent mode feature on the safe.
6.4. Alarm System
The safe is equipped with an anti-theft alarm system:
- If an incorrect code is entered 3 consecutive times, the safe will automatically lock and trigger an audible alarm.
- The alarm will sound for a set period, alerting to attempted unauthorized access.
7. Maintenance
7.1. Battery Replacement
When the battery indicator light flashes red or the keypad does not respond, it is time to replace the batteries. Use 4 new AA batteries. Always replace all batteries at once.
7.2. Cleaning
Wipe the safe's exterior with a soft, damp cloth. Avoid abrasive cleaners or solvents that could damage the finish or electronic components.
7.3. Key Management
Record the unique number found on the keyhole. This number is essential if you need to request a replacement key. Store your emergency keys in a secure location away from the safe.
8. Troubleshooting
- Safe will not open with digital code:
- Ensure batteries are fresh and correctly installed.
- Verify the code entered is correct.
- If batteries are dead, use the external battery box or emergency key.
- Keypad is unresponsive:
- Replace batteries.
- If still unresponsive, use the emergency key.
- Alarm sounds unexpectedly:
- This indicates 3 incorrect code entries. Wait for the alarm to stop or enter the correct code to disarm.
- Forgotten code:
- Use the emergency key to open the safe and reset the code.
9. Specifications
| Brand | Tiskgg |
| Model Number | 2.8 cubic fireproof home safe |
| Capacity | 2.8 Cubic Feet |
| Exterior Dimensions (D x W x H) | 12.2" x 14.96" x 17.71" (31cm x 38cm x 45cm) |
| Interior Dimensions (D x W x H) | 11" x 14.5" x 17.32" |
| Material | Alloy Steel |
| Lock Type | Combination, Electronic, Key |
| Item Weight | 30.4 Pounds (13.8 kg) |
| Mounting Type | Freestanding, Tabletop |
| Special Features | Alarm System, Removable Shelf, Sensor Light |
| Batteries Required | Yes (4x AA, not included) |
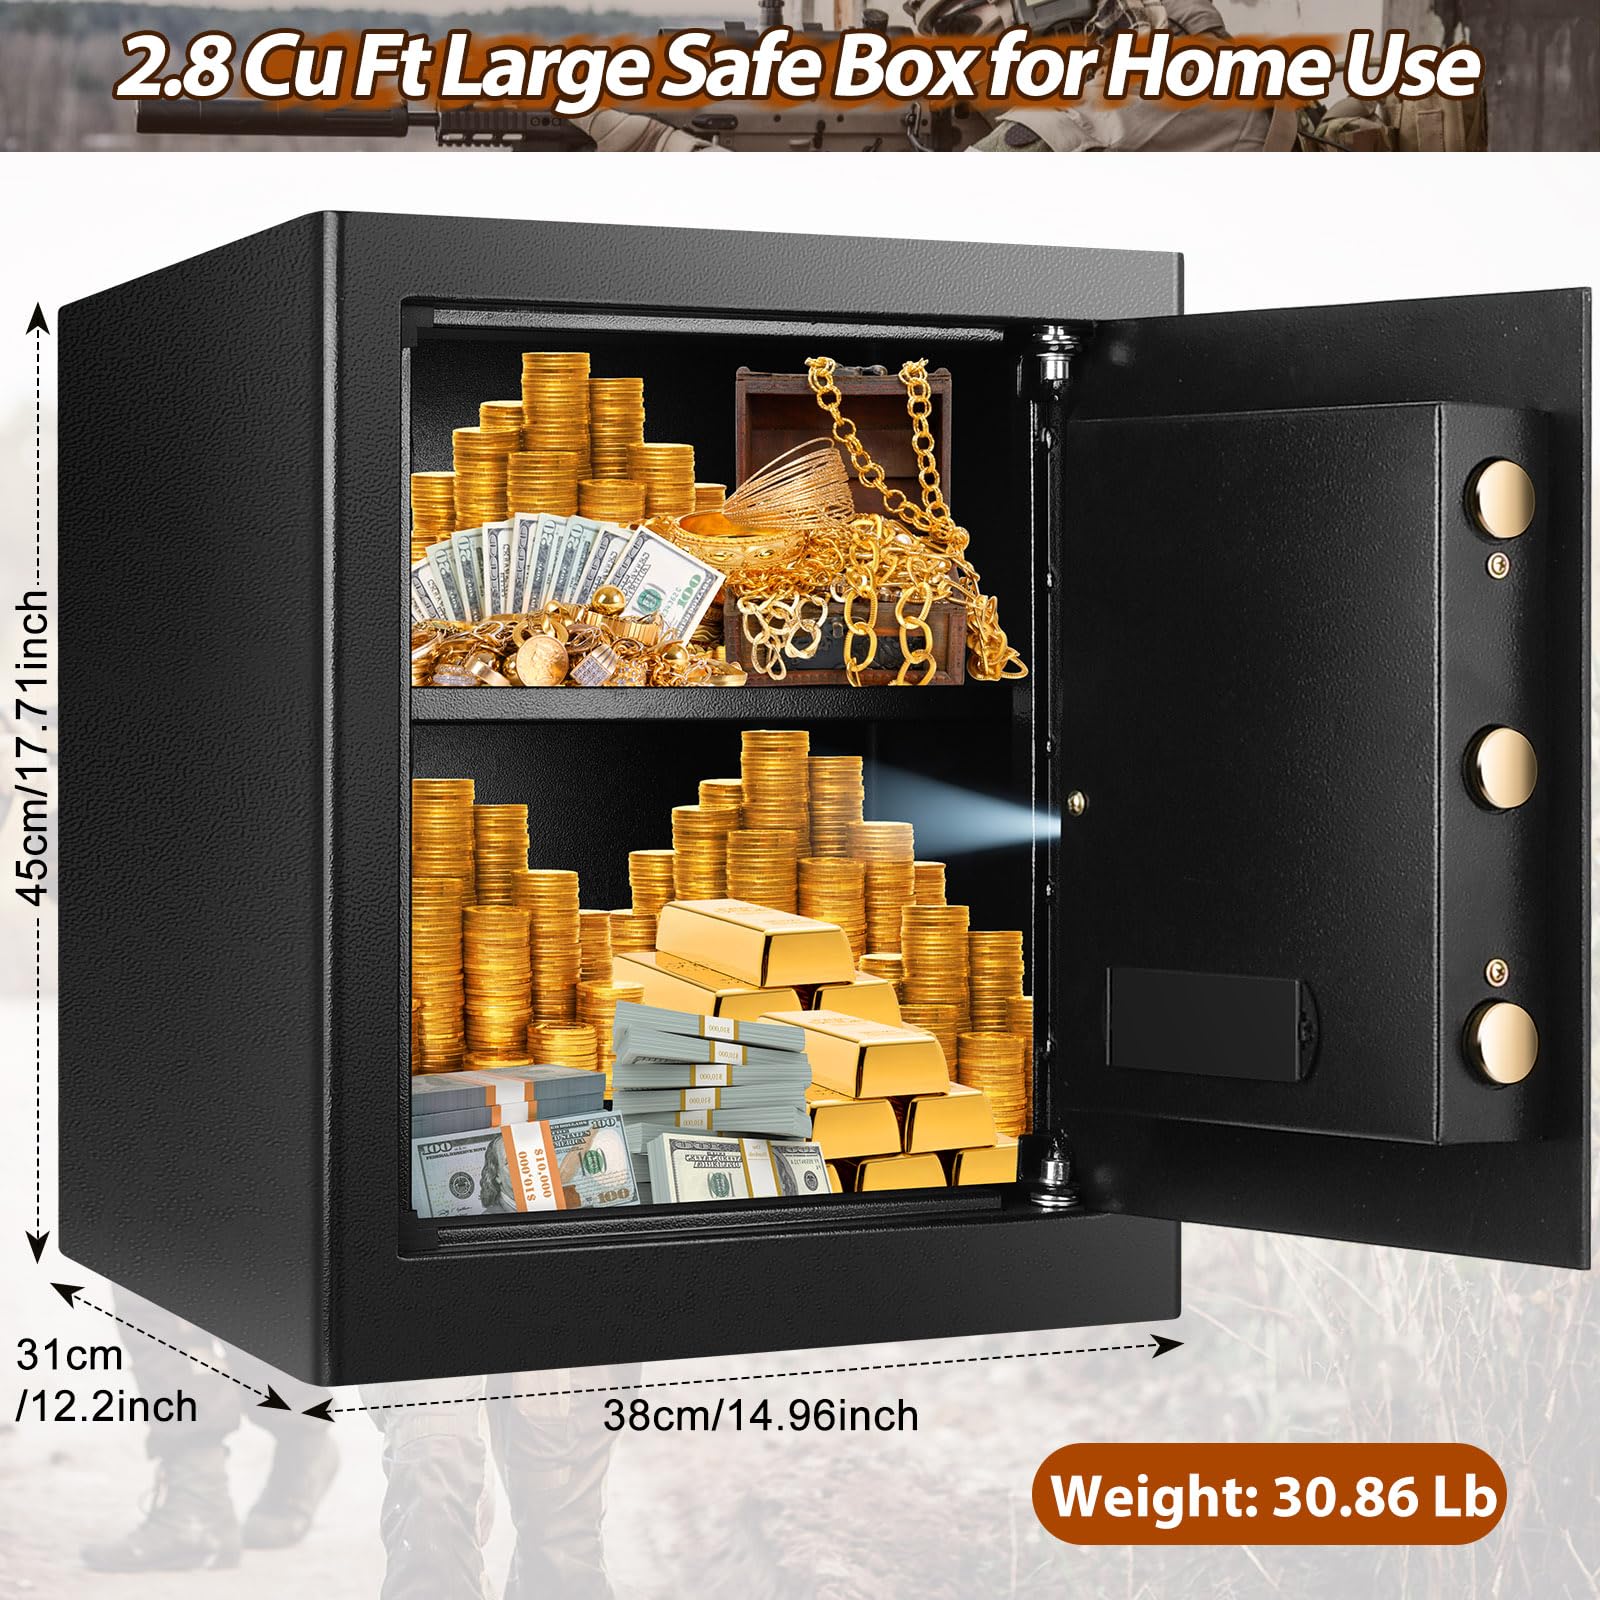
Image: Detailed dimensions and weight of the Tiskgg 2.8 Cu Ft safe box.
10. Warranty and Support
Tiskgg provides 24-hour online customer service. If you lose your emergency keys, please contact customer service with the unique number found on the keyhole to request a new set.
For any questions, concerns, or support needs, please contact the seller, TISKGG SHOP, directly through your purchase platform.


