
1. Product Overview
The SLGPC 1/2 inch Quick Connect Kit provides a reliable and efficient solution for connecting various pressure washer components. This kit is designed for high-pressure applications, supporting up to 5000 PSI, and facilitates quick attachment and detachment of hoses, pumps, wands, surface cleaners, and guns.
The kit includes two primary components:
- One 1/2 inch quick coupler plug with a 1/2 inch male pipe thread.
- One 1/2 inch quick coupler socket with a 1/2 inch male pipe thread.
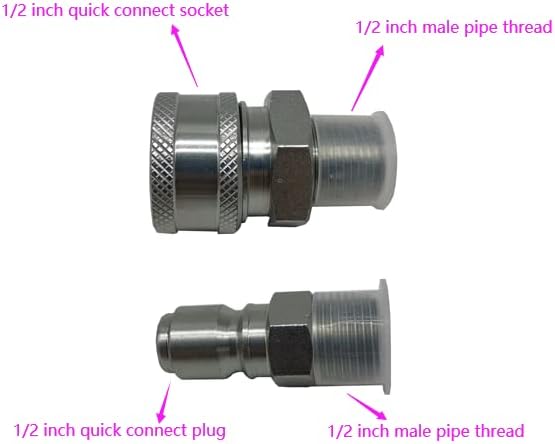
Figure 1: The SLGPC 1/2 inch Quick Connect Kit, showing the quick connect socket and quick connect plug, each with a 1/2 inch male pipe thread. This image helps identify the individual components of the kit.
2. Setup and Installation
Before installation, ensure all components are clean and free from debris. It is recommended to apply thread sealant tape (PTFE tape) to the male pipe threads for a secure, leak-free connection.
- Identify Components: Locate the 1/2 inch quick coupler plug and the 1/2 inch quick coupler socket. Each component features a 1/2 inch male pipe thread for attachment.
- Prepare Threads: Wrap the 1/2 inch male pipe threads of both the plug and the socket with thread sealant tape. Apply 2-3 wraps in the direction of the thread.
- Attach Plug: Screw the 1/2 inch male pipe thread of the quick coupler plug into the female port of the component you wish to connect (e.g., a pressure washer hose, gun, or wand). Tighten securely by hand, then use a wrench for a final snug turn, being careful not to overtighten.
- Attach Socket: Screw the 1/2 inch male pipe thread of the quick coupler socket into the female port of the other component (e.g., a pump outlet, surface cleaner inlet). Tighten securely as described for the plug.

Figure 2: The quick connect socket (top) and quick connect plug (bottom) ready for installation. Note the male pipe threads for attachment to equipment.
3. Operating Instructions
The quick connect system allows for fast and easy attachment and detachment of pressure washer accessories.
- Connecting:
- Ensure the pressure system is depressurized before connecting or disconnecting.
- Pull back the collar on the quick coupler socket.
- Insert the quick coupler plug fully into the socket.
- Release the collar. A secure connection is indicated by the collar snapping forward and the plug being firmly seated without wobbling. Gently pull on the connected components to confirm the lock.
- Disconnecting:
- Always depressurize the system before attempting to disconnect.
- Pull back the collar on the quick coupler socket.
- The quick coupler plug will release from the socket.
Important: Never attempt to connect or disconnect fittings while the system is under pressure. This can cause injury or damage to the fittings.
4. Maintenance
Proper maintenance ensures the longevity and reliable performance of your SLGPC Quick Connect Kit.
- Cleaning: Regularly clean the fittings to remove dirt, grime, and chemical residues. Use a damp cloth and mild detergent if necessary. Rinse thoroughly.
- Inspection: Periodically inspect the quick connect fittings for signs of wear, corrosion, or damage. Check the O-rings inside the socket for cracks or flattening, as these are crucial for a watertight seal.
- Lubrication: A small amount of silicone grease or O-ring lubricant can be applied to the O-rings and moving parts of the quick connect mechanism to ensure smooth operation and extend their life.
- Storage: Store the fittings in a clean, dry place when not in use to prevent contamination and corrosion.


Figure 3: Close-up views of the quick connect socket (left) and plug (right), highlighting areas for inspection and lubrication, such as the internal O-rings and locking mechanism.
5. Troubleshooting
| Problem | Possible Cause | Solution |
|---|---|---|
| Leakage at connection point |
|
|
| Difficulty connecting/disconnecting |
|
|
| Fittings feel loose after connection |
|
|
6. Product Specifications
| Feature | Detail |
|---|---|
| Model Number | fittings-1/2 |
| Material | Stainless Steel |
| Thread Size | 1/2 inch NPT Male Pipe Thread |
| Connector Type | Quick Coupler Plug and Socket |
| Maximum Working Pressure | Up to 5000 PSI |
| Dimensions (L x W x H) | Approximately 2.76 x 1.18 x 2.36 inches (for the set) |
| Item Weight | Approximately 0.44 Pounds (7 ounces) |
| Color | Silver |
| Included Components | 1x 1/2'' Quick Coupler Plug, 1x 1/2'' Quick Coupler Socket |