Introduction
This manual provides comprehensive instructions for the safe and effective use, setup, operation, and maintenance of your ESAB® Sentinel™ A60 Welding Helmet. Please read this manual thoroughly before using the product to ensure proper function and safety.

Figure 1: Front view of the ESAB Sentinel A60 Welding Helmet.
Safety Information
Always prioritize safety when welding. This helmet is designed to protect your eyes and face from sparks, spatter, and harmful radiation during welding operations. However, it is crucial to follow all safety guidelines.
- Ensure the helmet is properly fitted and adjusted before each use.
- Inspect the helmet and lenses for any damage before use. Replace damaged parts immediately.
- Do not use the helmet if the auto-darkening filter (ADF) is not functioning correctly.
- Always wear appropriate personal protective equipment (PPE) in addition to the welding helmet, including safety glasses, gloves, and protective clothing.
- Avoid direct exposure to welding arc rays without proper eye protection.
Setup
1. Headgear Adjustment
The Sentinel A60 features a fully-adjustable Halo headgear designed for comfort and stability. Proper adjustment is essential for optimal performance and comfort during extended use.
- Place the helmet on your head.
- Adjust the top strap to ensure the helmet sits securely and comfortably.
- Use the rear adjustment knob to tighten or loosen the headgear for a snug fit.
- Adjust the distance and angle of the helmet to your face using the side pivots to achieve the best viewing position.

Figure 2: The ergonomic headgear offers 5-way adjustability for a customized fit.
2. Battery Installation (if applicable)
The Sentinel A60 uses a replaceable CR2450 battery. Ensure the battery is correctly installed for the ADF to function.
- Locate the battery compartment, typically on the inside of the helmet near the ADF.
- Open the compartment and insert the CR2450 battery with the correct polarity.
- Close the compartment securely. A low battery indicator LED will alert you when replacement is needed.
Operating Instructions
1. Auto-Darkening Filter (ADF) Controls
The Sentinel A60 features intuitive internal ADF controls for sensitivity and delay, along with 0.5 increment shade adjustments.
- Shade Range: Adjust the shade from DIN 3/5–13 in 0.5 increments to match your welding process and current.
- Sensitivity: Controls how sensitive the ADF is to the welding arc. Adjust for different lighting conditions and arc stability.
- Delay: Determines how long the lens remains dark after the arc extinguishes. Adjust for different welding applications to prevent eye fatigue from afterglow.
- Shade Lock: A setting is available to lock the shade, preventing accidental changes during operation.

Figure 3: The Sentinel A60 offers EN 1/1/1/1 rated optical clarity and a large viewing area (4.65 x 2.80 inches).
2. External Grind Mode Control
The external grind mode button allows for quick and easy switching between welding and grinding modes without removing the helmet.
- Press the "Grind" button located on the side of the helmet to activate grind mode. The ADF will remain in a light state (shade 3) for clear visibility during grinding.
- Press the button again to return to welding mode, where the ADF will automatically darken upon arc initiation.

Figure 4: The external grind mode button allows for easy switching even with gloves on.
Maintenance
1. Cleaning the Helmet
- Clean the helmet shell with a mild soap and water solution. Avoid harsh chemicals or abrasive cleaners.
- Wipe the outer and inner cover lenses with a soft, clean cloth. Do not use abrasive materials that could scratch the lenses.
- The ADF should only be cleaned with a soft, dry cloth. Do not immerse the ADF in water or cleaning solutions.
2. Replacing Cover Lenses
Regularly inspect and replace scratched or damaged outer and inner cover lenses to maintain optical clarity and protection.
- Carefully remove the old cover lens by unlatching its retaining clips or frame.
- Clean the area around the lens opening.
- Insert a new, clean cover lens, ensuring it is securely seated.
3. Battery Replacement
When the low battery indicator illuminates, replace the CR2450 battery promptly to ensure continuous operation of the ADF.
Troubleshooting
| Problem | Possible Cause | Solution |
|---|---|---|
| ADF does not darken. | Low or dead battery; Sensors obstructed; Grind mode active; Incorrect sensitivity setting. | Replace battery; Clean sensors; Deactivate grind mode; Adjust sensitivity. |
| Poor visibility through lens. | Scratched or dirty cover lens; ADF malfunction. | Clean or replace cover lenses; Contact ESAB support if ADF is faulty. |
| Helmet feels uncomfortable or unstable. | Improper headgear adjustment. | Re-adjust headgear for a secure and balanced fit. |
Specifications
- ADF Viewing Area: 4.65 x 2.80 inches (118 x 71 mm)
- Optical Clarity: EN 1/1/1/1 rated
- Shade Range: DIN 3/5–13 (adjustable in 0.5 increments)
- Arc Sensors: 4
- Switching Time: 0.08 milliseconds
- Power: Replaceable CR2450 battery
- Material: High Impact Resistance Nylon
- Item Weight: 3.72 Pounds
- Model Name: Sentinel
- Part Number: SENTINELPAR
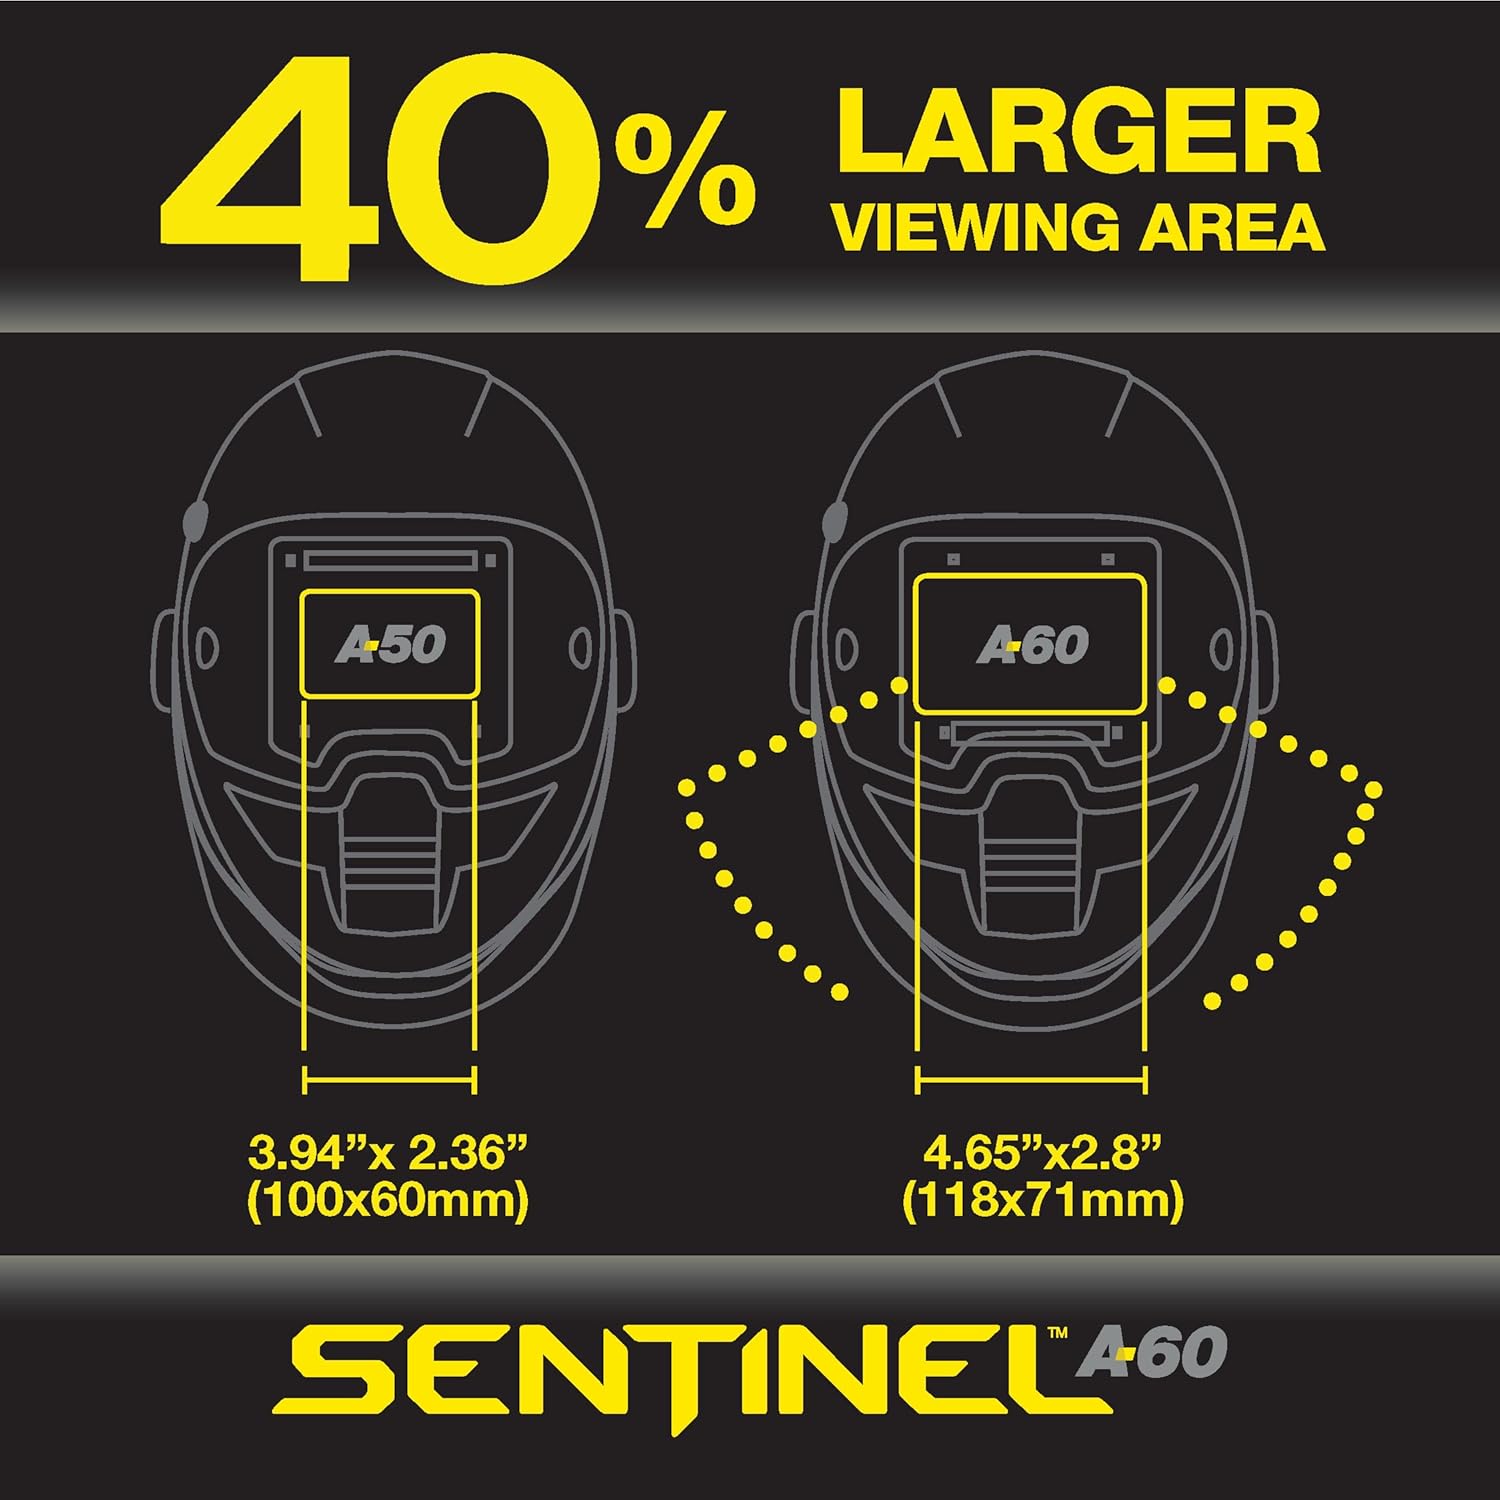
Figure 5: The Sentinel A60 offers a 40% larger viewing area compared to previous models.
Warranty and Support
For warranty information, technical support, or to purchase replacement parts, please visit the official ESAB website or contact their customer service department. Retain your proof of purchase for warranty claims.
ESAB Official Website: www.esab.com


