
MESTEK IR05A-OR
Contents
MESTEK Infrared Thermometer IR05A Instruction Manual
Model: IR05A-OR | Brand: MESTEK
1. Introduction
Thank you for choosing the MESTEK IR05A Infrared Thermometer. This high-temperature non-contact digital laser thermometer is designed for accurate temperature measurement in various industrial, HVAC, forge, and metal smelting applications. It features a wide temperature range, dual laser targeting, adjustable emissivity, and multiple measurement modes, including MIN/MAX/AVG/DIF. This manual provides detailed instructions for safe and effective use of your device.

2. Safety Information
WARNING: This device is designed for inanimate objects only. Do NOT use for measuring human or animal body temperature.
- Do not point the laser directly at eyes or indirectly off reflective surfaces. This product contains a Class II laser with optical power <1mW and wavelength 620~690 um.
- Do not use the thermometer near explosive gas, steam, or dust.
- Avoid exposing the device to extreme temperatures, humidity, or direct sunlight.
- Keep the device clean and dry.
- If the device is damaged, do not attempt to repair it yourself. Contact customer support.
3. Package Contents
- MESTEK IR05A High Temp Infrared Thermometer
- K-Type Thermocouple Probe
- Carrying Case
- 2 x 1.5V AA Batteries
- User Manual (this document)
4. Product Overview
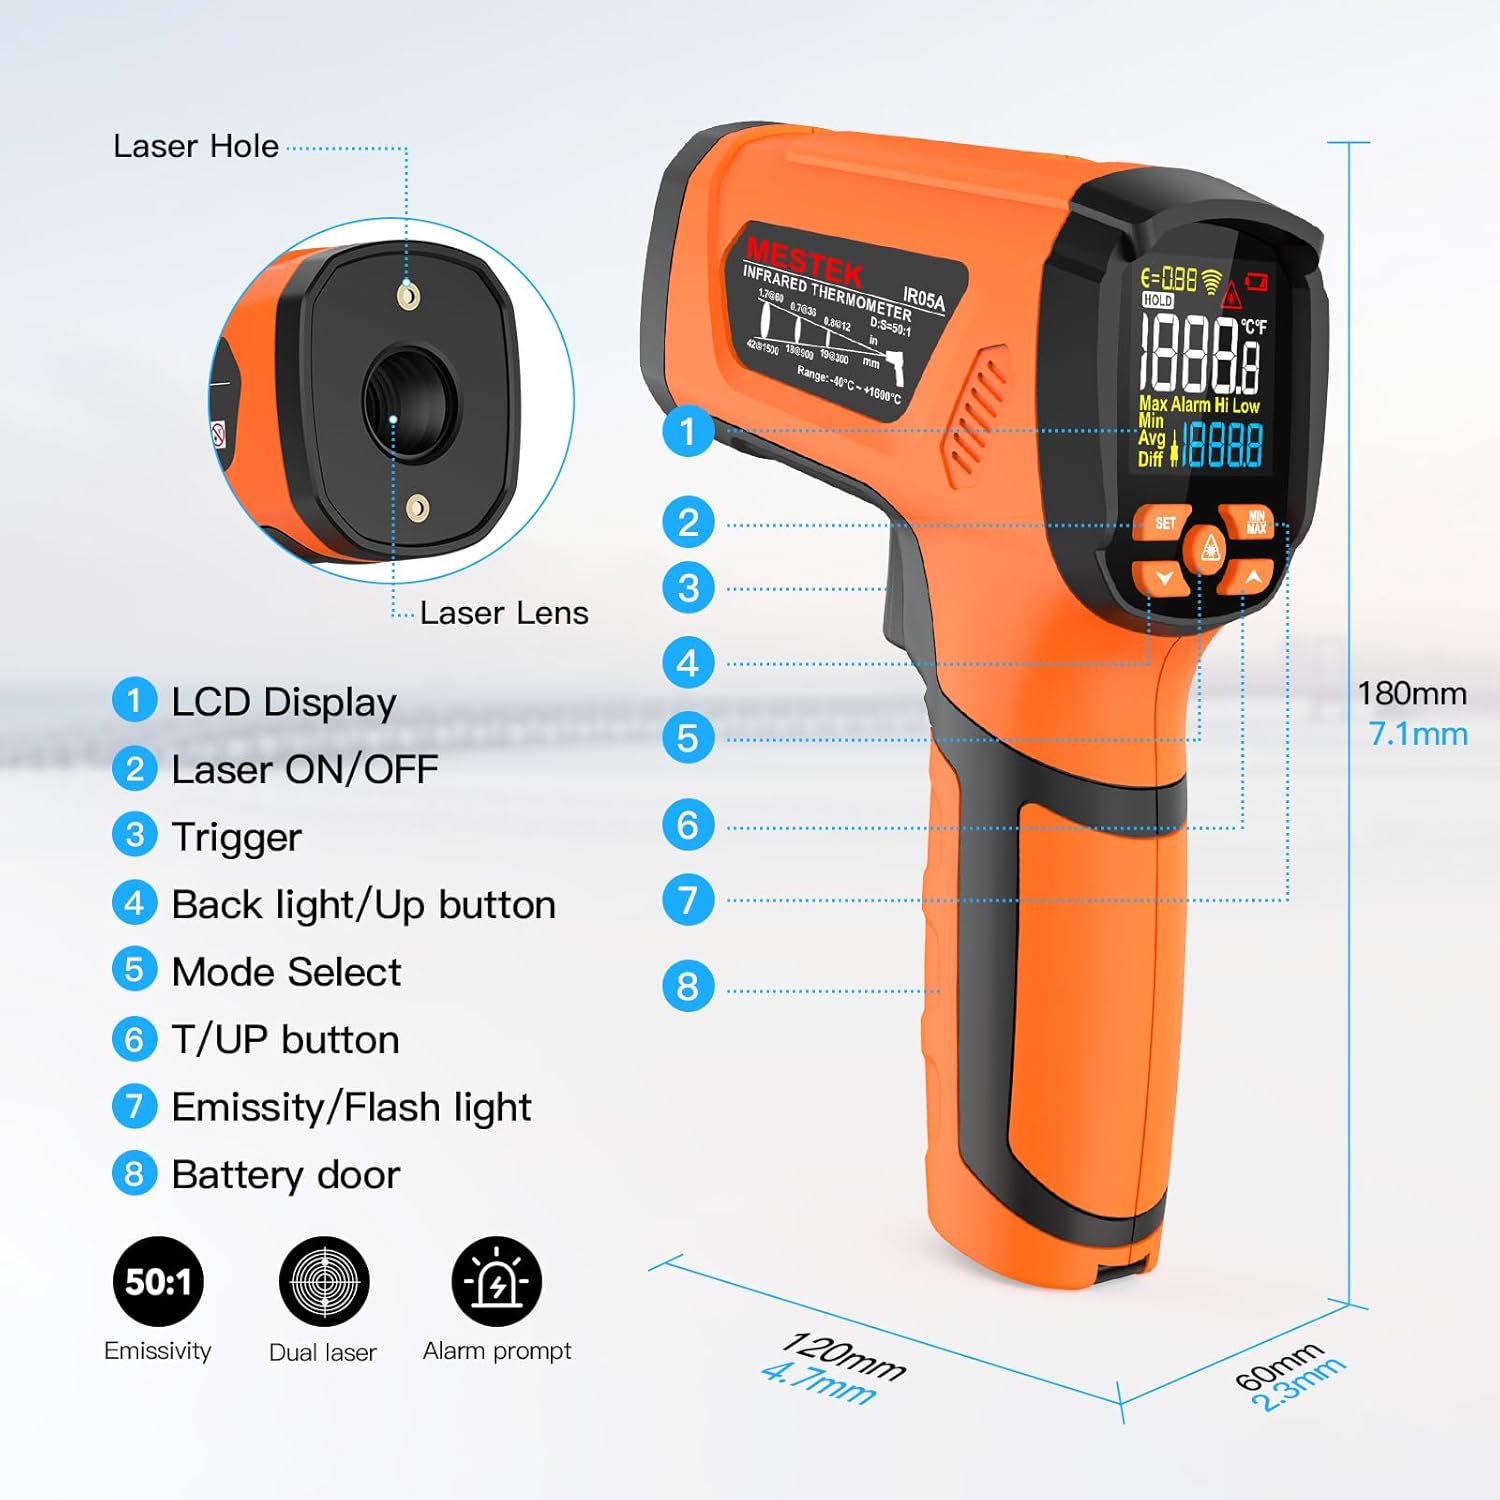
- LCD Display: Color VA Backlit Screen for clear readings.
- Laser ON/OFF Button: Activates or deactivates the dual laser pointers.
- Trigger: Press to initiate temperature measurement.
- Backlight/Up Button: Controls backlight and navigates menus.
- Mode Select Button: Cycles through measurement modes (MIN/MAX/AVG/DIF).
- T/UP Button: Used for K-probe temperature measurement.
- Emissivity/Flashlight Button: Adjusts emissivity and controls flashlight.
- Battery Door: Access for battery installation.
5. Setup
5.1 Battery Installation
The MESTEK IR05A requires two 1.5V AA batteries. These are included in the package.
- Locate the battery door at the bottom of the handle (refer to Figure 4.1, item 8).
- Open the battery compartment.
- Insert the two AA batteries, ensuring correct polarity (+/-).
- Close the battery door securely.
For a visual guide on battery installation and initial setup, please refer to the official product video below:
Video 5.1: Official MESTEK product overview, including battery installation (0:06-0:12).
6. Operating Instructions
6.1 Basic Temperature Measurement
To take a temperature reading, simply point the thermometer at the target object and press the trigger. The temperature will be displayed on the LCD screen instantly.
6.2 MAX/MIN/AVG/DIF Modes
The IR05A offers various measurement modes for detailed analysis:
- MAX: Displays the maximum temperature measured during a continuous scan.
- MIN: Displays the minimum temperature measured during a continuous scan.
- AVG: Displays the average temperature measured during a continuous scan.
- DIF: Displays the difference between the maximum and minimum temperatures measured.
To switch between these modes, press the MIN/MAX button repeatedly. The active mode will be indicated on the display.

See the video for a demonstration of switching between MAX/MIN/AVG/DIF modes:
Video 6.1: Demonstration of MAX/MIN/AVG/DIF modes (0:45-0:51).
6.3 Adjustable Emissivity (ε: 0.10-1.00)
Emissivity is crucial for accurate non-contact temperature measurement. Different materials have different emissivities. The IR05A allows you to adjust the emissivity from 0.10 to 1.00.
- Press the SET button to enter the settings menu.
- Press the SET button again to navigate to the Emissivity setting.
- Use the Up and Down arrow buttons to adjust the emissivity value.
- Pull the trigger to save the setting and exit.

6.4 Temperature Unit Switch (°C/°F)
You can switch between Celsius (°C) and Fahrenheit (°F) display units:
- Press the SET button repeatedly until the °C/°F icon flashes.
- Use the Up or Down arrow buttons to toggle between °C and °F.
- Pull the trigger to confirm your selection.
Refer to the video for a visual guide on changing temperature units:
Video 6.3: How to switch between Celsius and Fahrenheit (0:31-0:34).
6.5 Laser ON/OFF
The dual laser pointers assist in targeting the measurement area. You can toggle them on or off:
- Short press the Laser button (refer to Figure 4.1, item 2) to turn the laser pointers ON or OFF.

A demonstration of the laser ON/OFF function is available in the video:
Video 6.4: Toggling the laser ON/OFF (0:36-0:41).
6.6 High/Low Alarm Settings
The IR05A allows you to set high and low temperature alarms. An audible and visual alert will trigger if the measured temperature exceeds or falls below the set thresholds.
- Long press the SET button to enter the alarm setting mode.
- Use the Up and Down arrow buttons to adjust the High Alarm threshold.
- Gently press the SET button again to switch to the Low Alarm threshold.
- Use the Up and Down arrow buttons to adjust the Low Alarm threshold.
- Pull the trigger to save the settings and exit.
For a visual guide on setting high and low alarms, please watch the video:
Video 6.5: Setting High and Low Alarm modes (0:15-0:26).
6.7 Contact K-Probe Measurement
For contact temperature measurements, use the included K-type thermocouple probe. This is ideal for measuring internal temperatures of liquids or semi-solids.
- Plug the K-type probe into the designated port on the top of the thermometer (refer to Figure 4.1, item 6).
- The display will automatically switch to K-probe measurement mode.
- Insert the probe into the substance you wish to measure. The temperature will be displayed on the screen.

Watch the video for a demonstration of K-probe usage:
Video 6.6: Demonstration of Contact K-Probe Thermometer (0:53-1:00).
7. Maintenance
7.1 Cleaning
To ensure accurate readings and prolong the life of your thermometer:
- Wipe the device clean with a soft, damp cloth. Do not use abrasive cleaners or solvents.
- Keep the infrared lens clean and free of dust or debris. Use a soft brush or compressed air if necessary.
7.2 Battery Replacement
When the low battery indicator appears on the display, replace the batteries promptly to maintain accuracy and functionality. Follow the battery installation steps in Section 5.1.
8. Troubleshooting
8.1 Common Issues
- No Power: Check battery installation and ensure batteries are fresh.
- Inaccurate Readings: Verify emissivity setting matches the material being measured. Ensure the lens is clean. Maintain proper distance to spot ratio (50:1).
- Laser Not Working: Check if the laser is turned ON (Section 6.5).
- "Not For Human" Warning: This device is not intended for medical use. Readings on humans or animals will be inaccurate.
9. Specifications
| Feature | Specification |
|---|---|
| Model Number | IR05A-OR |
| Temperature Range (IR) | -40℉~2912℉ (-40℃~1600℃) |
| Temperature Range (K-Probe) | 14℉~932℉ (-10℃~500℃) |
| Accuracy (IR) | ± 2% (average) |
| Accuracy (K-Probe) | ± 1.5% (average) |
| Distance to Spot Ratio | 50:1 |
| Emissivity | 0.10-1.00 (Adjustable) |
| Response Time | 0.5 seconds |
| Laser Type | Class II, <1mW, 620~690 um |
| Display Type | Digital Color VA LCD Display |
| Power Source | 2 x 1.5V AA Batteries |
| Product Dimensions | 7 x 4.6 x 2.4 inches |
| Item Weight | 9.28 ounces |
10. Warranty and Support
MESTEK products are designed for reliability and performance. For any technical or quality issues, please do not hesitate to contact MESTEK customer support. Our team is available to assist you with product inquiries, troubleshooting, and warranty claims.
Please refer to the product packaging or the official MESTEK website for the most up-to-date warranty information and contact details.
Ask a question about this manual
Ask about setup, troubleshooting, compatibility, parts, safety, or missing instructions. Manuals+ will review the question and use this page’s manual context to help answer it.