1. Introduction
This manual provides essential instructions for the safe and effective use of your Hatteker Professional Hair Clipper and T-Blade Trimmer Kit, Model RFC-695. Please read this manual thoroughly before first use and retain it for future reference.
2. Safety Information
To reduce the risk of injury, electric shock, fire, or damage to the product, always follow these basic safety precautions:
- Avoid using near eyes.
- Do not ingest or inhale small parts.
- Clean with care.
- Handle batteries with care.
- Do not immerse the charging cable or adapter in water.
- This appliance is waterproof (IPX7 rated) and can be rinsed under running water, but ensure the charging port is dry before charging.
3. Package Contents
Verify that all items are present in your package:
- Hair Clipper
- T-blade Trimmer
- 9 Guide Combs (various sizes)
- Scissors
- Hairdressing Cape
- USB Charging Cable
- Cleaning Brush
- Hair Comb

Image 1: Hatteker Hair Clipper and T-Blade Trimmer Kit, showing the main clipper, T-blade trimmer, and all included accessories such as guide combs, scissors, cape, USB cable, cleaning brush, and hair comb.
4. Specifications
| Feature | Detail |
|---|---|
| Model Number | RFC-695 |
| Brand | Hatteker |
| Blade Material | Stainless Steel |
| Power Source | Battery Powered (Lithium-Ion) |
| Charging Time | Approximately 1.5 Hours |
| Working Time (Clipper) | Up to 150 Minutes |
| Working Time (Trimmer) | Up to 180 Minutes |
| Waterproof Rating | IPX7 (Whole body washable) |
| Product Dimensions | 7.3 x 14.7 x 22.8 cm |
| Weight | 960 g |
5. Setup
5.1 Charging the Device
Before first use, fully charge the hair clipper and T-blade trimmer. The devices feature an LED display indicating battery percentage and charging status.
- Connect the USB charging cable to the charging port on the device.
- Connect the other end of the USB cable to a USB charger, power bank, laptop, or computer.
- The LED display will show the charging progress. A full charge takes approximately 1.5 hours.
- Ensure the device is completely dry before charging, especially if it has been rinsed with water.

Image 2: Hatteker Hair Clipper and T-blade Trimmer connected to a USB power source for charging, illustrating the LED display showing battery status and charging time.
5.2 Attaching Guide Combs
Select the appropriate guide comb for your desired hair length. The main clipper uses 5 guide combs for longer lengths, while the T-blade trimmer uses 4 guide combs for shorter, more precise lengths.
- To attach: Align the guide comb with the blade and push it firmly until it clicks into place.
- To remove: Gently pull the comb away from the blade.

Image 3: Hatteker Hair Clipper and T-blade Trimmer displaying the different guide comb attachments for various hair cutting lengths.
6. Operating Instructions
6.1 Using the Hair Clipper
- Ensure the clipper is charged and a guide comb is securely attached, if desired.
- Adjust the blade length using the taper lever on the side of the clipper. Settings range from 0.5mm to 2.5mm.
- Press the power button to turn on the clipper. The LED display will show the current speed and battery level.
- Use the speed adjustment buttons (+/-) to select one of the three available speeds.
- Begin cutting hair, moving the clipper against the direction of hair growth for an even cut.
- After use, press the power button to turn off the clipper.

Image 4: Close-up of the Hatteker Hair Clipper, highlighting the adjustable blade lever for precise length control from 0.5mm to 2.5mm.
6.2 Using the T-Blade Trimmer
The T-blade trimmer is designed for precise detailing, sharp lines, beard trimming, and sideburns.
- Ensure the trimmer is charged and a guide comb is attached, if desired, for beard or body hair trimming.
- Press the power button to turn on the trimmer. The LED display will show the current speed and battery level.
- Carefully use the T-blade for outlining, detailing, or close trimming.
- After use, press the power button to turn off the trimmer.
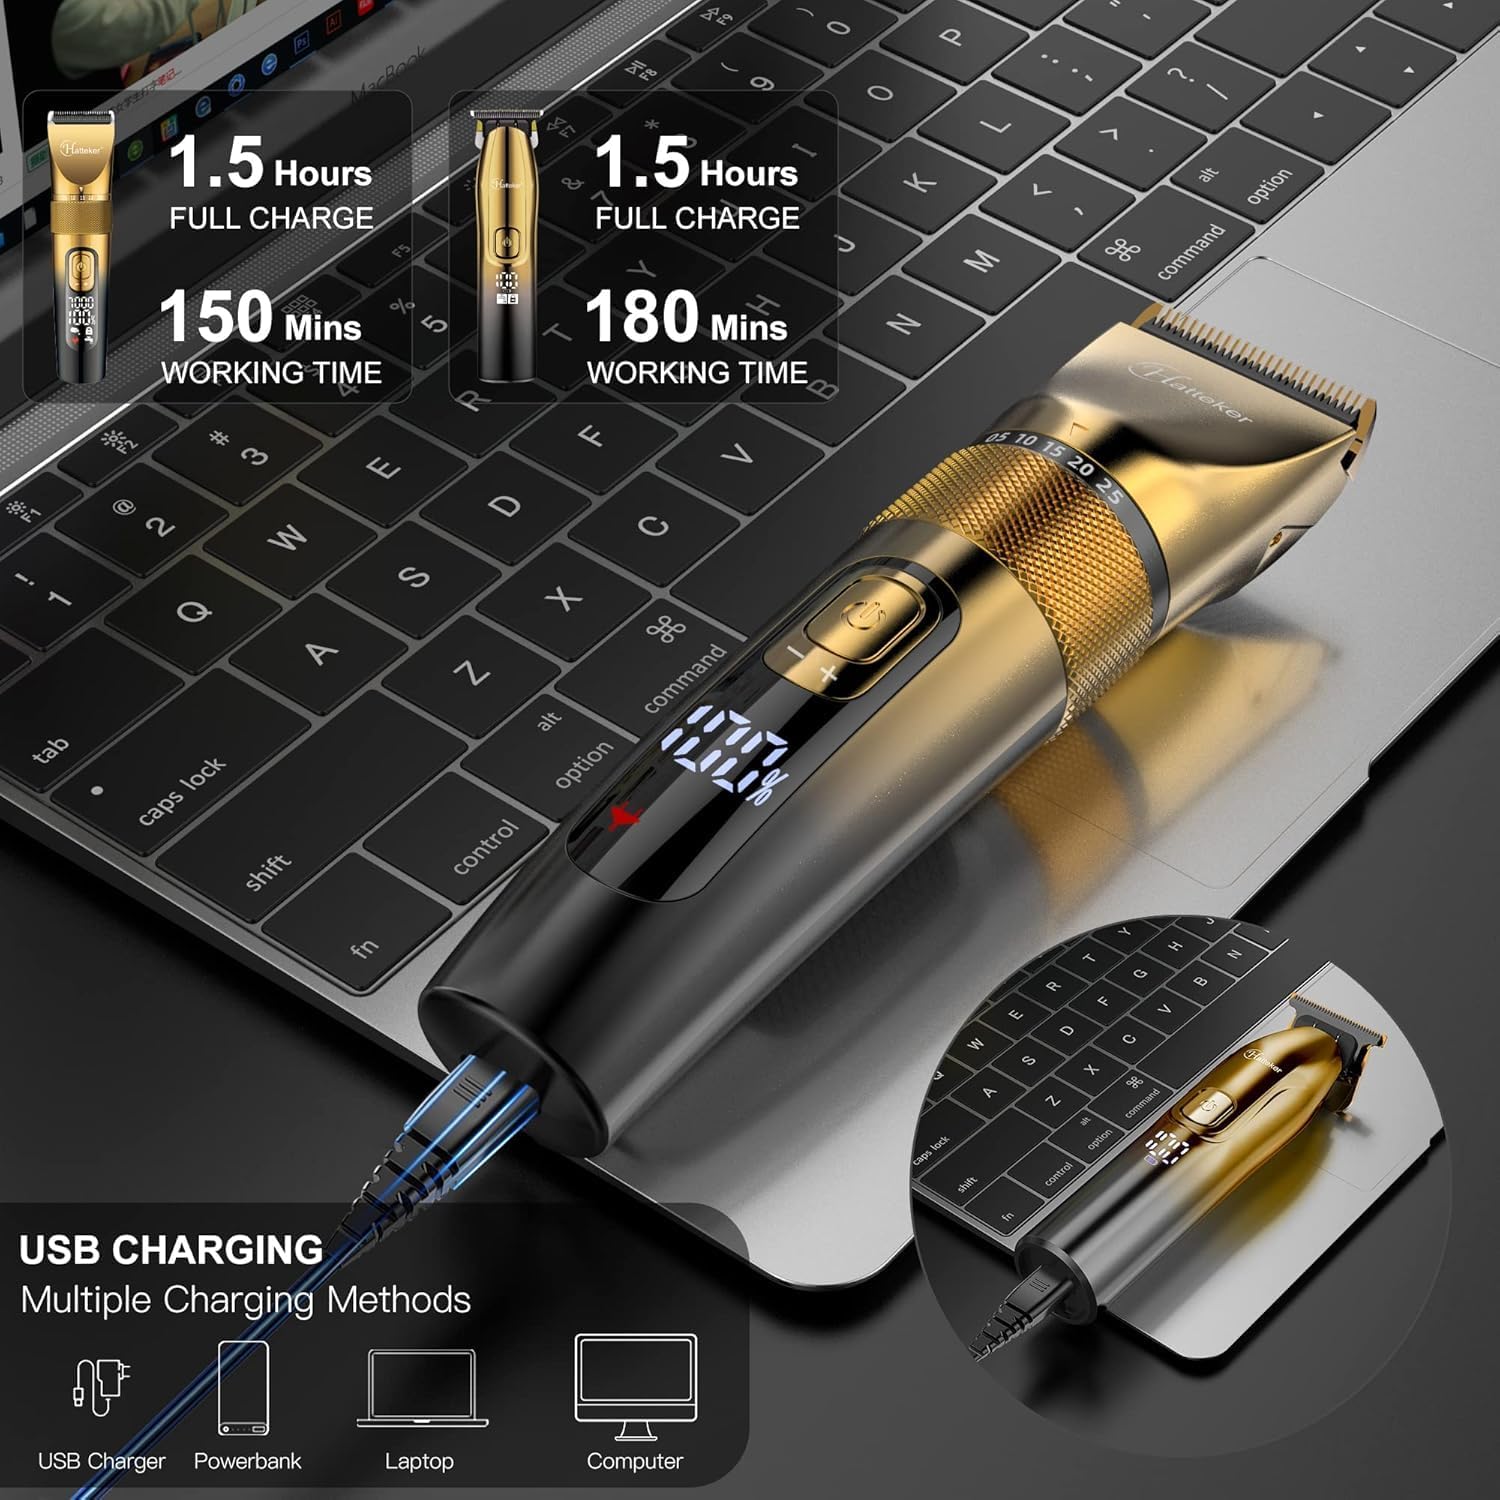
Image 5: Hatteker T-Blade Trimmer in use, demonstrating its capability for precision edging, beard trimming, and body hair grooming.
7. Maintenance
7.1 Cleaning the Blades
Regular cleaning ensures optimal performance and hygiene.
- Turn off the device before cleaning.
- Remove any attached guide combs.
- Use the provided cleaning brush to remove loose hairs from the blades.
- Since the devices are IPX7 waterproof, you can rinse the blades under running water. Ensure the charging port is sealed or dry before rinsing.
- Allow the blades to air dry completely before storing or reattaching combs.

Image 6: Hatteker Hair Clipper being cleaned under running water, demonstrating its IPX7 waterproof feature for easy maintenance.
7.2 Blade Lubrication
For prolonged blade life and smooth operation, periodically apply a small amount of lubricating oil (not included) to the blades.
- Apply 1-2 drops of clipper oil to the blades while the device is off.
- Turn on the device for a few seconds to distribute the oil.
- Wipe off any excess oil.
8. Troubleshooting
| Problem | Possible Cause | Solution |
|---|---|---|
| Device does not turn on. | Low battery. | Charge the device fully. |
| Device pulls hair or cuts unevenly. | Blades are dull or clogged with hair. Insufficient lubrication. | Clean the blades thoroughly. Apply lubricating oil. Consider blade replacement if dullness persists. |
| Device makes unusual noise. | Blades are not properly aligned or lubricated. | Ensure blades are clean and lubricated. If noise persists, contact customer support. |
| Charging indicator not working. | Faulty charging cable or adapter. Device not properly connected. | Check cable connections. Try a different USB cable or power source. |
9. Warranty and Support
For warranty information or technical support, please refer to the contact details provided with your purchase or visit the official Hatteker website. Keep your proof of purchase for warranty claims.


