Introduction
This manual provides essential instructions for setting up, operating, maintaining, and troubleshooting your Vibox I-26 PC Gaming Complete System. Please read this manual thoroughly before using your new system to ensure optimal performance and longevity.
1. Setup Guide
1.1 Unboxing and Component Check
Carefully remove all components from the packaging. Verify that all items listed below are present:
- Vibox I-26 PC Tower
- 22-inch Monitor
- Gaming Keyboard
- Gaming Mouse
- Gaming Headphones
- Mouse Pad
- WiFi Adapter
- Power Cables (for PC and Monitor)
- Video Cable (DVI-D or VGA)

Image 1.1: The complete Vibox I-26 PC Gaming System, including the PC tower, 22-inch monitor, gaming keyboard, gaming mouse, and gaming headphones.
1.2 Connecting Peripherals
- Monitor Connection: Connect the monitor to the PC using the provided video cable (DVI-D or VGA). Ensure the cable is securely fastened.
- Keyboard and Mouse: Plug the gaming keyboard and mouse into available USB ports on the rear of the PC.
- Headphones: Connect the gaming headphones to the audio jacks (usually green for audio out, pink for microphone in) on the front or rear of the PC.
- WiFi Adapter: Insert the WiFi adapter into an available USB port. Drivers may install automatically.
- Power: Connect the power cables to the PC and the monitor, then plug them into a power outlet.
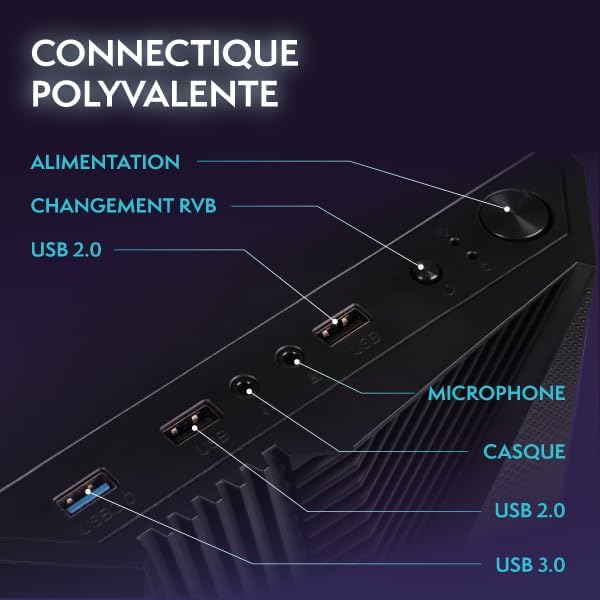
Image 1.2: Front panel connectivity ports, showing USB 2.0, USB 3.0, headphone, and microphone jacks for easy access.
1.3 Initial Boot and Windows 11 Setup
Press the power button on the PC tower. The system will boot up. Follow the on-screen instructions to complete the Windows 11 Home setup. This typically involves selecting your region, language, creating a user account, and connecting to a network.
2. Operating Your PC
2.1 Basic Operation
- Power On/Off: Press the power button to turn on the PC. To shut down, click the Start button in Windows, then Power > Shut down.
- Restart: To restart the system, click the Start button, then Power > Restart.
- Sleep Mode: To put the PC into sleep mode, click the Start button, then Power > Sleep.

Image 2.1: An internal view of the PC tower, highlighting the main components and RGB lighting.
2.2 Windows 11 Navigation and Features
Windows 11 Home is pre-installed, offering a modern interface and optimized performance. Key features include:
- Faster loading times with DirectStorage.
- Auto HDR for enhanced graphics.
- Seamless Xbox Game Pass integration.
- Optimized CPU performance.

Image 2.2: Visual representation of Windows 11 Home features, emphasizing its benefits for gaming and general use.
2.3 Installing Software and Games
You can install software and games from various sources:
- Microsoft Store: Access a wide range of applications and games directly from the pre-installed Microsoft Store.
- Game Launchers: Download and install popular game launchers like Steam, Epic Games Store, or GOG Galaxy for your gaming library.
- Web Downloads: Install software downloaded from trusted websites.
3. Maintenance
3.1 Cleaning Your PC
Regular cleaning helps maintain optimal performance and extends the lifespan of your PC.
- Exterior: Use a soft, damp cloth to wipe down the exterior of the PC case and monitor. Avoid harsh chemicals.
- Dust Removal: Periodically use compressed air to clear dust from vents and internal components. Ensure the PC is powered off and unplugged before doing so.
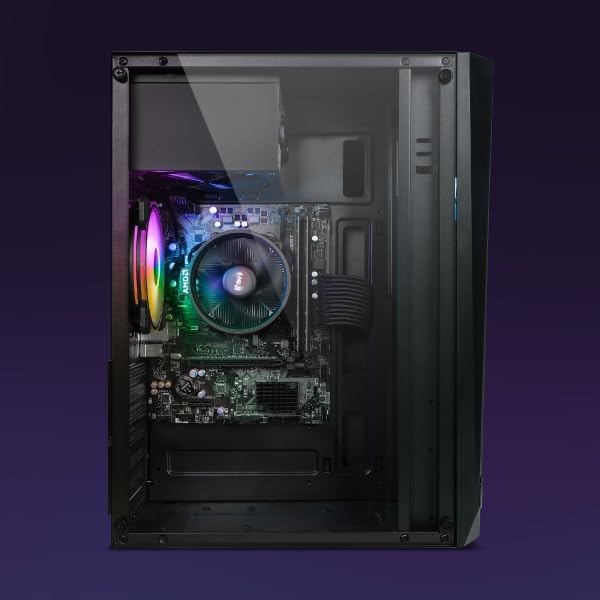
Image 3.1: An internal view of the PC, illustrating the layout of components and areas where dust may accumulate.
3.2 Software Updates
Keep your operating system and drivers updated for security and performance:
- Windows Updates: Go to Settings > Windows Update to check for and install the latest OS updates.
- Driver Updates: Regularly check the AMD website for the latest graphics drivers for your Radeon Vega 8.
3.3 Data Backup
Regularly back up important data to an external drive or cloud storage to prevent data loss.
4. Troubleshooting
This section addresses common issues you might encounter.
4.1 No Power
- Check Power Cables: Ensure all power cables are securely connected to the PC, monitor, and wall outlet.
- Power Strip: Verify that the power strip or surge protector is switched on and functioning.
4.2 No Display on Monitor
- Video Cable: Confirm the video cable is firmly connected to both the PC and the monitor.
- Monitor Input: Check the monitor's input source settings to ensure it's set to the correct input (e.g., DVI-D, VGA).
- Monitor Power: Ensure the monitor is powered on.
4.3 Slow Performance
- Close Background Applications: Close unnecessary programs running in the background.
- Disk Space: Ensure your 500GB NVMe M.2 SSD has sufficient free space.
- Updates: Verify that Windows and graphics drivers are up to date.
- Malware Scan: Run a full system scan using reputable antivirus software.
4.4 Network Connectivity Issues
- WiFi Adapter: Ensure the USB WiFi adapter is properly inserted and its drivers are installed.
- Router/Modem: Restart your router and modem.
- Network Settings: Check Windows network settings to ensure WiFi is enabled and connected to the correct network.
5. Specifications
Detailed technical specifications for the Vibox I-26 PC Gaming Complete System:
| Component | Specification |
|---|---|
| Processor | AMD Ryzen 3 3200G Quad Core (3.6 GHz base, 4.0 GHz Turbo) |
| Graphics | Integrated AMD Radeon Vega 8 Graphics |
| RAM | 8GB DDR4 2400MHz Dual-Channel |
| Storage | 500GB NVMe M.2 Solid State Drive |
| Operating System | Windows 11 Home (Pre-installed) |
| Monitor | 22-inch 1080p (1920x1080, 5ms response, LED backlit, 1 DVI-D, 1 VGA) |
| Connectivity | WiFi (600 Mbps adapter), Ethernet, 3x USB 2.0, 3x USB 3.0, 1x HDMI (from motherboard), Audio Jacks |
| Dimensions (PC Tower) | 32.6 x 19.5 x 42 cm |
| Weight (PC Tower) | 11.75 kg |

Image 5.1: Dimensions of the Vibox I-26 PC tower for reference.
6. Warranty and Support
6.1 Warranty Information
Your Vibox I-26 PC Gaming Complete System comes with a Vibox Lifetime Evolution Warranty. For specific terms and conditions, please refer to the warranty documentation included with your purchase or visit the official Vibox website.
6.2 Technical Support
If you encounter issues not covered in this manual or require further assistance, please contact Vibox customer support. Contact details can typically be found on the Vibox website or in your product packaging.
Before contacting support, please have your product model (I-26) and any relevant purchase information ready.


