Introduction
The Telestar DIRA M 1 A mobile is a compact, state-of-the-art hybrid radio designed for versatile audio reception. It supports digital DAB+ and Internet radio stations, as well as analog FM radio. This device delivers robust sound, customizable via its integrated equalizer, and features a clear 2.4-inch (6.1 cm) TFT color display for detailed information. With UPnP, Line-In, and USB Media Playback capabilities, it allows for playback of various music file formats from multiple sources. The DIRA M 1 A mobile also incorporates innovative EWF (Emergency Warning Function) and Journaline technologies, providing critical emergency alerts. Its integrated 2600 mAh Li-ION battery offers up to 15 hours of portable operation. Additional features include an alarm clock, sleep timer, and current weather information display, making it a comprehensive and unique audio solution.
Safety Information
Please read all safety instructions carefully before operating the device. Keep this manual for future reference.
- Do not expose the device to rain, moisture, or extreme temperatures.
- Avoid placing the device near heat sources such as radiators, heat registers, stoves, or other apparatus (including amplifiers) that produce heat.
- Use only attachments/accessories specified by the manufacturer.
- Unplug the device during lightning storms or when unused for long periods.
- Do not open the device casing. Refer all servicing to qualified service personnel.
- Dispose of batteries responsibly. Do not expose batteries to excessive heat or fire.
- Ensure proper ventilation around the device. Do not block any ventilation openings.
Package Contents
Verify that all items are present in the package:
- Telestar DIRA M 1 A Mobile Radio
- Remote Control (including battery)
- Screw-on Telescopic Antenna
- Power Adapter
- User Manual (this document)
Product Overview
Familiarize yourself with the components and controls of your Telestar DIRA M 1 A mobile radio.
Front Panel and Display

Image: Front view of the Telestar DIRA M 1 A mobile radio, showcasing the speaker grille on the left and the control panel with a color display on the right. The display shows radio station information and album art. Below the display are various control buttons and a rotary knob.
- 2.4-inch TFT Color Display: Shows station information, track details, settings, and weather.
- Speaker Grille: Located on the left side, covering the integrated speaker.
- Control Buttons: Include 'List', 'Preset', 'Mode', 'Menu', playback controls (1/►II, 2/■, 3/◄◄, 4/►►), 'Rec' (Record), Power button, and Back button.
- Rotary Knob: Used for navigation, selection, and volume control.
Rear Panel and Connections

Image: Rear view of the Telestar DIRA M 1 A mobile radio, displaying the antenna connection point, a USB port, an AUX-IN port, a DC-IN power input, and a power switch.
- Antenna Connector: For attaching the telescopic antenna.
- USB Port: For media playback from USB drives and potentially recording.
- AUX-IN: 3.5mm jack for connecting external audio devices.
- DC IN: Power input for the included power adapter.
- Headphone Jack: 3.5mm jack for private listening.
Setup
1. Power Connection
- Connect the provided power adapter to the "DC IN" port on the rear of the radio.
- Plug the power adapter into a wall outlet.
- Alternatively, the radio can operate on its internal 2600 mAh Li-ION battery for up to 15 hours. Ensure the battery is charged for portable use.
2. Antenna Setup

Image: The Telestar DIRA M 1 A mobile radio with its telescopic antenna fully extended, ready for optimal signal reception.
- Screw the telescopic antenna firmly into the antenna connector on the rear panel.
- For optimal DAB+ and FM reception, fully extend the antenna and adjust its position.
3. Initial Power On and Network Setup
- Press the Power button (⏻) on the front panel to turn on the radio.
- Upon first use, the radio will guide you through an initial setup wizard, including language selection and network configuration.
- To connect to your Wi-Fi network for Internet radio functionality:
- Navigate to the "System" menu using the rotary knob and select "Network".
- Choose "Wi-Fi Network" and then "Scan Network" to find available networks.
- Select your desired network from the list.
- Enter your Wi-Fi password using the rotary knob to select characters and confirm. This process can be lengthy.
- Once connected, the Wi-Fi icon will appear on the display.
Operating Instructions
Mode Selection
Press the Mode button to cycle through available listening modes: DAB+, FM, Internet Radio, Bluetooth, and USB.
DAB+ Radio
- Select DAB+ mode. The radio will automatically scan for available stations.
- Use the rotary knob to scroll through the list of stations. Press the knob to select a station.
- Press the rotary knob to switch between station name and additional information (e.g., program details, album art).
FM Radio
- Select FM mode.
- To manually tune, press the rotary knob once and rotate it.
- To auto-scan for the next available station, press and hold the rotary knob.
- RDS (Radio Data System) information, such as station name, will be displayed if available.
Internet Radio
- Ensure the radio is connected to a Wi-Fi network.
- Select Internet Radio mode. You can browse stations by genre, location, or search for specific stations.
- Use the rotary knob to navigate and select.
- Podcasts can also be accessed and searched for within this mode.
Bluetooth Connectivity
- Select Bluetooth mode. The radio will enter pairing mode.
- On your smartphone or other Bluetooth device, search for "DIRA M 1 A" in the Bluetooth settings and pair.
- Once connected, you can stream audio from your device to the radio.
USB Media Playback
- Insert a USB flash drive into the USB port on the rear panel.
- Select USB mode. The radio will scan the drive for compatible audio files.
- Use the navigation buttons and rotary knob to browse and play music.
- The radio supports USB recording functionality.
EWF (Emergency Warning Function) and Journaline
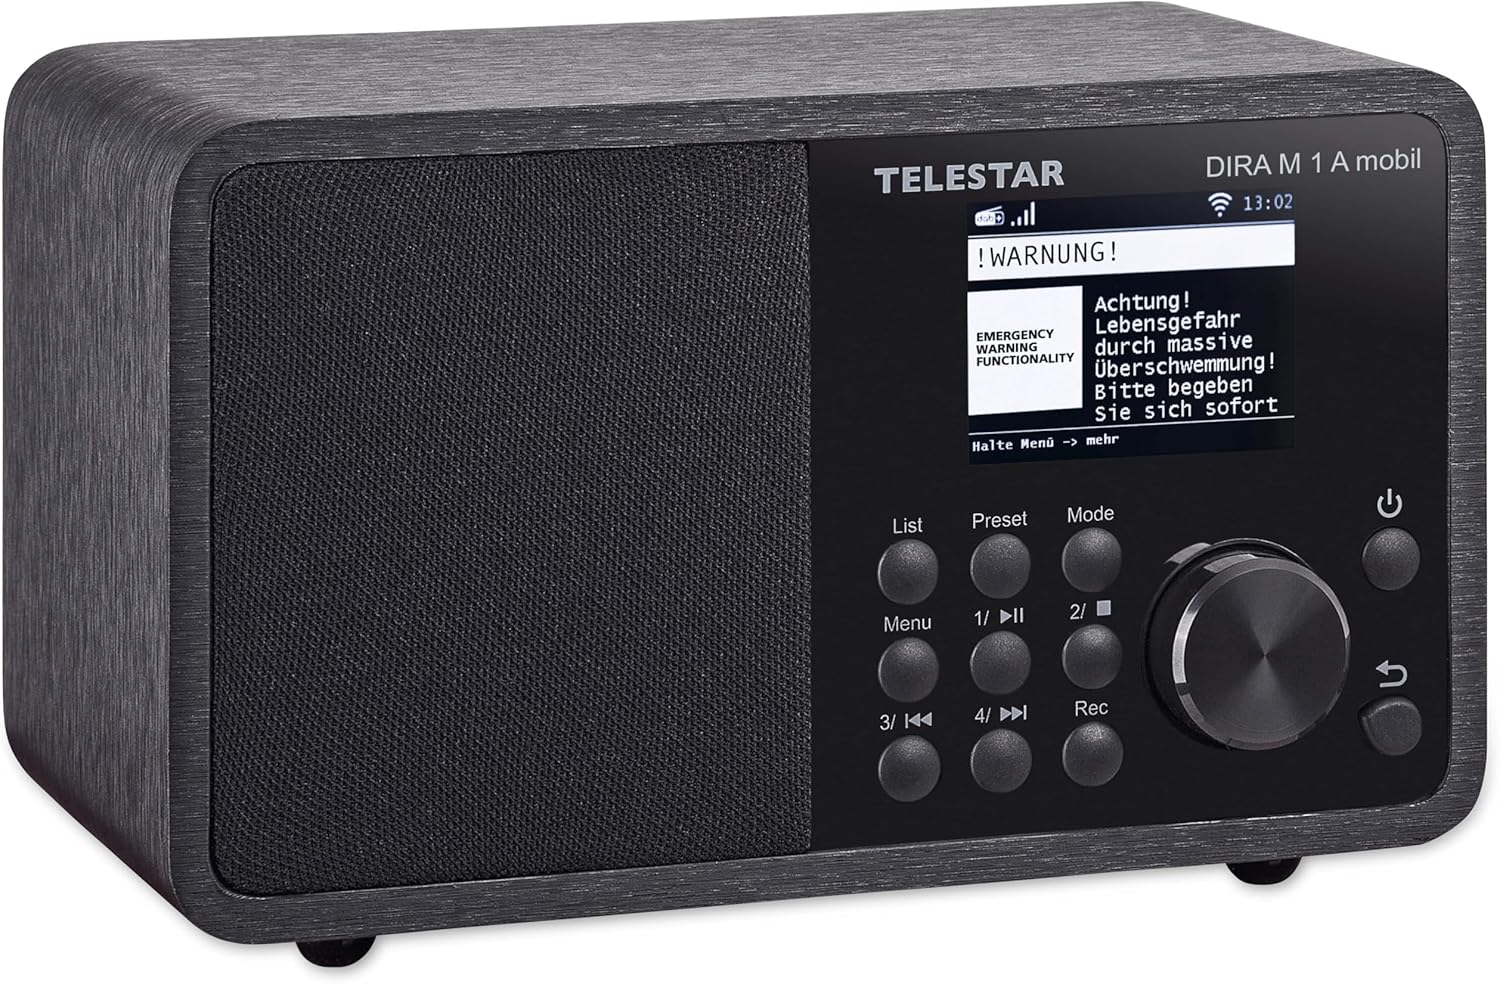
Image: The Telestar DIRA M 1 A mobile radio display showing an active emergency warning message, indicating its EWF functionality.
- The radio is equipped with EWF, an emergency alert system via DAB+ that can automatically activate and display warnings in case of disasters.
- Journaline provides text-based information services, typically news and program guides, broadcast via DAB+.
Alarm Clock and Sleep Timer
- Access these functions through the "System" or "Settings" menu.
- Set alarms to wake up to your preferred radio station or a buzzer.
- Configure the sleep timer to automatically turn off the radio after a set period.
Equalizer Settings
- Adjust the audio output to your preference via the equalizer settings, typically found in the "Sound" or "Settings" menu.
- Choose from preset equalizer modes or customize your own.
Maintenance
- Cleaning: Use a soft, dry cloth to clean the radio's exterior. Do not use abrasive cleaners or solvents.
- Battery Care: To prolong battery life, avoid fully discharging the battery frequently. If storing the radio for an extended period, charge the battery to about 50% and store in a cool, dry place.
- Antenna: Handle the telescopic antenna with care to prevent bending or breaking.
Troubleshooting
| Problem | Possible Cause | Solution |
|---|---|---|
| Radio does not turn on. | No power, discharged battery. | Ensure power adapter is securely connected and plugged into a live outlet. Charge the internal battery. |
| No sound. | Volume too low, mute activated, incorrect source. | Increase volume. Check if mute is active. Ensure correct input mode (DAB+, FM, Internet, Bluetooth, USB). |
| Poor DAB+/FM reception. | Antenna not extended, weak signal area, interference. | Fully extend and adjust the telescopic antenna. Try repositioning the radio. Check for local signal strength. |
| Cannot connect to Wi-Fi. | Incorrect password, out of range, network issue. | Double-check Wi-Fi password. Move radio closer to router. Restart router. |
| Bluetooth pairing fails. | Device not in pairing mode, out of range, other device connected. | Ensure radio is in Bluetooth pairing mode. Move devices closer. Disconnect any other paired Bluetooth devices. |
| Weather function not working. | Outdated firmware. | Check the Telestar website for firmware updates for model DIRA M 1 A mobile. Follow the instructions provided with the firmware to update the device. After updating, you may need to manually set your location for weather display. |
Specifications
| Feature | Detail |
|---|---|
| Brand | Telestar |
| Model Number | 30-011-02 |
| Color | Black |
| Display Technology | LCD (2.4-inch TFT Color Display) |
| Special Features | Portable, Rechargeable, EWF Emergency Warning, Journaline |
| Connectivity Technology | Bluetooth 5.1, USB, WLAN (Wi-Fi) |
| Tuner Technology | DAB+, DAB, FM, Internet Radio |
| Power Source | Battery (2600 mAh Li-ION, up to 15 hours), Wired (Power Adapter) |
| Audio Output Power | 10 W (Mono) |
| Compatible Devices | Headphones, Laptop, Smartphone, Tablet |
| Dimensions (L x W x H) | 12 x 13 x 19 cm (approximately 4.7 x 5.1 x 7.5 inches) |
| Weight | 1.2 kilograms (approximately 2.65 lbs) |
| USB Ports | 1 |
| Remote Control | IR |
Warranty and Support
The Telestar DIRA M 1 A mobile radio comes with a manufacturer's warranty. Please refer to the warranty card included in your package for specific terms and conditions. Spare parts availability is listed as 1 year from the date of purchase.
For technical support, troubleshooting assistance beyond this manual, or warranty claims, please contact Telestar customer service. Contact information can typically be found on the manufacturer's official website or on the product packaging.
It is recommended to check the official Telestar website (telestar.de) for the latest firmware updates, FAQs, and support resources, especially if experiencing issues like the weather function not working as expected.


