Introduction
This manual provides detailed instructions for the installation, operation, and maintenance of your FEKOTS Universal Ceiling Fan Remote Control Kit, model HD3. This kit is designed to add remote control functionality to most 110V 3-speed AC ceiling fans, including popular brands such as Hampton Bay, Home Decorators Collection, Hunter, and Harbor Breeze. It offers convenient control over fan speed, light dimming, thermostatic functions, and timers.
Safety Precautions
WARNING: HIGH VOLTAGE! Disconnect power by removing the fuse or switching off the circuit breaker before installation or maintenance. Failure to do so may result in serious injury or death.
- Do not use this kit with solid-state fans.
- All electrical wiring must comply with local and national electrical code requirements.
- The power supply for the fan must be 110/120 volts, 60Hz.
- Maximum fan motor amperage: 1.0 Amp.
- Maximum light wattage: 300 watts for dimmable LED or incandescent bulbs only. Most LED and all CFL lamps are not dimmable and will only support ON/OFF functionality.

Package Contents
Verify that all components are present before beginning installation:
- 1 x Remote Control (requires 2 AAA batteries, not included)
- 1 x Receiver/Controller
- 1 x Wall Mount Holder for Remote Control
- 6 x Wire Connectors
- 1 x Instruction Manual

Specifications
| Feature | Specification |
|---|---|
| Model Number | HD3 |
| Product Dimensions | 5.91 x 1.77 x 0.59 inches (Remote) |
| Item Weight | 8.4 ounces |
| Compatible Devices | Most 3-speed AC ceiling fans (downrod style) |
| Max Supported Devices | 1 |
| Color | Black |
| Special Features | Comfort Breeze Setting, Thermostatic feature, 3 Speed and Light Control, Walk Away Time Delay Function |
Setup and Installation
Follow these steps carefully to install your FEKOTS HD3 remote control kit:
- Disconnect Power: Before starting, ensure the power to the ceiling fan is completely off at the circuit breaker.
- Access Fan Wiring: Carefully lower the ceiling fan canopy to expose the wiring connections.
- Set Dip Switches: The remote control and receiver use dip switches to set the operating frequency. Ensure the dip switches on both the remote and the receiver are set to the same code. There are 16 different frequencies available. The default setting is 0000, which is not recommended due to potential interference. Avoid using 0000.
- Wire the Receiver: Connect the receiver wires to the fan and household wiring according to the wiring diagram provided below. Use the included wire connectors to secure all connections.
- Connect the AC IN N (Neutral) wire from the receiver to the household neutral wire (usually white).
- Connect the AC IN L (Live) wire from the receiver to the household live wire (usually black).
- Connect the TO MOTOR L (Live) wire from the receiver to the fan motor live wire (usually black).
- Connect the TO LIGHT L (Live) wire from the receiver to the fan light live wire (usually blue).
- Connect the ANT (Antenna) wire from the receiver.
- Secure Receiver: Carefully tuck the receiver into the fan canopy, ensuring no wires are pinched.
- Reattach Canopy: Securely reattach the fan canopy to the ceiling.
- Install Remote Batteries: Open the battery compartment on the remote control and insert two AAA batteries (not included), observing correct polarity.
- Restore Power: Turn the power back on at the circuit breaker.
- Test Functionality: Test all functions of the remote control to ensure proper operation.


Operating Instructions
Familiarize yourself with the remote control buttons and their functions:
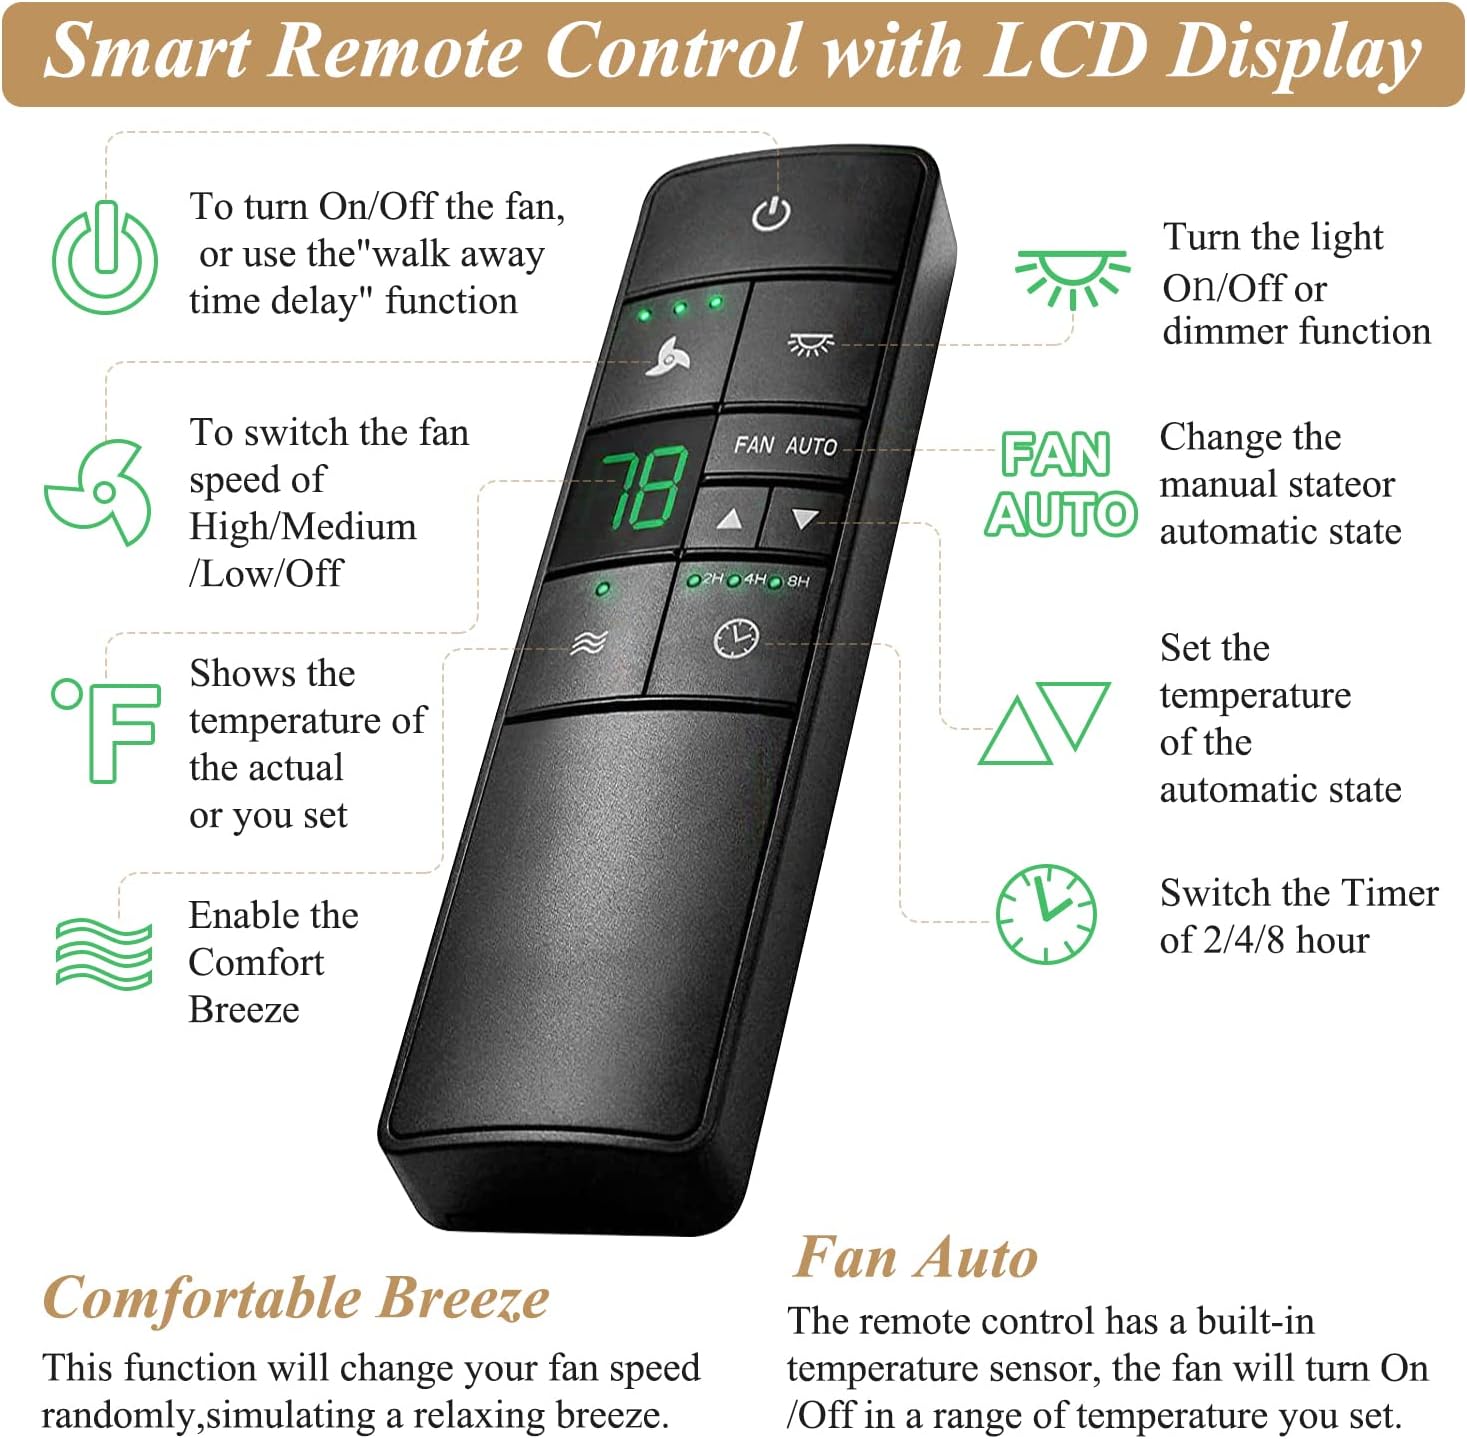
- Power Button (U): Press to turn the fan ON/OFF. This button also activates the "walk away time delay" function.
- Fan Speed Control (Fan Icon): Cycles through High, Medium, Low, and Off fan speeds.
- Light Control (Light Bulb Icon): Turns the light ON/OFF. If compatible, press and hold to dim the light.
- Comfortable Breeze (Wave Icon): Activates a natural breeze effect by randomly changing the fan speed.
- Thermostatic Control (°F / Up/Down Arrows): The remote has a built-in temperature sensor. Use the up/down arrows to set a desired room temperature. The fan will automatically turn ON/OFF when the room temperature is 1°C or 1°F above/below the set temperature. The LCD displays the current or set temperature.
- FAN AUTO Button: Changes the fan from manual control to automatic thermostatic control.
- Timer Settings (Clock Icon / 2H, 4H, 8H): Sets the fan and/or light to turn off automatically after 2, 4, or 8 hours.
- Walk Away Time Delay: When activated, the light will remain on for 30 seconds after you leave the room, then turn off.
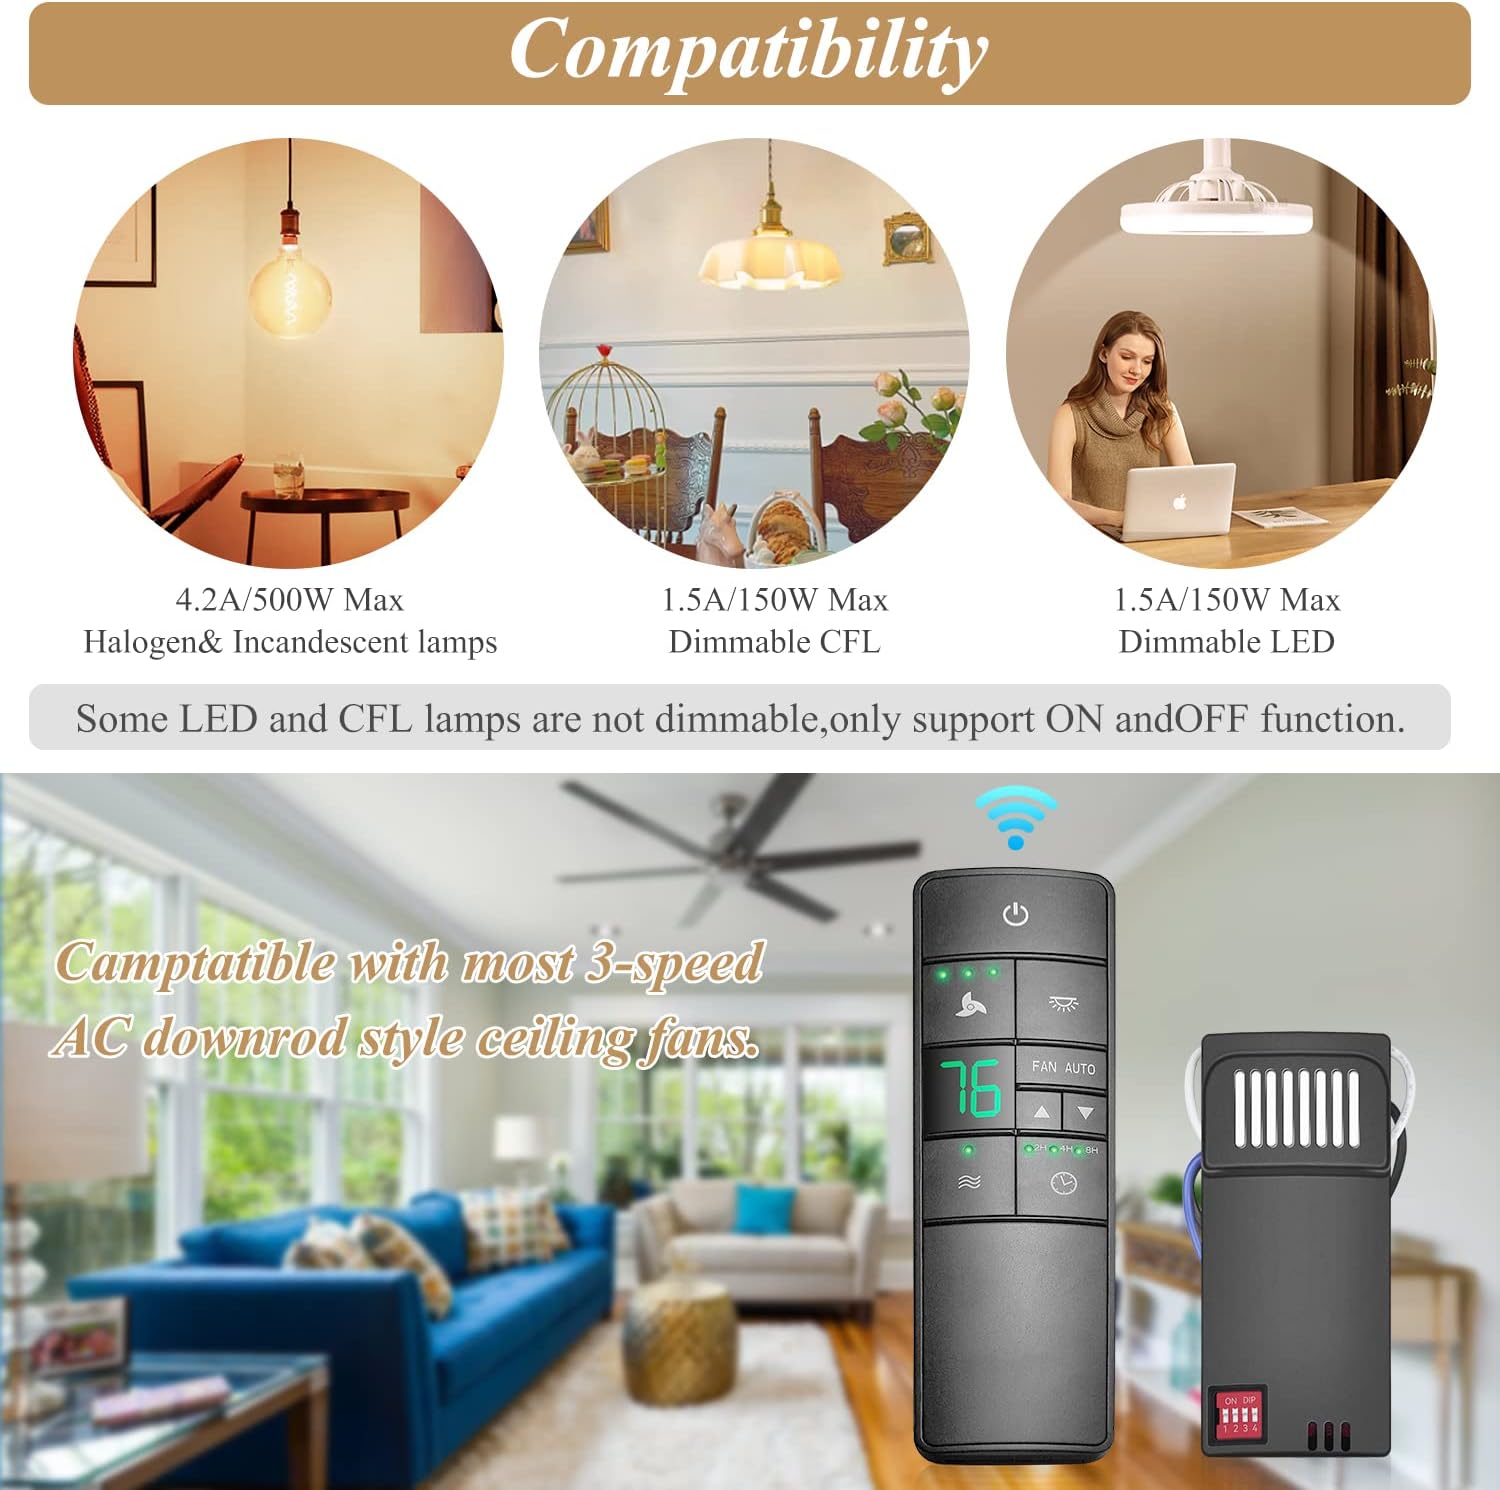
Compatibility
This remote control kit is compatible with most 3-speed AC downrod style ceiling fans. It is not recommended for use with hugger style fans.
Regarding lighting, the kit is compatible with:
- Halogen & Incandescent lamps (up to 4.2A/500W Max)
- Dimmable CFL (up to 1.5A/150W Max)
- Dimmable LED (up to 1.5A/150W Max)
Note: Most LED lamps and all CFL lamps are not dimmable with this kit; they will only support ON/OFF functionality.
Troubleshooting
If you encounter issues with your remote control kit, refer to the following common solutions:
- Remote not responding:
- Check if the batteries in the remote control are correctly inserted and not depleted. Replace with fresh AAA batteries if necessary.
- Ensure the dip switches on both the remote and the receiver are set to the exact same code.
- Verify that the power to the fan is on at the circuit breaker.
- Fan or light not working after installation:
- Double-check all wiring connections in the fan canopy. Ensure they are secure and match the wiring diagram.
- Confirm that the fan and light fixtures themselves are in working order.
- Ensure the receiver is not pinched or damaged within the canopy.
- Light does not dim:
- Confirm that the light bulbs installed are dimmable. Most LED and all CFL bulbs are not dimmable with this kit and will only function as ON/OFF.
- Ensure the total wattage of the bulbs does not exceed 300 watts.
- Intermittent operation or interference:
- Change the dip switch settings on both the remote and receiver to a different code (not 0000) to avoid interference from other devices.
- Ensure the remote is within range of the receiver and there are no major obstructions.
Maintenance
To ensure the longevity and proper functioning of your remote control kit:
- Cleaning: Wipe the remote control and receiver with a soft, dry cloth. Do not use abrasive cleaners or solvents.
- Battery Replacement: Replace remote control batteries promptly when they are depleted to prevent leakage and damage.
- Environmental Conditions: Avoid exposing the remote or receiver to extreme temperatures, humidity, or direct sunlight.
Warranty and Support
For warranty information or technical support, please refer to the contact details provided with your purchase documentation or visit the official FEKOTS brand store on Amazon. The manufacturer, FEKOTS, is dedicated to providing quality replacement parts and customer assistance.
You can visit the FEKOTS store for more information: FEKOTS Amazon Store


