1. Introduction
This manual provides detailed instructions for the installation, operation, and maintenance of your OMAC Roof Rack system. Please read this manual thoroughly before installation and use to ensure safe and correct operation. This roof rack is designed specifically for the Volvo XC60 model years 2017-2023.

Image 1.1: OMAC Roof Rack installed on a Volvo XC60.
2. Safety Information
- Maximum Load Capacity: Do not exceed the maximum load capacity of 75 kg (165 lbs) for the roof rack. Always refer to your vehicle's owner's manual for its specific roof load limits.
- Secure Fastening: Ensure all components are securely fastened before driving. Periodically check the tightness of all bolts and fasteners, especially after driving on rough roads or at high speeds.
- Weight Distribution: Distribute the load evenly on the roof rack. Place heavier items at the bottom and center.
- Vehicle Handling: Be aware that carrying loads on the roof can affect vehicle handling, braking, and fuel consumption. Adjust driving style accordingly.
- Height Clearance: Remember that the vehicle's overall height increases with the roof rack and any loaded items. Be mindful of low clearances (e.g., garages, car washes, drive-thrus).
- Aerodynamics: Large or irregularly shaped items can significantly affect aerodynamics. Secure them properly to prevent movement or detachment.
- Regular Inspection: Inspect the roof rack for any signs of wear, damage, or corrosion before each use. Replace damaged parts immediately.
3. Package Contents
Verify that all components are present before beginning installation:
- 2x Profiled Roof Rails (Crossbars)
- Connection Set
- Mounting Set
- Plastic Star Wrench
- Fastening Material

Image 3.1: Contents of the OMAC Roof Rack package.
4. Compatibility
This OMAC Roof Rack system is specifically designed for:
- Vehicle Model: Volvo XC60
- Model Years: 2017, 2018, 2019, 2020, 2021, 2022, 2023
- Roof Type: Compatible with vehicles equipped with flush rails.
Important: This product is not compatible with vehicles that have:
- Naked/Smooth Roof
- Factory Installed Roof Racks (Werkseitig installierter Dachgepäckträger)
- Raised Rails (Offene Dachreling)
- Fixed Point mounting systems

Image 4.1: Roof rail compatibility guide. This roof rack is designed for flush rails only.
5. Setup and Installation
Installation is straightforward. Follow these steps carefully:
- Identify Front and Rear Bars: The roof bars may have a specific orientation or length for front and rear. Consult the included connection set for guidance.
- Attach Mounting Feet: Secure the mounting feet to each end of the roof bars using the provided fastening material. Ensure they are oriented correctly to grip the flush rails.
- Position Bars on Roof Rails: Carefully place the assembled roof bars onto your vehicle's flush roof rails. Adjust their position to ensure even spacing and proper alignment.
- Tighten Clamping Mechanism: Using the provided plastic star wrench, tighten the clamping mechanism on each mounting foot. Ensure a firm and secure grip on the flush rails. Do not overtighten.
- Lock the System: Once securely tightened, use the locking mechanism (if applicable) to prevent unauthorized removal.
- Final Check: Before driving, gently pull and push on each roof bar to confirm it is firmly attached and does not move.

Image 5.1: Detail of the mounting foot mechanism.

Image 5.2: Mounting foot securely attached to the vehicle's flush rail.

Image 5.3: Using the star wrench to tighten the mounting foot.

Image 5.4: Detail of the locking mechanism for added security.
6. Operation
Your OMAC Roof Rack is designed for versatile use. Observe the following guidelines:
- Loading: Always adhere to the maximum load capacity of 75 kg. Distribute weight evenly.
- Securing Loads: Use appropriate straps, nets, or other securing devices to firmly attach all items to the roof rack. Ensure no items protrude excessively or obstruct visibility.
- Aerodynamic Design: The roof rack features an aerodynamic design to minimize wind noise. However, additional loads may increase noise.
- Removability: The roof rack is designed to be easily removable when not in use. This can help improve fuel efficiency and reduce wind noise.
7. Maintenance
To ensure the longevity and safe operation of your roof rack, follow these maintenance tips:
- Regular Cleaning: Clean the roof rack regularly with mild soap and water to remove dirt, road grime, and salt. Avoid abrasive cleaners.
- Inspect Fasteners: Periodically check all bolts, screws, and clamping mechanisms for tightness. Retighten as necessary.
- Check for Damage: Inspect the bars and mounting feet for any cracks, bends, or other signs of damage. Replace any damaged components immediately.
- Lubrication: If any moving parts or locking mechanisms become stiff, apply a small amount of silicone-based lubricant.
- Storage: If removing the roof rack for extended periods, store it in a dry, protected area away from direct sunlight and extreme temperatures.
8. Troubleshooting
| Issue | Possible Cause | Solution |
|---|---|---|
| Roof rack feels loose after installation. | Mounting feet not sufficiently tightened. | Re-tighten all clamping mechanisms using the star wrench until secure. Ensure proper alignment. |
| Excessive wind noise during driving. | Improperly secured load; incorrect bar positioning; missing end caps. | Ensure all items are securely fastened. Adjust bar position if possible. Check that all end caps are in place. |
| Difficulty attaching accessories to the bars. | Incompatible accessory; T-slot obstruction. | Verify accessory compatibility with the bar dimensions (40mm x 20mm). Check T-slots for debris. |
9. Specifications
- Brand: OMAC
- Model Numbers: A057264, A057392
- Material: Powder-coated steel / Metal
- Color: Silver
- Maximum Load Capacity: 75 kg (165 lbs)
- Bar Dimensions: Approximately 40mm (width) x 20mm (height)
- Mounting Type: Crossbar holder, luggage rack, rails (specifically for flush rails)
- Special Features: Easy assembly, multifunctional, aerodynamic design, low noise, lockable, removable, vehicle-specific fit.
- Certifications: TÜV & Crash Test Certified
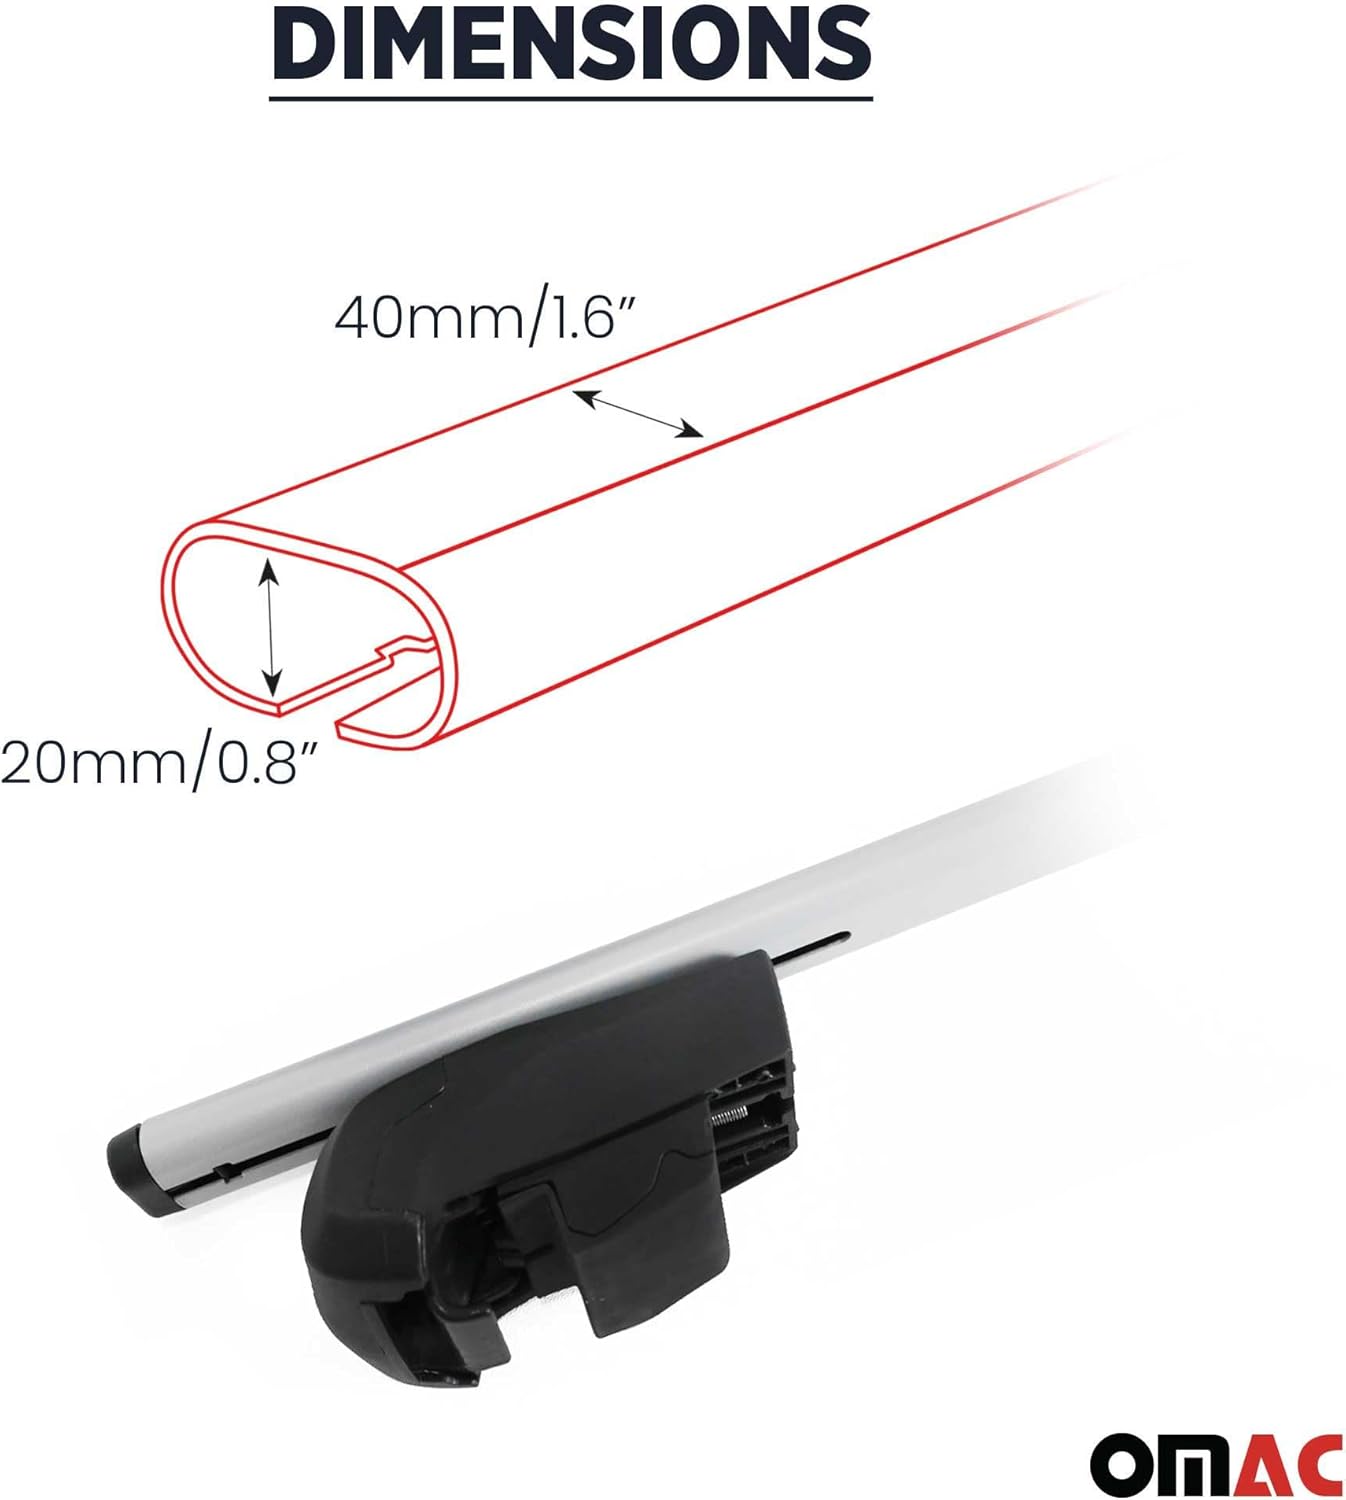
Image 9.1: Roof bar dimensions.
10. Warranty and Support
OMAC products are designed for durability and performance. For specific warranty details, please refer to the warranty card included with your product or contact OMAC customer support directly. Keep your purchase receipt as proof of purchase.
For further assistance, technical support, or to inquire about replacement parts, please visit the official OMAC website or contact your retailer.


