1. Important Safety Information
Read all instructions carefully before operating the PetraTools HD2000-S Battery Powered Sprayer. Failure to follow these instructions may result in electric shock, fire, and/or serious injury.
- Chemical Safety: Always wear appropriate personal protective equipment (PPE) such as gloves, eye protection, and respiratory masks when handling and spraying chemicals. Refer to the chemical manufacturer's instructions and safety data sheets (SDS) for specific precautions.
- Ventilation: Use the sprayer in well-ventilated areas. Avoid inhaling spray mist.
- Flammable Liquids: Do not spray flammable liquids, acids, or caustic solutions. This sprayer is designed for water-based solutions, herbicides, pesticides, and fertilizers.
- Electrical Safety: Keep the battery and charger dry. Do not expose to rain or wet conditions. Use only the charger supplied by PetraTools.
- Children and Pets: Keep the sprayer and chemicals out of reach of children and pets.
- Storage: Store the sprayer in a cool, dry, and secure location when not in use.
- Maintenance: Disconnect the battery before performing any maintenance or cleaning.
2. Package Contents
Verify that all components are present before assembly and operation.
- 2 Gallon Sprayer Tank (HDPE)
- Sprayer Wand with Hose (4-foot hose, 1.8 meters)
- 12V Rechargeable Battery
- Battery Charger
- Adjustable Brass Nozzle (for mist and stream)
- Fan-Tip Nozzle
- Padded Shoulder Strap
- User Manual

Image 2.1: PetraTools HD2000-S Sprayer and included accessories.
3. Setup Instructions
3.1 Charging the Battery
- Locate the 12V rechargeable battery and the battery charger.
- Connect the charger to the battery.
- Plug the charger into a standard electrical outlet. The charger light will typically turn red to indicate charging.
- Allow 4-6 hours for a full charge. The light may turn green or become dim when fully charged.
- Disconnect the charger once charging is complete.
3.2 Assembly
- Attach the Hose: Securely connect the sprayer hose to the outlet on the sprayer tank and to the wand handle. Ensure connections are tight to prevent leaks. Teflon tape can be used for a more secure seal if needed.
- Install Nozzle: Choose your desired nozzle (adjustable brass or fan-tip) and screw it onto the end of the wand.
- Attach Shoulder Strap: Clip the padded shoulder strap to the designated attachment points on the sprayer tank for comfortable carrying.

Image 3.1: Key features for comfortable use and easy filling.

Image 3.2: Translucent tank with clear measurement markings.
4. Operating Instructions
4.1 Filling the Sprayer
- Ensure the sprayer is turned off.
- Unscrew the wide-mouth cap from the top of the tank.
- Carefully pour your desired liquid solution into the tank. Do not overfill past the 2-gallon capacity.
- Securely replace the cap, ensuring a tight seal.
4.2 Priming the Pump
Before first use or after the tank has been emptied, the pump may need priming.
- With the tank filled, turn the sprayer on using the power switch located at the base.
- Point the wand into a safe area (e.g., a bucket or drain).
- Engage the trigger on the wand. It may take a few moments for the pump to draw liquid and begin spraying consistently. Continue holding the trigger until a steady spray is achieved.
4.3 Spraying
- Turn on the sprayer using the power switch.
- Hold the wand firmly and point the nozzle towards the target area.
- Press the trigger on the wand handle to begin spraying. The handle features a locking mechanism for continuous spraying.
- Nozzle Adjustment:
- Adjustable Brass Nozzle: Rotate the nozzle head to switch between a fine mist and a direct stream. This nozzle can achieve a spray distance of 15+ feet.
- Fan-Tip Nozzle: Provides a wide, even fan-shaped spray pattern, ideal for broad coverage.
- Release the trigger to stop spraying.
- When finished, turn off the sprayer using the power switch.

Image 4.1: Nozzle selection for varied spray patterns.

Image 4.2: Sprayer demonstrating a long-distance spray.
5. Maintenance
5.1 Cleaning After Use
Proper cleaning extends the life of your sprayer and prevents cross-contamination of chemicals.
- Empty any remaining solution from the tank.
- Rinse the tank thoroughly with clean water.
- Fill the tank with clean water and spray it through the wand and nozzle for several minutes to flush out any chemical residue from the pump, hose, and wand.
- Remove and clean the nozzles separately to prevent clogging.
- Wipe down the exterior of the sprayer with a damp cloth.
5.2 Storage
- Ensure the sprayer is clean and dry before storage.
- Store the sprayer in a cool, dry place, away from direct sunlight and freezing temperatures.
- Store the battery fully charged to maintain its lifespan. Recharge periodically if stored for extended periods.
6. Troubleshooting
| Problem | Possible Cause | Solution |
|---|---|---|
| Sprayer does not turn on. | Battery is not charged or not connected. | Ensure battery is fully charged and properly inserted. |
| No spray or weak spray. |
|
|
| Leaking from connections. | Loose connections or damaged seals. | Tighten all connections. Inspect O-rings and seals for damage and replace if necessary. Use Teflon tape on threaded connections. |
| Battery not charging. | Faulty charger or battery. | Ensure charger is plugged into a working outlet. Contact customer support if the issue persists. |
7. Specifications
- Model: HD2000-S
- Tank Volume: 2 Gallons (7.57 Liters)
- Power Source: 12V Battery Powered
- Battery Life: Up to 2 hours on a single charge
- Hose Length: 4 feet (1.8 meters)
- Material: HDPE (High-Density Polyethylene)
- Nozzles Included: Adjustable Brass Nozzle, Fan-Tip Nozzle
- Product Dimensions: 8"W x 20"H
- Item Weight: 7.52 pounds
- Recommended Uses: Fertilizers, Pest Control, Watering
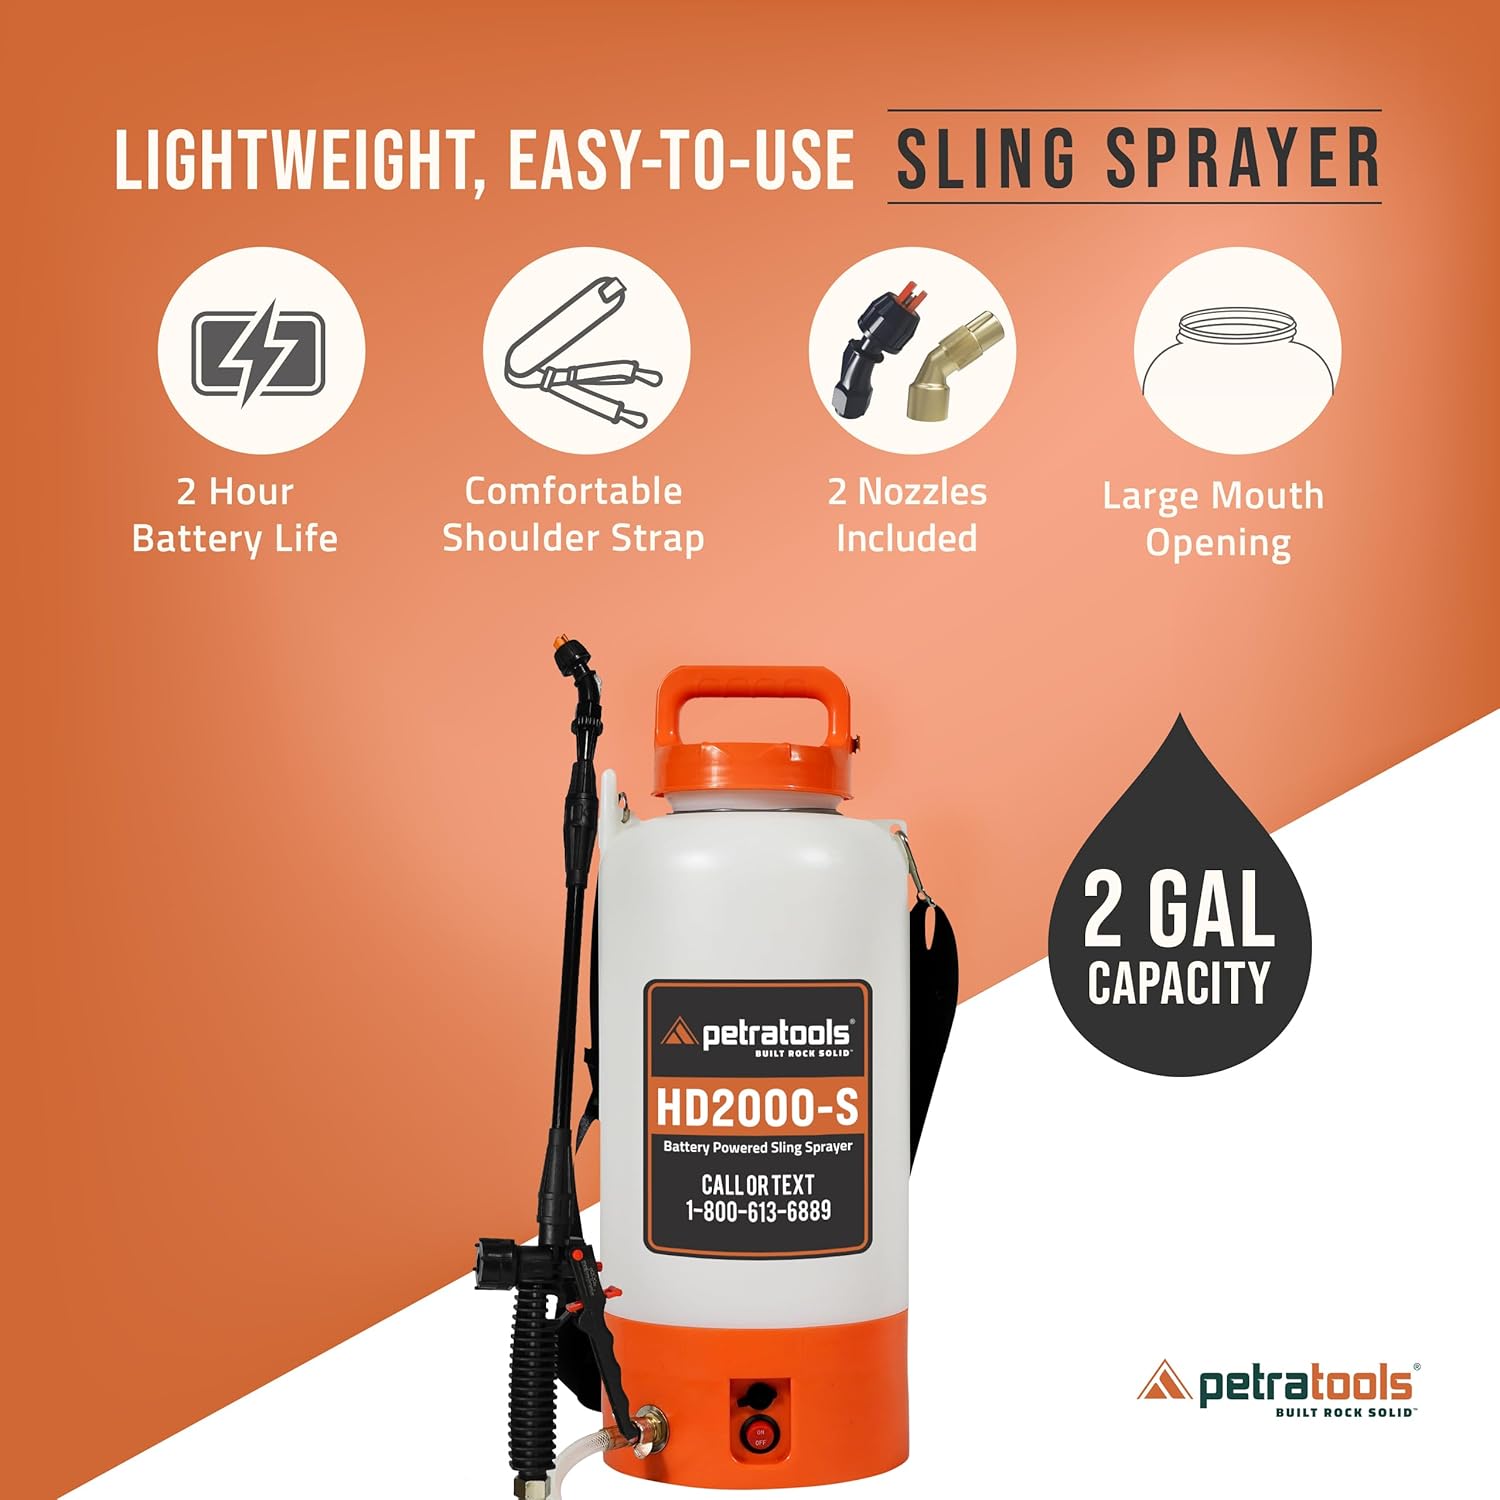
Image 7.1: Overview of key features and specifications.
8. Warranty and Support
PetraTools stands behind the quality of its products. For warranty information, technical support, or to purchase replacement parts, please contact PetraTools customer service.
Contact Information:
- Refer to the product packaging or the official PetraTools website for the most current contact details.
- Online resources and support videos may also be available on the PetraTools website.

Image 8.1: The PetraTools team, an American family-owned company.


