
ZOTAC ZT-D40810J-10P
Contents
ZOTAC Gaming GeForce RTX 4080 16GB Trinity OC Graphics Card User Manual
Model: ZT-D40810J-10P

Image: The ZOTAC Gaming GeForce RTX 4080 16GB Trinity OC graphics card displayed with its retail packaging.
Introduction
This manual provides essential information for the installation, operation, and maintenance of your ZOTAC Gaming GeForce RTX 4080 16GB Trinity OC graphics card. This high-performance graphics card is powered by the NVIDIA Ada Lovelace architecture, featuring advanced cooling with IceStorm 2.0 and customizable Spectra 2.0 RGB lighting. It is designed to deliver exceptional gaming performance and visual fidelity.
Please read this manual thoroughly before installation to ensure proper setup and to maximize the performance and longevity of your product.
What's in the Box
Verify that all components are present in the package:
- ZOTAC GAMING GeForce RTX 4080 16GB Trinity OC graphics card
- GPU Support Stand
- 3-pin RGB Header Cable
- 3x 8-pin-to-12VHPWR cable
- User Manual (this document)

Image: Contents of the ZOTAC Gaming GeForce RTX 4080 Trinity OC box, showing the graphics card, support stand, cables, and documentation.
Setup and Installation
Before proceeding, ensure your computer is powered off and unplugged from the wall outlet. It is recommended to wear an anti-static wrist strap to prevent damage from static electricity.
1. Prepare Your System
- Power Supply: Ensure your power supply unit (PSU) meets the recommended 750-watt requirement.
- Case Clearance: Verify your PC case has sufficient space for the graphics card (Length: 356.1mm, Height: 150.1mm, Width: 3.5 slot / 71.4mm).
- PCIe Slot: Locate an available PCI Express 4.0 x16 slot on your motherboard.
2. Graphics Card Installation
- Open PC Case: Remove the side panel of your computer case.
- Remove Slot Covers: Remove the necessary PCI slot covers from the back of your case to accommodate the graphics card's 3.5-slot width.
- Insert Graphics Card: Carefully align the graphics card with the PCIe x16 slot and press down firmly until it is securely seated. The retention clip on the motherboard slot should click into place.
- Secure Card: Fasten the graphics card to the case using the screws from the removed slot covers.

Image: Angled view of the ZOTAC Gaming GeForce RTX 4080 Trinity OC graphics card, showing its triple-fan design and heatsink.
3. Power Connection
The ZOTAC Gaming GeForce RTX 4080 Trinity OC requires a 12VHPWR power input. Use the provided 3x 8-pin-to-12VHPWR cable to connect your power supply to the graphics card.
- Connect three 8-pin PCIe power connectors from your PSU to the 8-pin ends of the adapter cable.
- Connect the 12VHPWR end of the adapter cable firmly into the corresponding port on the graphics card. Ensure a secure connection to prevent power delivery issues.
4. GPU Support Stand Installation
Due to the size and weight of the graphics card, it is highly recommended to install the included GPU Support Stand to prevent sag.
- Assemble the GPU Support Stand according to its quick guide.
- Position the stand beneath the graphics card, adjusting its height to provide firm support without putting excessive upward pressure on the card.
Image: The GPU Support Stand, a crucial accessory for preventing graphics card sag, shown alongside other included components.
5. RGB Lighting Connection (Optional)
If you wish to synchronize the SPECTRA 2.0 RGB lighting with your motherboard or external LED strips, use the provided 3-pin RGB Header Cable.
- Locate the 3-pin RGB header on your graphics card.
- Connect one end of the 3-pin RGB Header Cable to the graphics card.
- Connect the other end to a compatible 3-pin ARGB header on your motherboard or an external LED strip controller.
6. Connect Display Cables
Connect your monitor(s) to the graphics card using DisplayPort 1.4a or HDMI 2.1a cables. The card supports up to four simultaneous displays.
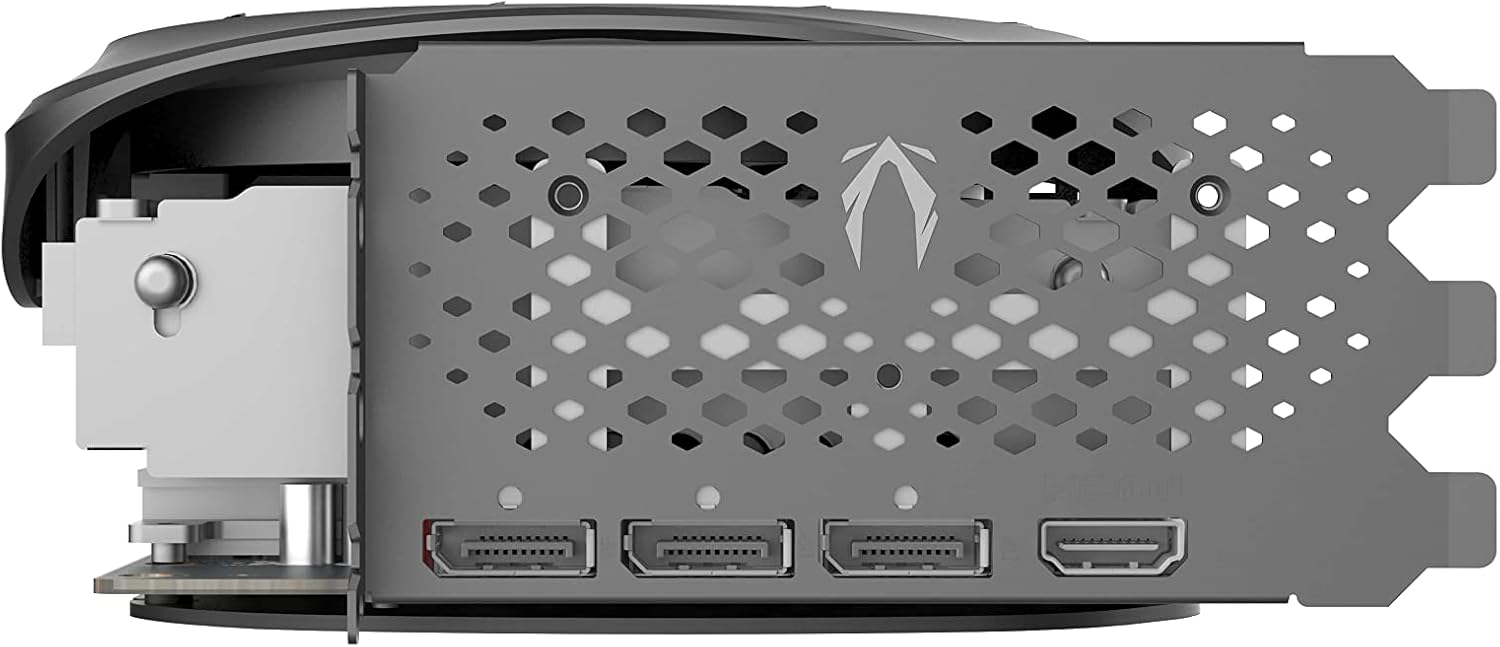
Image: The I/O panel of the ZOTAC Gaming GeForce RTX 4080 Trinity OC, featuring three DisplayPort 1.4a outputs and one HDMI 2.1a output.
7. Close PC Case and Power On
Replace the side panel of your PC case, plug in the power cord, and power on your computer.
8. Driver Installation
Once your system boots, install the latest NVIDIA GeForce drivers. You can download them from the official NVIDIA website (www.nvidia.com/drivers) or use the NVIDIA GeForce Experience application.
Operating Your Graphics Card
NVIDIA GeForce Experience
NVIDIA GeForce Experience is a companion application that optimizes your game settings, updates drivers, and allows you to record and stream gameplay. It is highly recommended for all users.
ZOTAC GAMING FireStorm Utility
The ZOTAC GAMING FireStorm Utility provides advanced control over your graphics card. With this software, you can:
- Monitor GPU performance (temperatures, clock speeds, fan speeds).
- Adjust fan curves and activate Active Fan Control.
- Customize SPECTRA 2.0 RGB lighting effects.
- Overclock the GPU for enhanced performance (use with caution).
- Switch between Dual BIOS profiles (if applicable).
Download the latest version of the FireStorm Utility from the official ZOTAC website.
Key Features
- IceStorm 2.0 Advanced Cooling: Features a robust cooling system with multiple fans (2x 110mm, 1x 100mm) and a large heatsink for efficient heat dissipation.
- FREEZE Fan Stop: Fans stop spinning during low load conditions to reduce noise.
- Active Fan Control: Allows independent control of fan speeds for optimized cooling.
- SPECTRA 2.0 RGB Lighting: Customizable RGB lighting zones on the card, controllable via FireStorm Utility or motherboard synchronization.
- Dual BIOS: Provides a backup BIOS or allows switching between different performance profiles.
- NVIDIA Technologies: Supports NVIDIA DLSS, Ray Tracing, Reflex, G-SYNC, and Broadcast for enhanced gaming and creative experiences.
Maintenance
Proper maintenance ensures optimal performance and extends the lifespan of your graphics card.
- Keep Drivers Updated: Regularly update your graphics drivers through NVIDIA GeForce Experience or the NVIDIA website to ensure compatibility and performance improvements.
- Clean Dust: Periodically clean dust from the graphics card fans and heatsink using compressed air. Ensure the system is powered off and unplugged before cleaning. Hold the fans gently to prevent them from spinning rapidly during cleaning.
- Ensure Airflow: Maintain good airflow within your PC case. Ensure case fans are properly configured to exhaust hot air and intake cool air.
- Monitor Temperatures: Use the ZOTAC GAMING FireStorm Utility or other monitoring software to keep an eye on GPU temperatures, especially during heavy loads.
Troubleshooting
This section addresses common issues you might encounter.
- No Display Output:
- Ensure the graphics card is fully seated in the PCIe slot.
- Verify all power cables (12VHPWR) are securely connected to the graphics card and PSU.
- Check that your monitor cable is connected to the graphics card, not the motherboard's integrated graphics port.
- Test with a different display cable or monitor if possible.
- Driver Installation Issues:
- Download the latest drivers directly from the official NVIDIA website.
- Uninstall any previous graphics drivers using Display Driver Uninstaller (DDU) in Safe Mode before attempting a fresh installation.
- Ensure your operating system is up to date.
- Overheating or Performance Throttling:
- Ensure adequate airflow within your PC case.
- Clean dust from the graphics card heatsink and fans.
- Verify that the GPU Support Stand is not obstructing fan movement.
- Check fan speeds using ZOTAC GAMING FireStorm Utility and ensure they are operating correctly.
- Ensure your case has sufficient ventilation.
- System Instability or Crashes:
- Ensure your power supply meets the recommended wattage.
- Check for the latest motherboard BIOS updates.
- If overclocking, revert to default settings to rule out instability caused by overclocks.
- Run memory diagnostic tools to check for RAM issues.
Specifications
| Feature | Detail |
|---|---|
| GPU | NVIDIA GeForce RTX 4080 |
| CUDA Cores | 9728 |
| Video Memory | 16GB GDDR6X |
| Memory Bus | 256-bit |
| Engine Boost Clock | 2520 MHz |
| Memory Clock | 22.4 Gbps |
| PCI Express | 4.0 16x |
| Display Outputs | 3 x DisplayPort 1.4a (up to 7680x4320@60Hz), 1 x HDMI 2.1a (Supports 4K 120Hz HDR, 8K 60Hz HDR, VRR) |
| HDCP Support | 2.3 |
| Multi-Display Capability | Quad simultaneous display capable |
| Recommended Power Supply | 750-watt |
| Power Consumption | 320-watt max |
| Power Input | 1 x 12VHPWR |
| Dimensions (Length) | 356.1mm (14in) |
| Dimensions (Height) | 150.1mm (5.9in) |
| Dimensions (Width) | 3.5 slot (71.4mm / 2.8in) |
| Supported OS | Windows 11 / 10 (64-bit, April 2018 update or later) |
| Model Number | ZT-D40810J-10P |
Warranty and Support
For detailed warranty information, please refer to the warranty card included with your product or visit the official ZOTAC website. ZOTAC provides technical support and resources to assist with any issues or questions you may have.
- Official User Manual (PDF): For a comprehensive guide, you can download the official PDF manual: Download PDF Manual
- ZOTAC Support: Visit the ZOTAC website for driver downloads, FAQs, and contact information for technical support.
- Product Registration: Register your product on the ZOTAC website to activate your warranty and receive product updates.
Ask a question about this manual
Ask about setup, troubleshooting, compatibility, parts, safety, or missing instructions. Manuals+ will review the question and use this page’s manual context to help answer it.