
1. Product Overview
The VXDAS Ultra Mini Dashboard Screen is designed to integrate seamlessly into Tesla Model 3 and Model Y vehicles manufactured between 2017 and 2023. This display provides essential driving information directly in the driver's line of sight, enhancing safety and convenience by reducing the need to frequently look away from the road to the main center screen.

Image 1.1: VXDAS Dashboard Screen installed in a Tesla vehicle.
The 6.2-inch LCD screen features a 960x360p resolution with true-color technology, ensuring clear and vibrant visuals. It supports smart brightness adjustment for optimal visibility in various lighting conditions.

Image 1.2: Driver's view of the dashboard screen, indicating compatibility with Model 3 and Model Y.
2. Package Contents
Verify that all components are present in the package before proceeding with installation:
- VXDAS Ultra Mini Dashboard Screen Unit
- Intel Wire Harness (for Tesla vehicles with Intel processors)
- AMD Wire Harness (for Tesla vehicles with AMD processors)
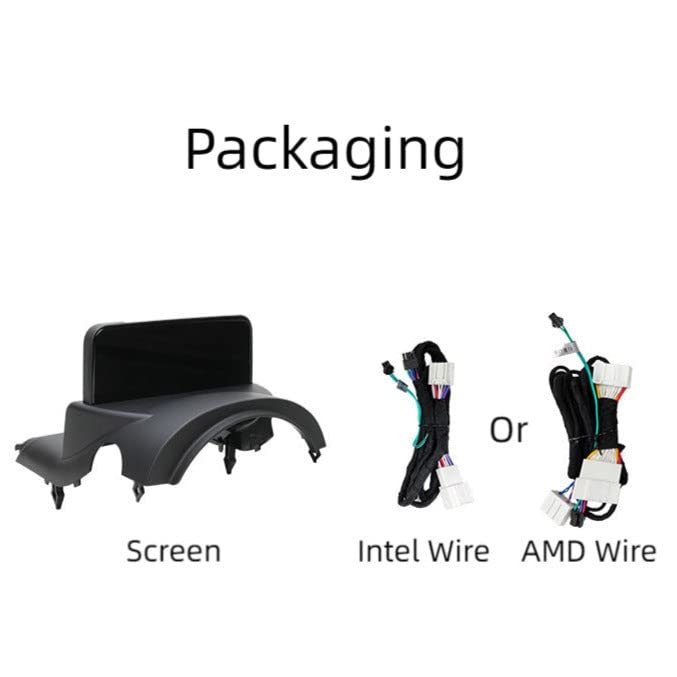
Image 2.1: Packaging contents showing the screen unit and two types of wiring harnesses.
3. Specifications
| Feature | Detail |
|---|---|
| Manufacturer | VXDAS |
| Product Dimensions (L x W x H) | 24.3 x 21.8 x 14.3 cm |
| Weight | 700 grams |
| Model Number | VXDAS-6.2-Tesla-Head-Up-Display |
| Material | Aluminum |
| Color | Metallic or Silver |
| Style | Minimalist Technology |
| Special Features | Adjustable, Smart Brightness, OTA Updates |
| Compatible Devices | Tesla Model 3, Tesla Model Y (2017-2023) |
| Display Type | IPS 2.5D Color Full-View LCD |
| Resolution | 960 * 360p |
| Water Resistance Level | Not waterproof |
4. Setup and Installation
The VXDAS dashboard screen is designed for a plug-and-play, non-destructive installation, preserving your car's original wiring and functionalities. Installation typically involves accessing the central console area to connect the appropriate wiring harness.
4.1 Identifying Your Tesla Processor
Tesla vehicles use different processors (Intel or AMD) depending on the manufacturing year. It is crucial to identify your car's processor type to use the correct wiring harness provided in the package. Vehicles manufactured from 2022 onwards typically use AMD processors.
4.2 Installation Steps Overview
- Prepare the Vehicle: Ensure the vehicle is powered off and in a safe state for installation.
- Access Wiring: Carefully lift the central console area to access the necessary power and data connections.
- Connect Harness: Connect the appropriate Intel or AMD wire harness to the vehicle's system. Ensure all connections are secure.
- Mount Display: Securely mount the VXDAS dashboard screen unit in the designated area behind the steering wheel.
- Test Functionality: Power on the vehicle and test all display functions to ensure proper operation.
For detailed visual instructions, it is recommended to consult online video tutorials specific to your Tesla model year and processor type. These resources can provide step-by-step guidance for a smooth installation process.

Image 4.1: Side view of the dashboard screen unit.

Image 4.2: Rear view of the dashboard screen unit with its connection cable.
5. Operating Instructions
The VXDAS dashboard screen provides a range of real-time vehicle information and smart functionalities:
5.1 Displayed Information
- Current Speed (km/h or mph)
- Battery Usage
- Time (12h and 24h format)
- Front Trunk Status (Open/Closed)
- Door Status (Left Front, Right Front, Left Rear, Right Rear: Open/Closed)
- Left/Right Turn Signal Indication
- Fog Lamp Indication
- Blind Spot Indication
- Autopilot Status Lights
- Outside Temperature
- Gear Display (P/R/N/D)
- Handbrake Reminder
- Seat Belt Indicator
- Tire Pressure Gauge
- Vehicle Distance Indicator
- Power Usage Beam
- American Road Signs
5.2 Smart Features
- User Interfaces: Choose between 2 distinct user interfaces.
- Brightness Settings: Adjustable brightness to suit ambient light conditions.
- Day and Night Mode: Automatic or manual switching between day and night display modes.
- Wireless CarPlay & Android Auto: Seamless integration with your smartphone for navigation, music, calls, and more (on compatible models).
- Over-The-Air (OTA) Updates: The system supports OTA updates to ensure you always have the latest features and improvements.
- Multi-Language Support: Wide language options are available.
- Optional Front Blind Spot Camera: Enhance safety with an optional front blind spot camera (sold separately).
5.3 Day/Night Mode Switching
To manually switch between day and night modes, push and hold the right scroll wheel on your steering wheel to the right for 3 seconds. This action will access the settings menu, where you can adjust the desired brightness and mode.
6. Maintenance
To ensure the longevity and optimal performance of your VXDAS Ultra Mini Dashboard Screen, follow these maintenance guidelines:
- Cleaning: Use a soft, dry, lint-free cloth to gently wipe the screen. For stubborn smudges, slightly dampen the cloth with water. Avoid using harsh chemicals, abrasive cleaners, or solvents, as these can damage the screen surface.
- Protection: Avoid direct exposure to extreme temperatures or prolonged direct sunlight when the vehicle is parked, as this can affect the display's performance and lifespan.
- Handling: Do not apply excessive pressure to the screen or attempt to disassemble the unit, as this may void the warranty and cause damage.
7. Troubleshooting
This section addresses common issues you might encounter with your VXDAS Ultra Mini Dashboard Screen.
Q1: What if the Tesla screen is black? (Screen installed but not illuminated)
- Reason 1: Other factors causing abnormal microprocessor operation.
Solution 1: Restart the key. - Reason 2: The main unit plug was disconnected and not reconnected within 5 minutes.
Solution 2: Reconnect the wiring harness, lock the car for 2 hours, keep the phone and remote key more than 20 meters away from the car, and check if the screen lights up after 2 hours. - Reason 3: The main unit or screen plug is not securely connected.
Solution 3: Reconnect the main unit plug securely.
Q2: Why does the screen start but show no display?
- Reason: Backend data error.
Solution: Reconnect the main unit plug.
Q3: Why does the screen display out of sync or not show original car information?
- Reason: Power and protocol lines are not connected.
Solution: Reconnect and inspect the wiring interfaces for proper connection.
Q4: How to switch between day and night mode?
- Solution: Push and hold the right scroll wheel on your steering wheel to the right for 3 seconds to access the settings menu. From there, you can adjust the desired brightness and mode.
8. Warranty and Support
8.1 Warranty Information
The VXDAS Ultra Mini Dashboard Screen comes with a 1-year warranty for spare parts availability, ensuring support for potential component replacements.
8.2 Customer Support
VXDAS is committed to customer satisfaction. If you encounter any issues not covered in this manual or require further assistance, please contact VXDAS customer support. Our responsive support team is available to help with product inquiries, technical assistance, and warranty claims.
Additionally, the product supports Over-The-Air (OTA) updates, ensuring your system remains current with the latest features and performance enhancements.