1. Introduction
The Gator Frameworks Elite Series 10U Studio Rack Desk is designed to accommodate professional audio equipment, offering 10U of rack space, a convenient slide-out tray, and integrated cable management. This unit can function as a standalone rack or integrate with other Elite Furniture Series desks to expand your workspace. This manual provides essential information for the safe assembly, proper operation, and general maintenance of your studio rack desk.

Figure 1: Gator Frameworks Elite Series 10U Studio Rack Desk
2. Safety Information
Please read and understand all safety instructions before assembly and use. Failure to follow these instructions may result in injury or damage to the product.
- Ensure the slide-out tray does not exceed the maximum weight capacity of 35 lbs (16 kg).
- Use leveling feet to stabilize the rack on uneven surfaces to prevent tipping.
- Follow all assembly instructions carefully to ensure proper installation and safe use.
- Keep small parts and packaging materials away from children.
3. Package Contents
Verify that all components are present before beginning assembly. The package typically includes:
- Main desk panels (top, bottom, sides)
- 10U rack rails
- Slide-out tray with runners
- Legs/feet (with leveling feet)
- Assembly hardware (screws, dowels, cam locks, etc.)
- Assembly instructions

Figure 2: Empty 10U Studio Rack Desk showing internal structure
4. Assembly Instructions
Assembly requires careful attention to the provided instructions. It is recommended to have a drill for certain steps, as noted by some users. Lay out all parts and hardware before starting.
- Unpack and Identify Parts: Carefully remove all components from the packaging. Verify against the parts list in the separate assembly guide. Note that the product may arrive in multiple boxes.
- Assemble the Main Frame: Follow the detailed diagrams in the assembly guide to connect the side panels, top, and bottom panels using the provided hardware. Ensure all connections are secure.
- Install Rack Rails: Secure the 10U rack rails into the designated positions within the main frame. Ensure they are correctly oriented for equipment mounting.
- Install Slide-Out Tray: Attach the runners to the slide-out tray and then install the tray assembly into the rack desk. Test the tray's smooth operation. Ensure it can support up to 35 lbs (16 kg).
- Attach Legs/Leveling Feet: Securely attach the legs to the bottom of the desk. Install the leveling feet and adjust them to ensure the desk is stable on your floor surface.
- Optional: Integrate with Other Elite Series Furniture: If combining with a main desk or corner section, follow the specific instructions for connecting the units to create an extended workspace.
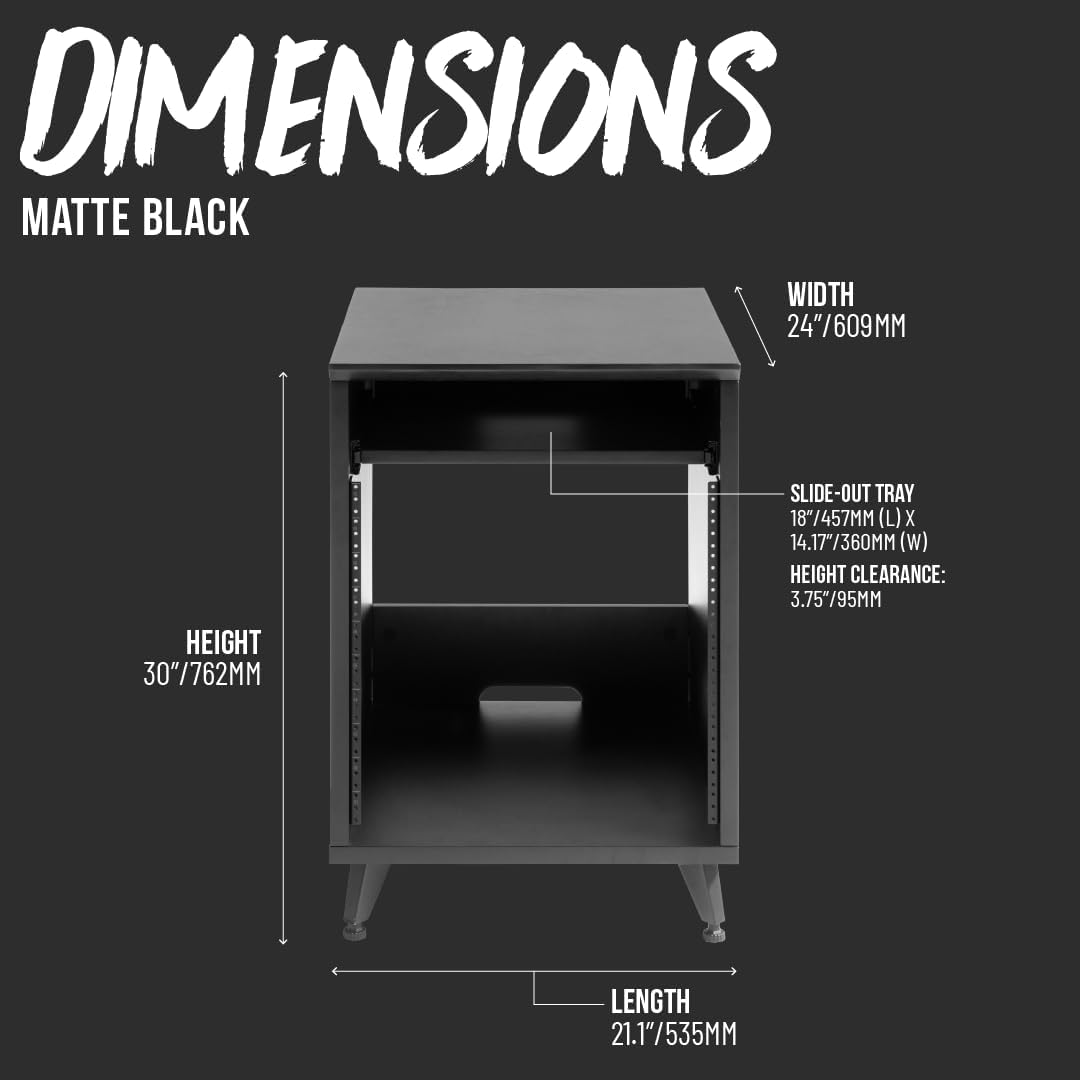
Figure 3: Product Dimensions

Figure 4: Rack Desk integrated with other Elite Series furniture
5. Operation
The Elite Series 10U Studio Rack Desk is designed for efficient organization and access to your studio equipment.
5.1 Installing Rack Equipment
Utilize the 10U rack space to mount preamps, effects processors, audio interfaces, and other standard 19-inch rack-mountable gear. Secure equipment using appropriate rack screws (not included unless specified in the separate assembly guide).

Figure 5: 10U Rack Space with equipment
5.2 Using the Slide-Out Tray
The slide-out tray, located above the rack space, provides additional storage for small samplers, controllers, or other desktop accessories. Gently pull the tray forward to access, and push it back to store. Do not exceed the maximum weight capacity of 35 lbs (16 kg).

Figure 6: Slide-Out Tray for additional storage
5.3 Cable Routing
The rear cable passthrough cutout helps manage and organize cables, keeping them out of sight and preventing clutter. Route power and audio cables through this opening for a tidy setup.

Figure 7: Rear Cable Passthrough
6. Maintenance
To ensure the longevity and appearance of your studio rack desk, follow these maintenance guidelines:
- Cleaning: Wipe surfaces with a soft, damp cloth. Avoid abrasive cleaners or harsh chemicals that could damage the finish.
- Hardware Check: Periodically inspect all screws and connections to ensure they remain tight. Re-tighten if necessary.
- Tray Lubrication: If the slide-out tray becomes stiff, apply a small amount of silicone-based lubricant to the runners.
7. Troubleshooting
If you encounter issues with your studio rack desk, consider the following common solutions:
- Instability: Ensure all leveling feet are properly adjusted and making firm contact with the floor. Check that all assembly hardware is securely tightened.
- Slide-Out Tray Issues: If the tray is not sliding smoothly, check for obstructions in the runners or ensure the runners are correctly installed. Lubricate if needed.
- Missing Parts: If any parts were missing upon delivery, contact the retailer or manufacturer's customer support for assistance.
- Assembly Difficulties: Double-check the assembly instructions. Sometimes, a small detail or orientation can be overlooked.
8. Specifications
| Model Number | GFW-ELITEDESKRK-BLK |
| Material | Wood |
| Mounting Type | Floor Mount |
| Style | 10U Studio Rack |
| Finish Type | Black |
| Product Dimensions (D x W x H) | 21.1" x 24" x 30" (53.5cm x 61cm x 76.2cm) |
| Slide-Out Tray Max Weight Capacity | 35 lbs (16 kg) |
| Required Assembly | Yes |
9. Warranty and Support
This Gator Frameworks product is covered by a 3-year manufacturer's warranty. For warranty claims, technical support, or to view other products, please visit the official Gator Frameworks store or contact customer service.
Official Brand Store: Gator Frameworks Store on Amazon


