1. Important Safety Instructions
Please read all safety warnings and instructions carefully before using this appliance to prevent fire, electric shock, injury, or property damage. Keep this manual for future reference.
- Always plug the heater directly into a wall outlet. Never use with an extension cord or relocatable power tap.
- Do not operate any heater with a damaged cord or plug, or after the heater malfunctions or has been dropped or damaged in any manner.
- Do not use outdoors. This heater is intended for indoor use only.
- Keep combustible materials, such as furniture, pillows, bedding, papers, clothes, and curtains at least 3 feet (0.9 m) from the front of the heater and away from the sides and rear.
- Extreme caution is necessary when any heater is used by or near children or invalids and whenever the heater is left operating unattended.
- To disconnect heater, turn controls to OFF, then remove plug from outlet.
- Do not insert or allow foreign objects to enter any ventilation or exhaust opening as this may cause an electric shock or fire, or damage the heater.
- This heater includes an anti-tip safety switch and an overheating protection system. If the heater tips over or overheats, it will automatically shut off.
2. Package Contents
Verify that all components are present and in good condition upon unpacking.
- OCEANIC 1500W Electric Oil-Filled Radiator Heater (Main Unit)
- Remote Control
- Wheel Assemblies (2 sets)
- Instruction Manual
3. Setup
3.1 Attaching the Wheels
- Carefully turn the heater upside down on a soft, non-abrasive surface to avoid scratching.
- Locate the two U-shaped bolts and four wing nuts provided.
- Align the wheel assemblies with the mounting holes at the bottom of the heater.
- Insert the U-shaped bolts through the mounting holes and secure them with the wing nuts. Ensure they are tightened firmly.
- Return the heater to an upright position.

Side view of the heater, illustrating the proper attachment of the wheel assemblies for mobility.
3.2 Placement Guidelines
Place the heater on a firm, level surface. Ensure there is adequate clearance from walls, furniture, and other objects (minimum 3 feet / 0.9 meters). Do not place the heater directly below a power outlet.

Example of the heater placed in a living space, demonstrating appropriate clearance from furniture and walls.
4. Operating Instructions
4.1 Control Panel Overview

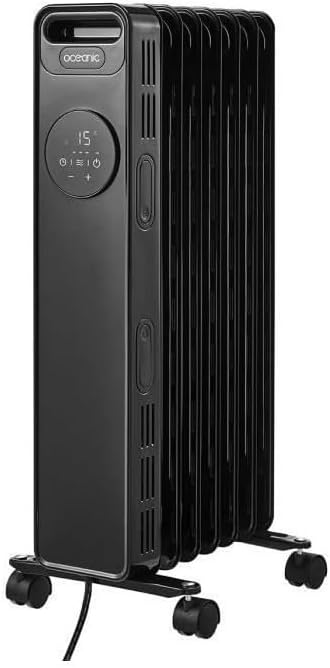
Detailed view of the heater's LED display and control buttons, including power, mode, timer, and temperature adjustments.
- Power Button: Turns the heater ON/OFF.
- Mode Button: Cycles through heating power settings (600W, 900W, 1500W).
- Temperature Buttons (+/-): Adjusts the desired temperature.
- Timer Button: Sets the operating timer (up to 24 hours).
- LED Display: Shows current temperature, timer settings, and power mode.
4.2 Powering On/Off
- Plug the heater into a suitable 220-240V AC power outlet.
- Press the Power Button on the control panel or remote control to turn the heater ON. The LED display will illuminate.
- To turn OFF, press the Power Button again.
4.3 Setting Temperature and Power
- Once ON, use the + or - buttons to set your desired temperature. The heater will automatically maintain this temperature.
- Press the Mode button to cycle through the three heating power settings: Low (600W), Medium (900W), and High (1500W). Select the appropriate power for your heating needs.
4.4 Using the Timer Function
- Press the Timer button. The display will show '00'.
- Use the + or - buttons to set the desired operating duration, from 1 to 24 hours.
- The heater will automatically turn off after the set time has elapsed.
4.5 Remote Control Operation
The included remote control duplicates the functions of the main control panel, allowing convenient operation from a distance. Ensure the remote has working batteries (not included) and is pointed towards the heater's receiver.
5. Maintenance
5.1 Cleaning
- Always unplug the heater and allow it to cool completely before cleaning.
- Wipe the exterior surfaces with a soft, damp cloth. Do not use abrasive cleaners or solvents.
- Do not immerse the heater in water or allow water to drip into the interior.
5.2 Storage
When not in use, store the heater in a cool, dry place. It is recommended to use the integrated cable winder to neatly store the power cord.
6. Troubleshooting
| Problem | Possible Cause | Solution |
|---|---|---|
| Heater does not turn on. | No power supply. Overheating protection activated. Anti-tip switch activated. | Check if the plug is securely in the outlet. Unplug, wait 30 minutes, then plug back in. Ensure the heater is on a flat, stable surface. |
| Heater produces no heat. | Temperature setting too low. Power mode set to low. | Increase the desired temperature setting. Cycle through power modes to a higher setting (900W or 1500W). |
| Remote control not working. | Batteries are dead or incorrectly inserted. Obstruction between remote and heater. | Replace batteries and ensure correct polarity. Remove any objects blocking the signal path. |
7. Specifications
| Feature | Detail |
|---|---|
| Model Number | OCEABHE1500B |
| Power Output | 1500W (Max) |
| Heating Power Settings | 600W, 900W, 1500W |
| Elements | 7 Oil-Filled Elements |
| Thermostat | Electric Thermostat |
| Display | LED Display |
| Timer | Up to 24 Hours |
| Control | On-board Panel & Remote Control |
| Safety Features | Anti-tip switch, Overheating protection |
| Mounting Type | Floor Mount (with wheels) |
| Power Source | Corded Electric |
| Item Weight | 9.54 Kilograms |
| Color | Black |
8. Warranty and Support
This OCEANIC product is covered by a manufacturer's warranty. For specific warranty terms, duration, and to register your product, please refer to the warranty card included in your package or visit the official OCEANIC website. For technical support, troubleshooting assistance, or to inquire about replacement parts, please contact OCEANIC customer service through their official channels.
Please retain your proof of purchase for any warranty claims.


