1. Introduction
This user manual provides essential information for the safe and efficient operation of your 3000W ZVS High Frequency Induction Heating Machine. This powerful device is designed for various applications including metal melting, quenching, annealing, and brazing. Please read this manual thoroughly before operating the machine to ensure proper usage and to prevent damage or injury.
2. Safety Instructions
WARNING: High voltage and high temperatures are present. Failure to follow these safety instructions may result in serious injury or death.
- Always ensure the machine is properly grounded.
- Do not operate the machine in damp or wet conditions.
- Keep flammable materials away from the heating area.
- Ensure adequate ventilation during operation to dissipate heat.
- Never touch the induction coil or heated workpiece directly during or immediately after operation. Use appropriate heat-resistant tools.
- Verify the water cooling system is functioning correctly before each use. Insufficient cooling can lead to overheating and damage.
- Wear appropriate personal protective equipment (PPE), including heat-resistant gloves, eye protection, and protective clothing.
- Disconnect power before performing any maintenance or inspection.
3. Product Overview and Components
Familiarize yourself with the main components of your induction heating machine.

Figure 3.1: Main unit of the 3000W ZVS High Frequency Induction Heating Machine with an attached coil and crucible.

Figure 3.2: Close-up of the digital display panel, providing real-time readings of voltage, current, power, and electric energy.
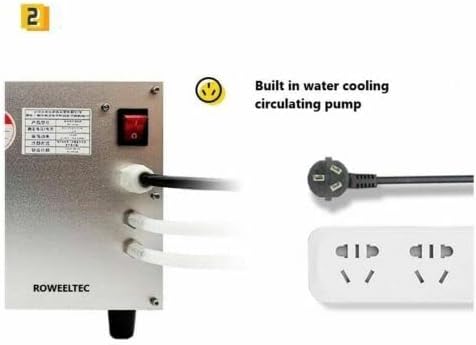
Figure 3.3: Rear view illustrating the built-in water cooling circulating pump connections and the power input port.

Figure 3.4: The complete pack list, including the host unit, induction coil, wrench, graphite cuvette, graphite crucibles, quartz crucible, crucible tongs, and silica gel tubes.

Figure 3.5: A table detailing various induction coil sizes (internal diameter, height) and their applicable workpiece dimensions, highlighting convenient coil replacement.
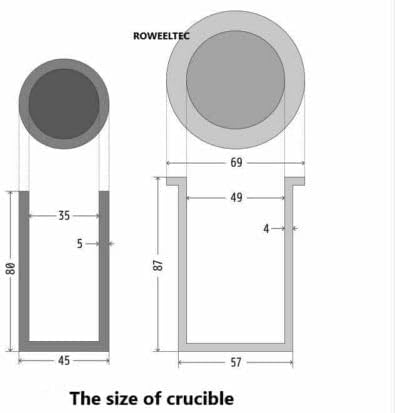
Figure 3.6: Diagram illustrating the dimensions of different crucible types compatible with the induction heating system.
4. Specifications
| Parameter | Value |
|---|---|
| Voltage | 220VAC |
| Smelting Power | 2100W |
| Quenching Power | 500W - 3000W (changes with load) |
| Host Size (L x W x H) | 355 x 158 x 198 mm |
| Package Size (L x W x H) | 530 x 230 x 290 mm |
| Weight | 8 kg |
| Manufacturer | Canglan Technology |
| ASIN | B0BJC5S7B2 |
| Date First Available | October 16, 2022 |

Figure 4.1: Detailed dimensions of the main unit in millimeters.
5. Setup
- Unpacking and Inspection: Carefully remove all components from the packaging. Inspect the machine and accessories for any signs of damage during transit. Report any damage to the supplier immediately.
- Placement: Place the induction heating machine on a stable, level, and non-flammable surface. Ensure there is ample space around the unit for proper ventilation and heat dissipation. Avoid placing it near flammable liquids or gases.
- Water Cooling System: The machine has a built-in circulating pump. Connect the provided silica gel tubes to the designated water inlet and outlet ports on the machine. Connect these tubes to an external water reservoir (not included) filled with clean, distilled water. Ensure the water level in the reservoir is sufficient for continuous circulation.
- Induction Coil Connection: Select the appropriate induction coil for your application. Connect the coil to the output terminals on the front of the machine, ensuring a secure and tight connection.
- Power Connection: Ensure the machine's power switch is in the OFF position. Connect the power cord to a grounded 220VAC power outlet. Verify that the power supply meets the machine's voltage requirements.
6. Operating Instructions
- Initial Check: Before powering on, double-check all connections, especially the water cooling system and induction coil. Ensure the workpiece or crucible is properly positioned within the coil.
- Power On: Flip the main power switch to the ON position. The digital display will illuminate, showing current voltage, current, and power readings.
- Adjusting Power: Use the control knob (if available) or digital interface to adjust the heating power and frequency according to your material and application requirements. Start with lower power settings and gradually increase as needed.
- Heating Process: The machine will begin to generate a high-frequency electromagnetic field, inducing eddy currents in the workpiece and causing it to heat rapidly. Monitor the heating process and the digital display for real-time feedback.
- Monitoring: Pay close attention to the workpiece's temperature and the machine's performance. The built-in safety features (over-current protection, temperature control) will help prevent damage, but continuous monitoring is recommended.
- Power Off: Once the heating process is complete, turn the power switch to the OFF position. Allow the machine and workpiece to cool down naturally. Do not touch the heated parts until they have cooled to a safe temperature.
7. Maintenance
- Cleaning: Regularly clean the exterior of the machine with a dry, soft cloth. Ensure no dust or debris accumulates in the ventilation openings.
- Water Cooling System: Periodically check the water level in the external reservoir and replenish as needed. It is recommended to change the water every 1-3 months, depending on usage, to prevent algae growth and mineral buildup. Use only distilled water.
- Coil Inspection: Inspect the induction coils for any signs of wear, damage, or discoloration. Replace damaged coils immediately to ensure efficient and safe operation.
- Connections: Periodically check all electrical and water connections to ensure they are secure and free from corrosion.
8. Troubleshooting
| Problem | Possible Cause | Solution |
|---|---|---|
| Machine does not power on | No power supply; Loose power cord; Blown fuse/circuit breaker | Check power outlet; Secure power cord; Check and reset circuit breaker/fuse |
| No heating or weak heating | Incorrect coil selection; Improper workpiece placement; Low power setting; Overload protection activated | Ensure correct coil for workpiece; Center workpiece in coil; Increase power setting; Reduce load or allow cooling |
| Overheating/Shutdown | Insufficient water cooling; Blocked water tubes; Prolonged operation at high power | Check water level/flow; Clear any blockages; Allow machine to cool down; Ensure proper ventilation |
| Unusual noise or smell | Internal component issue; Overload | Immediately power off the machine and disconnect from power. Contact customer support. |
If you encounter issues not listed here or if the suggested solutions do not resolve the problem, please contact Canglan Technology customer support.
9. Warranty and Support
For warranty information, please refer to the documentation provided with your purchase or visit the official Canglan Technology website. Keep your proof of purchase for warranty claims.
For technical support, spare parts, or service inquiries, please contact Canglan Technology directly. Contact information can typically be found on the product packaging or the manufacturer's official website.