1. Introduction
Thank you for choosing the MELONFARM 19-Inch Bud Leaf Bowl Trimmer. This manual provides essential information for the safe and efficient operation, setup, maintenance, and troubleshooting of your new trimming device. Please read these instructions thoroughly before use to ensure optimal performance and longevity of the product.
2. Safety Instructions
- Sharp Blades: The trimmer contains extremely sharp blades. Always handle with extreme caution. Keep hands and fingers away from the blades during assembly, operation, and cleaning.
- Wear Protective Gear: It is highly recommended to wear cut-resistant gloves and eye protection during operation and maintenance to prevent injury.
- Stable Surface: Always operate the trimmer on a stable, flat, and non-slip surface to prevent accidental tipping or movement.
- Adult Use Only: This product is intended for adult use only. Keep out of reach of children and pets.
- Proper Ventilation: Ensure adequate ventilation in the work area.
- Inspect Before Use: Before each use, inspect all components for damage or wear. Do not operate if any parts are damaged.

This image highlights safety features, including the recommendation to wear cut-resistant gloves during operation and the 6mm grid spacing of the plant tray, designed to prevent injury while ensuring effective cutting.
3. Package Contents
Please verify that all components are present in your package:
- 1 x 19-Inch Stainless Steel Bowl Trimmer Unit (includes bowl, grate, and clear lid with handle)
- 1 x Straight Blade
- 1 x Dentate Blade
- 1 x Wire X Blade
- 1 x 2ft 8L Dry Rack
- 1 x User Manual
4. Product Overview
The MELONFARM Bowl Trimmer is designed for efficient and precise trimming of plant material. Its manual operation provides control, while interchangeable blades cater to various trimming needs.
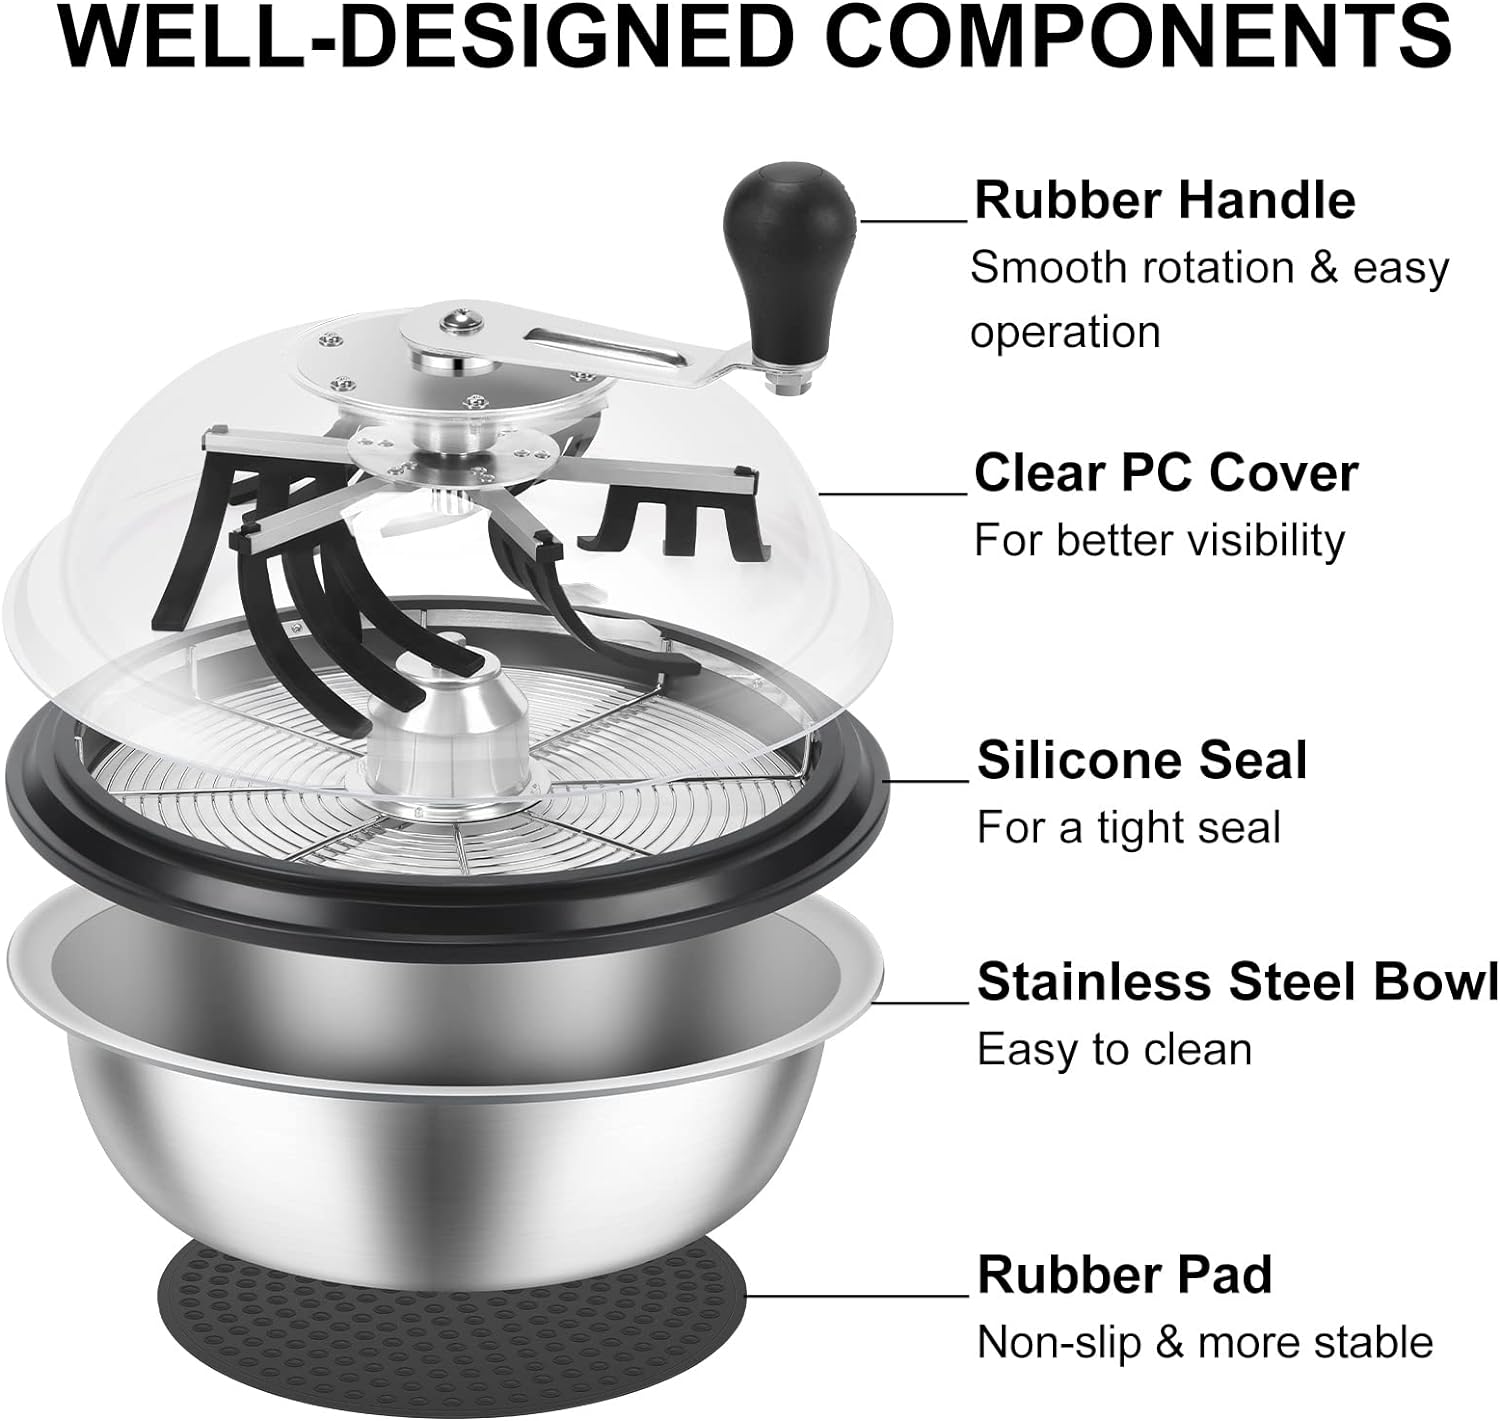
This diagram provides an exploded view of the trimmer's key components, detailing the rubber handle for smooth rotation, the clear PC cover for visibility, the silicone seal for a tight fit, the easy-to-clean stainless steel bowl, and the non-slip rubber pad for stability.
Key Components:
- Rubber Handle: Provides a comfortable grip and smooth rotation for manual operation.
- Clear PC Cover: Allows for visibility of the trimming process.
- Silicone Seal: Ensures a tight fit between the cover and the bowl.
- Stainless Steel Bowl: Durable and easy to clean, collects trimmed material.
- Rubber Pad: Non-slip base for enhanced stability during use.
- Trimming Grate: Supports plant material while blades trim underneath.
- Interchangeable Blades: Straight, Dentate, and Wire X blades for different trimming requirements.
5. Setup
- Unpack Components: Carefully remove all parts from the packaging.
- Place Bowl: Position the stainless steel bowl on a stable, flat surface. Ensure the rubber pad is securely attached to the bottom of the bowl for stability.
- Install Blade: Select the appropriate blade for your trimming needs (refer to Section 6.1). Carefully align the blade onto the central shaft within the bowl and secure it. Ensure it is firmly in place but can rotate freely.
- Place Grate: Position the trimming grate over the blade, ensuring it sits flush with the rim of the bowl.
- Attach Clear Cover: Place the clear PC cover onto the bowl, aligning the central shaft of the cover with the blade assembly. Ensure the silicone seal creates a tight fit.
- Attach Handle: Secure the rubber handle to the top of the clear cover's central shaft.
6. Operating Instructions
6.1. Blade Selection
Choose the blade type that best suits the moisture content of your plant material:
- Straight Blade: Ideal for wet trimming, providing a clean cut on fresh material.
- Dentate Blade: Suitable for semi-dry trimming, offering a balance between wet and dry applications.
- Wire X Blade: Best for dry trimming, designed to handle drier, more brittle material effectively.

This image illustrates the three interchangeable blade types—straight, dentate, and wire X—designed for different trimming applications: wet, semi-dry, and dry. It also shows examples of plant material after each trimming method.
6.2. Trimming Process
- Preparation: Ensure your plant material is free from large stems or debris. For best results, remove larger fan leaves manually before using the trimmer.
- Load Material: With the clear cover removed, evenly distribute a moderate amount of plant material onto the trimming grate. Do not overfill, as this can reduce efficiency and quality of trim.
- Secure Cover: Replace the clear PC cover and ensure it is properly sealed.
- Operate Handle: While holding the bowl steady, turn the rubber handle in a clockwise or counter-clockwise direction. The blades beneath the grate will rotate, trimming the excess leaves.
- Monitor Progress: Observe the trimming through the clear cover. Continue turning the handle until the desired trim level is achieved. The duration will vary based on material type and desired finish.
- Collect Trimmed Material: Once trimming is complete, remove the clear cover and grate. The trimmed leaves will collect in the bottom bowl, while the finished product remains on the grate.

This image displays the MELONFARM 19-Inch Bud Leaf Bowl Trimmer in use, highlighting its manual operation and efficient design for trimming plant material.
7. Maintenance and Cleaning
Regular cleaning is crucial for maintaining the performance and hygiene of your trimmer.
- Disassembly: Carefully disassemble the trimmer by removing the handle, clear cover, grate, and blade.
- Blade Cleaning: Use a soft brush or cloth and warm soapy water to clean the blades. For stubborn residue, isopropyl alcohol can be used. Exercise extreme caution due to blade sharpness.
- Bowl and Grate Cleaning: The stainless steel bowl and grate can be washed with warm soapy water. Many parts are dishwasher safe, but hand washing is recommended for longevity.
- Clear Cover Cleaning: Wipe the clear PC cover with a soft, damp cloth. Avoid abrasive cleaners that could scratch the surface.
- Drying: Ensure all components are thoroughly dried before reassembly or storage to prevent rust and mildew.
- Storage: Store the clean and dry trimmer in a cool, dry place, away from direct sunlight and out of reach of children.
8. Troubleshooting
- Uneven Trimming:
- Ensure plant material is evenly distributed on the grate.
- Do not overfill the bowl.
- Increase rotation time or speed.
- Difficulty Turning Handle:
- The bowl may be overfilled. Reduce the amount of material.
- Residue buildup on the shaft or blades. Clean thoroughly.
- Ensure the clear cover is properly seated and not binding.
- Material Sticking to Blades/Grate:
- Clean blades and grate more frequently during operation.
- Consider using a non-stick spray (food-grade) on blades if suitable for your application.
- Blades Not Cutting Effectively:
- Ensure the correct blade type is selected for the material's moisture content.
- Blades may be dull. Replacement blades may be required over time.
9. Specifications
| Feature | Specification |
|---|---|
| Model Number | MFBT16-DR24 |
| Diameter | 19 Inches |
| Product Weight | Approximately 15.9 lbs (7.2 kg) |
| Function | Manual |
| Rotation | 360° Cycle |
| Material | Stainless Steel (Bowl, Blades), PC (Cover) |
| Power Source | Manual |
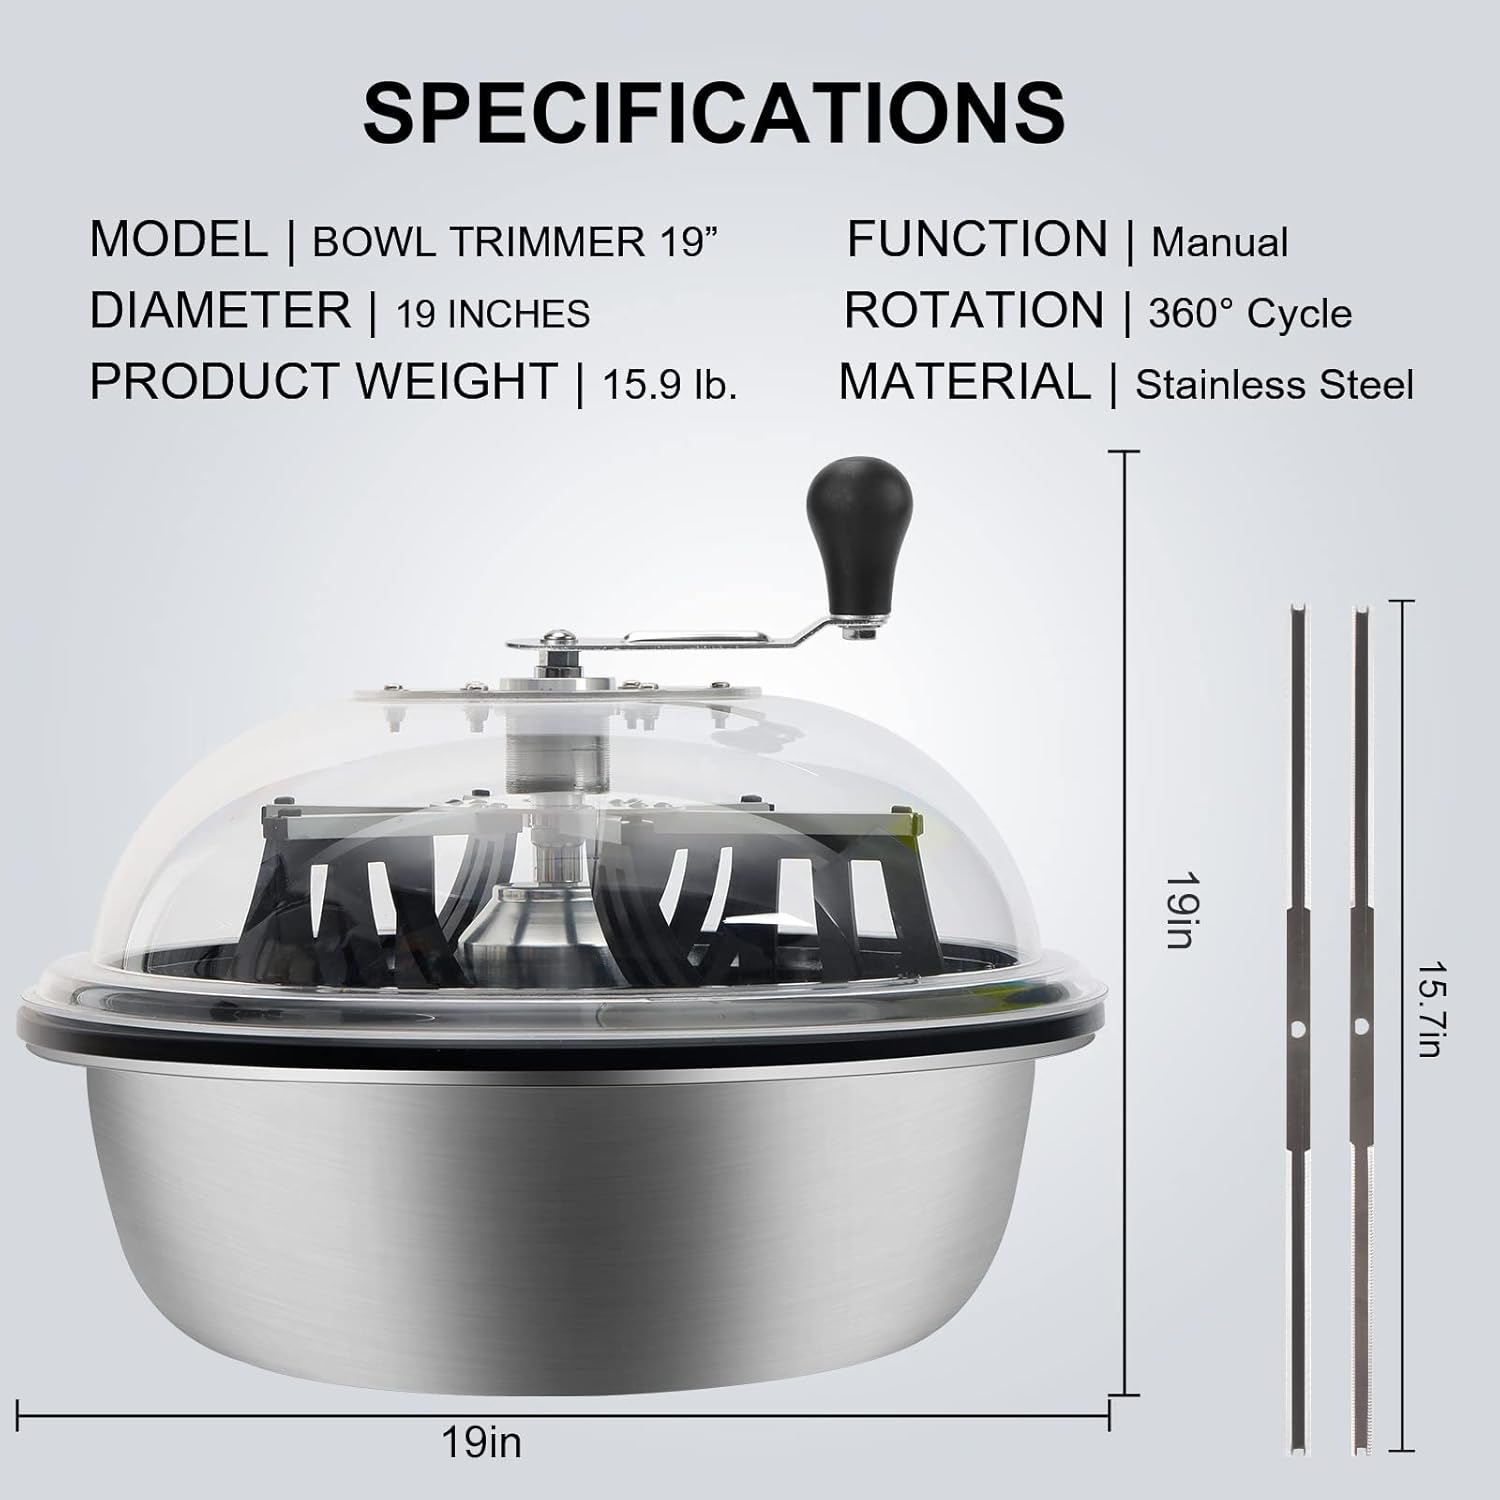
This image presents a visual summary of the product's specifications, including its 19-inch diameter, 15.9 lb weight, manual function, 360-degree rotation, and stainless steel construction.
10. Warranty Information
MELONFARM products are manufactured to high-quality standards. Specific warranty details may vary by region and retailer. Please retain your proof of purchase for any warranty claims. For detailed warranty information, refer to the documentation provided at the time of purchase or contact customer support.
11. Customer Support
If you have any questions, require assistance with setup, operation, or troubleshooting, or need to inquire about replacement parts, please contact MELONFARM customer support through the retailer where the product was purchased or visit the official MELONFARM website for contact information.