
VONFORN VF803
Contents
VONFORN 700W HVLP Paint Sprayer User Manual
Model: VF803
Introduction
Thank you for choosing the VONFORN 700W HVLP Paint Sprayer. This high-volume, low-pressure spray gun is designed for efficient and precise application of various paints and coatings on a wide range of surfaces. With its powerful 700W motor, adjustable spray patterns, and easy-to-clean design, it is an ideal tool for both beginners and experienced users tackling projects such as furniture, cabinets, fences, walls, and more. This manual provides essential information for safe operation, setup, maintenance, and troubleshooting to ensure optimal performance and longevity of your paint sprayer.
Important Safety Information
Always read and understand all safety warnings and instructions before operating this paint sprayer. Failure to follow these instructions may result in electric shock, fire, and/or serious injury.
- Keep away from children. This product is not a toy.
- Always wear appropriate personal protective equipment (PPE) including safety glasses, gloves, and a respirator when operating the paint sprayer.
- Ensure the work area is well-ventilated to prevent the accumulation of hazardous fumes.
- Do not spray flammable materials near open flames, pilot lights, or other ignition sources.
- Always disconnect the power supply before cleaning, adjusting, or performing maintenance on the sprayer.
- Do not immerse the motor unit in water or other liquids.
- Use only recommended thinning agents and follow paint manufacturer's instructions for preparation.
- Store the paint sprayer in a dry, secure location out of reach of children.
Product Overview and Components
The VONFORN HVLP Paint Sprayer is designed for user-friendly operation and efficient painting. Familiarize yourself with its main components:

Image: The main paint sprayer unit shown with its various accessories, including different sized nozzles, a viscosity cup, cleaning tools, and the blowing/cleaning joints.
- Motor Unit: Contains the 700W motor and trigger.
- Spray Gun Assembly: Includes the nozzle, air cap, and spray head.
- Paint Container: 1200ml capacity for holding paint.
- Nozzles: Four interchangeable nozzles (1.0mm, 1.5mm, 2.0mm, 3.0mm) for different paint viscosities and project types.
- Viscosity Cup: Used to measure paint viscosity for proper thinning.
- Cleaning Brush & Needle: Tools for thorough cleaning of the sprayer components.
- Dust Blowing Joint: Attachment for blowing away dust and debris from surfaces before painting.
- Clean Connector: Attachment for connecting to a water source for easy internal cleaning.
- Pot Lid: For sealing the paint container.
- Paint Filters: For filtering paint before use.
Setup
Proper setup is crucial for optimal performance and safety. Follow these steps before each use:
- Prepare the Work Area: Ensure the area is clean, well-ventilated, and free from ignition sources. Cover any surfaces not intended for painting.
- Assemble the Sprayer:
- Attach the spray gun assembly to the motor unit by twisting until secure.
- Select the appropriate nozzle (1.0mm, 1.5mm, 2.0mm, or 3.0mm) based on your paint type and desired spray pattern. Insert it into the spray head.
- Attach the air cap to the spray head, ensuring it is oriented for the desired spray pattern (horizontal, vertical, or circular).
- Prepare the Paint:
- Stir the paint thoroughly.
- Use the included viscosity cup to check the paint's viscosity. Fill the cup with paint and time how long it takes for the paint to flow out completely. Refer to the paint manufacturer's recommendations or the table below for ideal viscosity ranges.
- If the paint is too thick, thin it gradually with the recommended solvent (e.g., water for latex, mineral spirits for oil-based) until the desired viscosity is achieved. Mix well after each addition.
- Filter the paint using one of the included paint filters to remove any impurities that could clog the nozzle.
- Fill the Container: Pour the prepared paint into the 1200ml paint container and securely attach it to the spray gun assembly.

Image: A visual guide demonstrating the simple assembly process of the paint sprayer, showing how the motor unit, spray head, and paint container connect.
Nozzle Selection and Viscosity Guide

Image: A chart illustrating the four nozzle sizes (1.0mm, 1.5mm, 2.0mm, 3.0mm) with their recommended DIN-s viscosity ranges and typical applications like wooden artwork, cabinets, railings, and walls.
| Nozzle Size | Recommended Viscosity (DIN-s) | Typical Applications |
|---|---|---|
| 1.0 mm | 15-25 DIN-s | Wooden Artwork, DIY projects |
| 1.5 mm | 25-35 DIN-s | Chairs, Shutters, Cabinets |
| 2.0 mm | 35-50 DIN-s | Railings, Window Frames |
| 3.0 mm | 50-80 DIN-s | Walls, Decks, Fences |
Operating Instructions
Once the sprayer is assembled and the paint is prepared, you are ready to begin spraying.
- Power On: Plug the power cord into a suitable AC outlet (120V / 60Hz).
- Adjust Spray Pattern: Rotate the air cap to select one of the three spray patterns:
- Horizontal (90°): For vertical surfaces.
- Vertical (180°): For horizontal surfaces.
- Circular (45°): For small areas or corners.
- Adjust Flow Control: Use the flow control knob located on the trigger to adjust the paint output volume.
- Turn clockwise for more paint flow.
- Turn counter-clockwise for less paint flow.
- Blowing Function (Pre-Painting): Before applying paint, you can use the dust blowing joint to clear the surface of dust and debris. Attach the dust blowing joint to the sprayer and activate the unit to blow air.
- Spraying Technique:
- Hold the sprayer approximately 6-12 inches (15-30 cm) from the surface, perpendicular to the surface.
- Press the trigger to start spraying. Move the sprayer in smooth, even strokes, overlapping each pass by about 50%.
- Release the trigger at the end of each stroke to avoid paint buildup.
- Apply multiple thin coats rather than one thick coat to prevent drips and ensure a smooth finish. Allow adequate drying time between coats as per paint manufacturer's instructions.

Image: A visual representation of the three spray patterns (horizontal, vertical, circular) and how to adjust the air cap to achieve each.
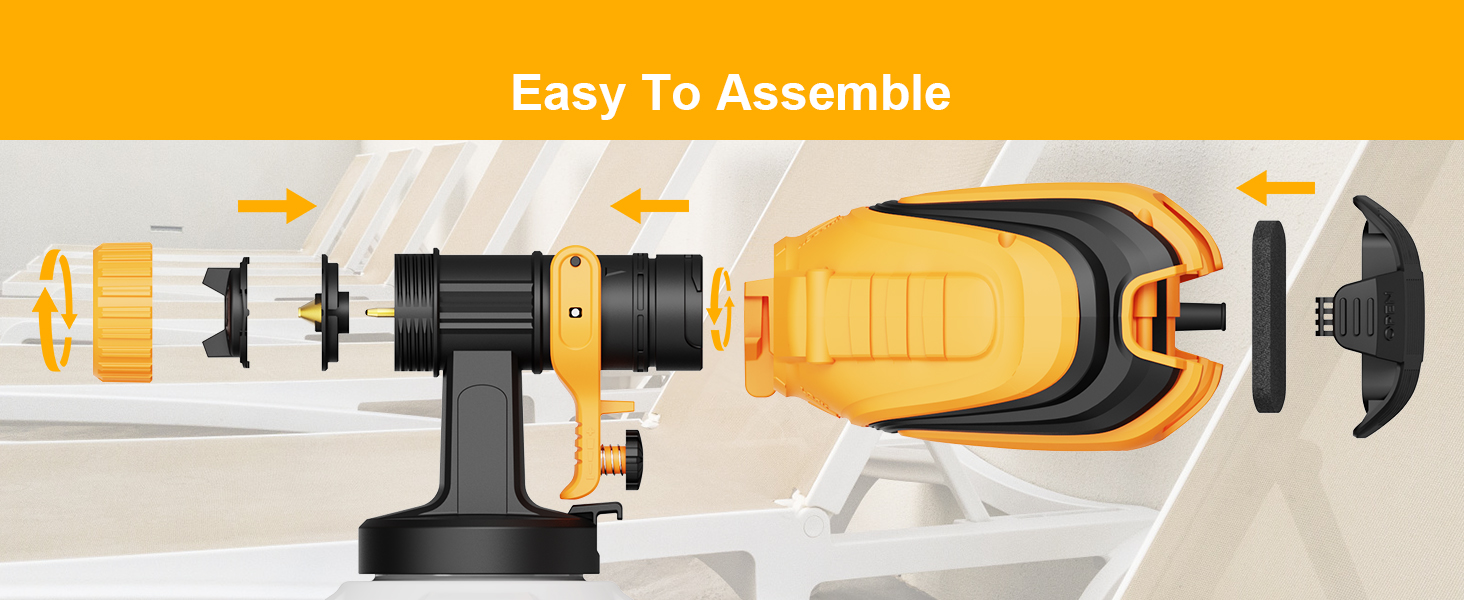
Image: A diagram illustrating the flexible flow control knob and how turning it clockwise increases paint flow and counter-clockwise decreases it.

Image: This image demonstrates the unique blowing function, showing the sprayer being used to clear sawdust from a wooden surface, and the cleaning function with a hose connection.
Maintenance
Thorough cleaning after each use is essential to prevent clogging and ensure the longevity of your paint sprayer.
- Empty Paint Container: Disconnect the paint container and pour any remaining paint back into its original can.
- Initial Rinse: Fill the paint container with appropriate cleaning solution (water for water-based paints, mineral spirits for oil-based paints). Reattach the container and spray the solution into a waste container until clear.
- Internal Cleaning (with Clean Connector): Attach the clean connector to the sprayer and connect it to a water faucet. Run water through the sprayer to flush out internal components.
- Disassemble and Clean Components:
- Disassemble the spray gun assembly (nozzle, air cap, spray head, paint container).
- Use the included cleaning brush and needle to thoroughly clean all paint-contacting parts. Pay special attention to the nozzle and air cap holes to remove any dried paint.
- Rinse all parts with clean water or appropriate solvent.
- Dry and Store: Allow all components to dry completely before reassembling. Store the clean, dry sprayer in a cool, dry place.

Image: A series of images demonstrating how to clean the paint sprayer, including rinsing the container, using the cleaning brush for internal parts, and using the needle for nozzle holes.
Troubleshooting
If you encounter issues with your paint sprayer, refer to the table below for common problems and solutions:
| Problem | Possible Cause | Solution |
|---|---|---|
| No spray or weak spray | Clogged nozzle or air cap; paint too thick; paint container empty; suction tube blocked. | Clean nozzle and air cap; thin paint to correct viscosity; refill paint container; clear suction tube. |
| Uneven spray pattern | Air cap not properly aligned; partially clogged nozzle; inconsistent spraying technique. | Adjust air cap orientation; clean nozzle thoroughly; practice consistent strokes. |
| Paint drips or runs | Paint too thin; spraying too close to surface; applying too much paint per coat; flow control too high. | Add unthinned paint to thicken; increase distance from surface; apply thinner coats; reduce flow control. |
| Motor not running | No power; loose connection; internal fault. | Check power outlet and cord; ensure all connections are secure; if problem persists, contact customer support. |
Specifications
| Feature | Detail |
|---|---|
| Model Name | VF803 |
| Brand | VONFORN |
| Power Source | AC |
| Voltage | 120V / 60Hz |
| Power Consumption | 700W |
| Max Flow Rate | 1000 ml/min |
| Max Viscosity | 100 DIN-s |
| Tank Volume | 1200 Milliliters |
| Nozzle Sizes | 1.0mm, 1.5mm, 2.0mm, 3.0mm |
| Spray Patterns | Horizontal, Vertical, Circular |
| Material | Plastic |
| Item Weight | 3.7 Pounds (approx. 1.68 kg) |
| Product Dimensions | 5.9"W x 11.42"H (approx. 15cm W x 29cm H) |
| Power Cord Length | 2 meters / 6.5 feet |
| Special Features | Low Pressure, High Volume, Unique Blowing & Cleaning Functions |
Warranty and Support
VONFORN is committed to providing high-quality products and customer satisfaction. While specific warranty details are not provided in this manual, we encourage you to retain your purchase receipt as proof of purchase.
For any questions, technical assistance, or after-sales support regarding your VONFORN Paint Sprayer, please contact us directly through your order platform. Our technical and after-sales teams are dedicated to assisting you and typically respond within 18 hours.
You can also visit the official VONFORN store on Amazon for more information and products: VONFORN Store
Ask a question about this manual
Ask about setup, troubleshooting, compatibility, parts, safety, or missing instructions. Manuals+ will review the question and use this page’s manual context to help answer it.