
1. Introduction
This manual provides essential instructions for the safe and efficient operation, maintenance, and troubleshooting of your Canglan Technology GK9-350 Electric Portable Bag Sealing Sewing Machine. Please read this manual thoroughly before using the machine to ensure proper function and longevity.
The GK9-350 is designed for sealing various types of bags, including woven bags, paper bags, and plastic composite bags. Its portable design and dual voltage capability (110V/220V) make it suitable for diverse environments.
2. Safety Instructions
- Always ensure the power supply matches the machine's voltage requirements (110V or 220V).
- Unplug the machine from the power outlet before performing any maintenance, cleaning, or when not in use.
- Keep hands and fingers away from the needle and moving parts during operation.
- Do not operate the machine in wet conditions or with wet hands.
- Use only genuine replacement parts and accessories.
- Keep the work area well-lit and clear of obstructions.
- This machine is not a toy. Keep it out of reach of children.
3. Package Contents
Upon unpacking, please verify that all components are present and undamaged. The standard package typically includes:
- GK9-350 Electric Portable Bag Sealing Sewing Machine
- Power Cord
- Thread Spool (pre-installed or separate)
- Instruction Manual (this document)
- Basic Tool Kit (e.g., screwdriver, oil bottle)
If any items are missing or damaged, please contact Canglan Technology customer support.
4. Product Overview
Familiarize yourself with the main components of your GK9-350 machine.

Figure 1: Front view of the GK9-350 machine with a thread spool. This image shows the main body, needle assembly, and the thread holder.

Figure 2: Side view of the GK9-350, highlighting the ergonomic handle and power unit. The red button on the handle is the power switch.
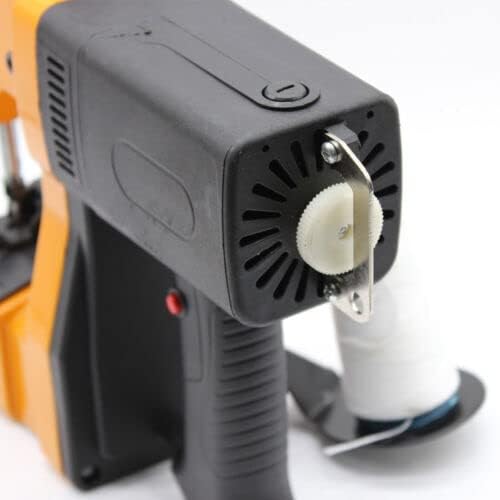
Figure 3: Detailed view of the thread tensioner and guide components, crucial for proper stitching.
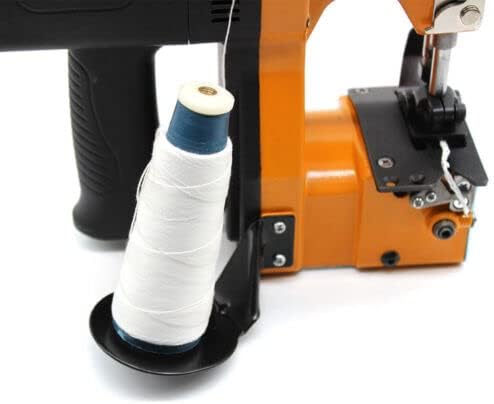
Figure 4: Close-up of the automatic thread cutter, located at the rear of the machine, which simplifies the sealing process.
5. Setup
5.1 Power Connection
- Ensure the machine's power switch is in the 'OFF' position.
- Connect the power cord to the machine's power input.
- Plug the power cord into a suitable 110V or 220V AC outlet, depending on your local voltage and the machine's setting.
5.2 Threading the Machine
Proper threading is crucial for consistent stitching. Follow these steps carefully:
- Place the thread spool onto the spool pin.
- Guide the thread through the first thread guide (usually a metal loop or hook).
- Pass the thread through the tension discs. Ensure the thread is seated correctly between the discs for proper tension.
- Thread through the take-up lever.
- Continue guiding the thread through any remaining thread guides down to the needle.
- Thread the needle from front to back. Pull about 6 inches of thread through the needle eye.
6. Operating Instructions
6.1 Preparing the Bag
Ensure the bag to be sealed is clean and free of debris. Align the edges of the bag opening evenly.
6.2 Sealing Process
- Hold the machine firmly by the handle.
- Position the bag opening under the presser foot, ensuring the needle is aligned with the desired stitching line.
- Press the power switch (red button on the handle) to start the machine. The needle will begin to move.
- Gently guide the bag through the machine, maintaining a steady pace. The machine will automatically feed the bag and create a stitch.
- Once the desired length of the seal is achieved, continue guiding the bag slightly past the end of the seal.
- The machine features an automatic thread cutter. To activate it, guide the bag slightly past the end of the seam and the cutter will engage. Alternatively, you may use a manual cutter if preferred.
- Release the power switch to stop the machine.
6.3 Adjusting Stitch Length and Tension
The GK9-350 typically has a fixed stitch distance of 6-7mm. Thread tension can be adjusted via the tension disc knob. Turn clockwise to increase tension, counter-clockwise to decrease. Test on a scrap piece of material to achieve optimal stitch quality.
7. Maintenance
7.1 Cleaning
- Regularly clean lint and dust from the needle area, feed dogs, and thread path using a small brush or compressed air.
- Wipe the exterior of the machine with a soft, dry cloth. Do not use harsh chemicals or abrasive cleaners.
7.2 Lubrication
Apply a few drops of sewing machine oil to moving parts as indicated in the machine's specific lubrication points (refer to diagrams if provided with the machine). Regular oiling ensures smooth operation and prevents wear.
7.3 Needle Replacement
- Turn off and unplug the machine.
- Loosen the needle clamp screw.
- Remove the old needle.
- Insert a new needle, ensuring the flat side of the needle faces the correct direction (usually towards the back). Push it up as far as it will go.
- Tighten the needle clamp screw securely.
8. Troubleshooting
| Problem | Possible Cause | Solution |
|---|---|---|
| Machine does not start | No power, loose connection, faulty switch | Check power cord, outlet, and switch. Ensure voltage is correct. |
| Thread breaks frequently | Incorrect threading, too much tension, damaged needle, poor quality thread | Re-thread the machine, adjust tension, replace needle, use quality thread. |
| Skipped stitches | Bent or dull needle, incorrect needle insertion, improper threading | Replace needle, ensure needle is inserted correctly, check threading path. |
| Uneven stitches | Incorrect tension, inconsistent bag feeding | Adjust thread tension, maintain steady bag feeding speed. |
| Machine jams | Thread tangled, excessive lint, damaged parts | Unplug, clear any tangled thread, clean thoroughly, inspect for damage. |
9. Specifications
| Parameter | Value |
|---|---|
| Model | GK9-350 |
| Voltage | 110V / 220V |
| Power | 105W |
| Sealing Thickness | 3mm |
| Stitch Distance | 6-7mm |
| Machine Size (L x W x H) | 15.35" x 10.83" x 14.37" (390 x 275 x 365mm) |
| Machine Weight | 8.8 pounds (4 KG) |
| Manufacturer | Canglan Technology |
10. Warranty Information
Canglan Technology products are manufactured to high-quality standards. Specific warranty terms and conditions may vary. Please refer to the warranty card included with your product or contact Canglan Technology customer support for detailed information regarding your product's warranty period and coverage.
11. Support
For technical assistance, replacement parts, or any inquiries not covered in this manual, please contact Canglan Technology customer support. You can typically find contact information on the product packaging, the manufacturer's official website, or through your point of purchase.
When contacting support, please have your product model number (GK9-350) and purchase date readily available.