1. Introduction
The Geek Airocook Digix 30L Electric Air Fryer Oven is a versatile kitchen appliance designed for multiple cooking functions including air frying, baking, grilling, toasting, rotisserie, dehydration, and reheating. This 1700W appliance features a digital display and intuitive spin control knob for precise temperature and time settings. Its 30-liter capacity is suitable for preparing meals for families.

Image 1: The Geek Airocook Digix 30L Electric Air Fryer Oven, a multi-functional kitchen appliance.
2. Important Safety Instructions
Please read all instructions carefully before using the appliance. Failure to follow these instructions may result in electric shock, fire, or serious injury.
- Always place the appliance on a stable, heat-resistant surface, away from walls and other appliances to ensure proper ventilation.
- Do not immerse the appliance, cord, or plug in water or other liquids.
- Supervise children closely when the appliance is in use.
- Unplug from the outlet when not in use and before cleaning. Allow to cool before handling parts.
- Do not operate any appliance with a damaged cord or plug, or after the appliance malfunctions or has been damaged in any manner.
- Do not use accessories not recommended by the manufacturer, as this may cause injuries.
- Do not place the appliance near hot gas or electric burners, or in a heated oven.
- Exercise extreme caution when moving an appliance containing hot oil or other hot liquids.
- Always ensure the crumb tray is in place before operation to catch drips and crumbs.
- The exterior surfaces of the appliance may become hot during use. Use oven mitts when handling hot components.
3. Product Overview and Components
The Geek Airocook Digix comes with several accessories to enhance your cooking experience.
3.1 Main Unit
The main unit houses the heating elements, fan, digital control panel, and oven cavity. It features a durable stainless steel body and a tempered glass door for viewing food during cooking.
3.2 Accessories
- Crumb Tray: Collects crumbs and drips for easy cleaning.
- Air Fryer Mesh Basket: Ideal for air frying, allowing 360° hot air circulation around food.
- Oven Rack: For baking, roasting, and general oven use.
- Baking Tray: For baking and collecting drips.
- Oven Mitt: For safe handling of hot accessories.
- Fetch Rack: Tool for safely removing hot racks and trays.
- Rotisserie Rod: For rotisserie cooking of whole chickens or roasts.

Image 2: The Geek Airocook Digix oven shown with its included accessories: crumb tray, air fryer mesh basket, oven rack, baking tray, oven mitt, fetch rack, and rotisserie rod.
3.3 Control Panel
The digital control panel features an LED display and two spin control knobs for easy operation.
- Digital LCD Display: Shows current temperature, time, and selected function.
- Function Knob: Used to select from 12 preset cooking functions (e.g., Fries, Roast, Fish, Prawns, Chicken, Rotisserie, Cake/Bake, Cookies, Toast, Pizza, Grill, Dehydrate).
- Temperature/Time Knob: Adjusts cooking temperature and time. Press to toggle between temperature and time adjustment.
- Start/Stop Button: Initiates or pauses/stops the cooking process.
- Speed Button: Adjusts fan speed for certain functions.
- Light Button: Turns the internal oven light on or off.
- Rotisserie Rotation On/Off: Activates or deactivates the rotisserie function.

Image 3: Close-up of the digital control panel with LCD display, function knob, temperature/time knob, and various control buttons.
4. Setup and First Use
- Unpacking: Carefully remove all packaging materials, stickers, and labels from the appliance and accessories.
- Cleaning: Wipe the exterior of the oven with a damp cloth. Wash all accessories (crumb tray, air fryer basket, racks, baking tray, rotisserie rod) with warm, soapy water. Rinse thoroughly and dry completely.
- Placement: Place the oven on a flat, stable, heat-resistant surface. Ensure there is at least 15 cm (6 inches) of clear space on all sides and above the oven for proper ventilation.
- Insert Crumb Tray: Slide the crumb tray into the lowest slot at the bottom of the oven cavity. This tray must always be in place during operation.
- Power Connection: Plug the power cord into a grounded electrical outlet. The display will illuminate.
- Initial Burn-in: Before first use with food, operate the oven empty for approximately 15 minutes at 200°C (390°F) to burn off any manufacturing residues. A slight odor or smoke is normal during this process. Ensure good ventilation.
5. Operating Instructions
5.1 General Operation
- Power On: Press the START/STOP button to turn on the oven.
- Select Function: Turn the Function Knob to select your desired cooking preset (e.g., Air Fry, Bake, Grill). The corresponding icon will light up on the display.
- Adjust Time/Temperature: Press the TIME/TEMP button to toggle between adjusting time and temperature. Turn the Temperature/Time Knob to set the desired values.
- Start Cooking: Press the START/STOP button to begin cooking.
- Pause/Resume: During cooking, press the START/STOP button once to pause. Press again to resume.
- Stop Cooking: Press and hold the START/STOP button for a few seconds to stop the cooking cycle completely.
- Auto Shut-off: The oven features an auto shut-off function that activates once the cooking cycle is complete.
5.2 Specific Cooking Functions
The oven utilizes 360° hot air circulation technology for even cooking and crispy results with minimal oil.

Image 4: Diagram illustrating the 360° hot air circulation technology within the oven cavity, ensuring even cooking.
- Air Fry: Use the air fryer mesh basket for best results. This function is ideal for achieving crispy textures with significantly less oil than traditional frying.
- Bake: Use the baking tray or oven rack. Suitable for cakes, cookies, bread, and other baked goods.
- Grill: Place food on the oven rack or baking tray. Ideal for grilling meats, vegetables, and other items.
- Rotisserie: Attach food securely to the rotisserie rod. Insert the rod into the designated slots in the oven and activate the rotisserie rotation.
- Dehydration: Use the mesh basket or oven rack for dehydrating fruits, vegetables, or jerky.
- Toast: Use the oven rack for toasting bread to your desired level.

Image 5: Example of food being prepared using the Air Fry function, resulting in crispy dishes.

Image 6: Example of food being prepared using the Bake function, such as cakes and pizzas.

Image 7: Example of food being prepared using the Grill function, suitable for barbecue-style cooking.

Image 8: Example of bread being toasted using the Toast function, with various browning levels shown.
6. Cleaning and Maintenance
Regular cleaning ensures optimal performance and extends the life of your appliance.
- Unplug and Cool: Always unplug the oven from the power outlet and allow it to cool completely before cleaning.
- Clean Interior: Wipe the interior walls with a damp cloth and mild detergent. For stubborn stains, use a non-abrasive cleaner. Ensure the interior is dry before next use.
- Clean Exterior: Wipe the exterior surfaces with a soft, damp cloth. Do not use abrasive cleaners or scouring pads.
- Clean Accessories: Wash the crumb tray, air fryer basket, oven racks, baking tray, and rotisserie rod in warm, soapy water. Rinse and dry thoroughly. These accessories are generally dishwasher safe, but hand washing is recommended for longevity.
- Crumb Tray: Empty and clean the crumb tray after each use to prevent grease buildup and potential fire hazards.
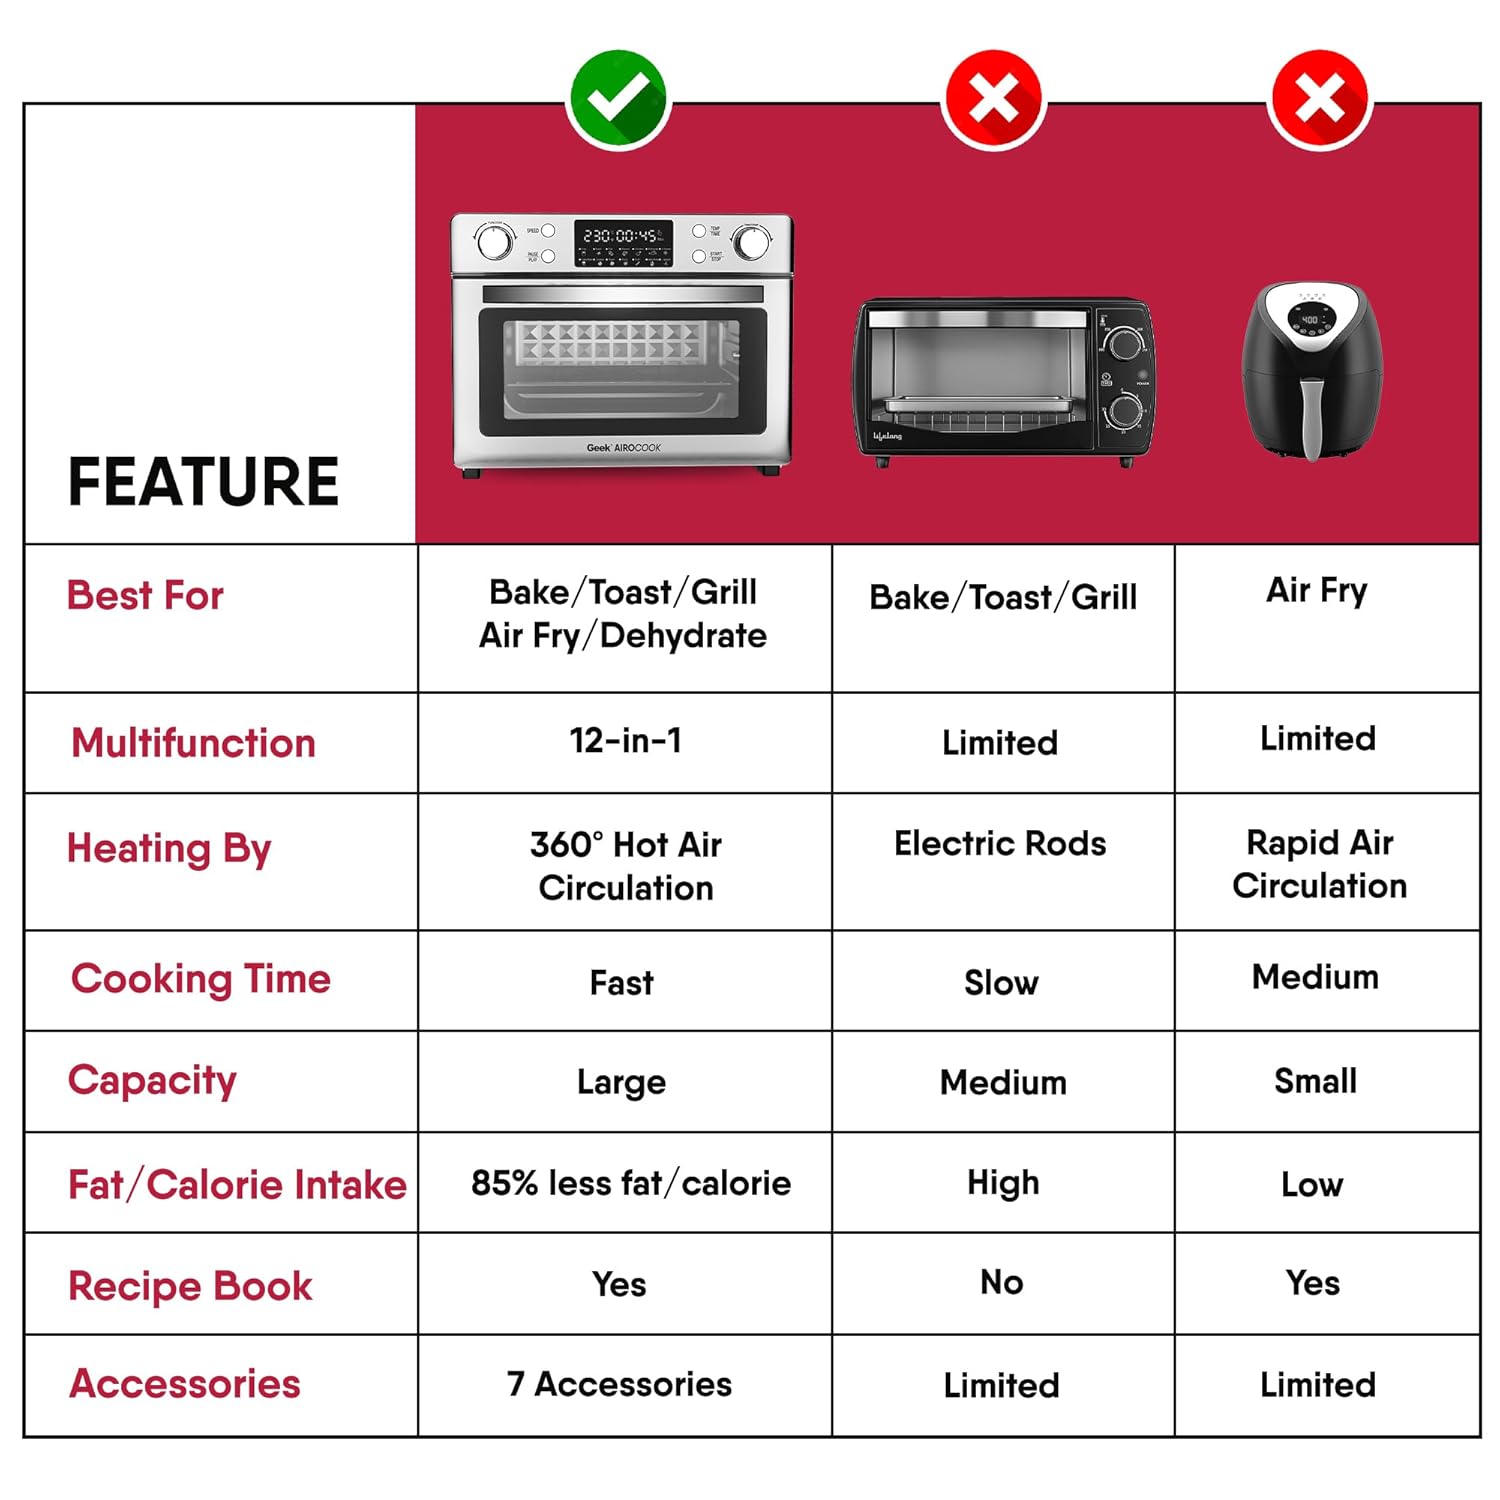
Image 9: A hand cleaning the interior of the oven with a cloth, demonstrating the easy-to-clean design with a detachable crumb tray.
7. Troubleshooting
| Problem | Possible Cause | Solution |
|---|---|---|
| Appliance does not turn on. | Not plugged in; power outlet malfunction; START/STOP button not pressed. | Ensure the power cord is securely plugged into a working outlet. Press the START/STOP button. |
| Food is not cooking evenly. | Overcrowding the basket/tray; incorrect temperature/time settings. | Do not overcrowd the cooking area. Ensure food is in a single layer. Adjust temperature and time as needed. Flip or shake food halfway through cooking. |
| White smoke coming from the oven. | Grease/oil residue from previous use; fatty food cooking. | Clean the crumb tray and interior thoroughly. For fatty foods, ensure proper ventilation and consider using less oil. |
| Food is not crispy. | Too much moisture in food; not enough oil (for air frying); incorrect temperature. | Pat food dry before cooking. For air frying, a small amount of oil can help. Increase temperature or cooking time slightly. |
8. Specifications
- Brand: Geek
- Model Name: AiroCook
- Capacity: 30 Litres
- Wattage: 1700 Watts
- Control Type: Knob (Digital)
- Material: Stainless Steel (exterior), Tempered Glass (door)
- Product Dimensions: 40.5D x 42.5W x 34H Centimeters
- Item Weight: 10 kg 400 g
- Included Components: 1x AirFryer Oven, Crumb tray, Air fryer Mesh Basket, Oven Rack, Baking Tray, Oven Mitt, Fetch Rack, Rotisserie Rod
9. Warranty and Support
For warranty information, product registration, or technical support, please refer to the warranty card included with your purchase or visit the official Geek website. Keep your purchase receipt as proof of purchase for any warranty claims.


