1. Introduction
The Douk Audio T8 PRO is a versatile HiFi 7-band EQ preamplifier designed to enhance your audio experience. It features a 7-band equalizer for precise frequency control, a real balanced XLR preamplifier, and a warm tube sound thanks to its classic 6H1N-BN vacuum tubes. This manual provides detailed instructions for setting up, operating, and maintaining your T8 PRO to ensure optimal performance and longevity.
2. Safety Instructions
Please read and understand all safety instructions before operating the device.
- Power Source: Use only the specified power adapter (DC 12V) provided with the unit. Ensure the voltage matches your local power supply.
- Ventilation: Do not block any ventilation openings. Install in accordance with the manufacturer's instructions.
- Water and Moisture: Do not expose this apparatus to rain or moisture. Do not place objects filled with liquids, such as vases, on the apparatus.
- Heat: Do not install near any heat sources such as radiators, heat registers, stoves, or other apparatus (including amplifiers) that produce heat.
- Cleaning: Clean only with a dry cloth. Unplug the unit from the power outlet before cleaning.
- Servicing: Do not attempt to service this product yourself as opening or removing covers may expose you to dangerous voltage or other hazards. Refer all servicing to qualified service personnel.
- Tube Handling: Vacuum tubes can become hot during operation. Exercise caution when handling or replacing tubes. Allow the unit to cool down before attempting tube replacement.
3. Package Contents
Verify that all items are present in the package.

Figure 3.1: Contents of the Douk Audio T8 PRO package, showing the main unit, two 6H1N-BN vacuum tubes, and a DC 12V power adapter.
- 1x Douk Audio T8 PRO Preamplifier Unit
- 2x 6H1N-BN Vacuum Tubes
- 1x DC 12V Power Adapter
4. Product Overview
The Douk Audio T8 PRO features a robust design with intuitive controls for optimal audio customization.
4.1 Front Panel Controls
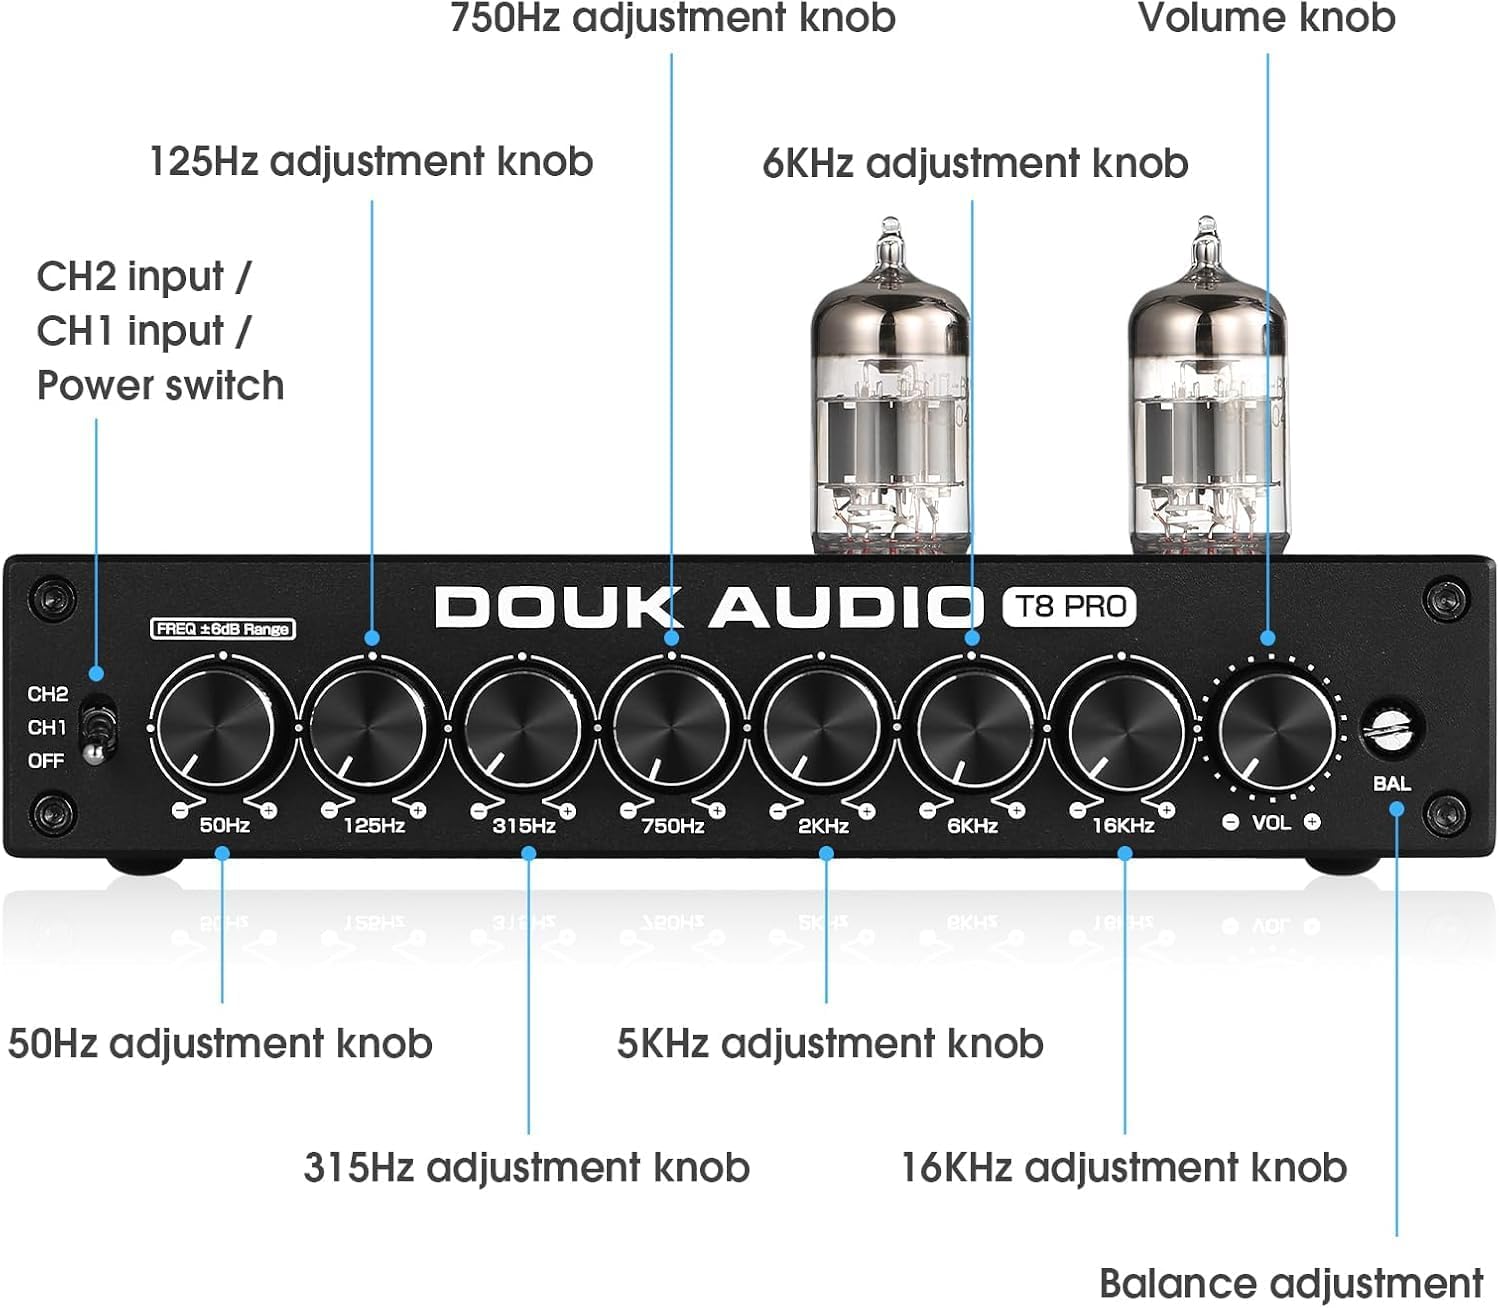
Figure 4.1: Front panel of the Douk Audio T8 PRO, illustrating the various adjustment knobs and input selection switch.
| Control | Function |
|---|---|
| CH2 / CH1 / OFF Switch | Selects between Channel 1 (XLR/RCA Input) or Channel 2 (RCA Input) or powers off the unit. |
| 50Hz Adjustment Knob | Adjusts the gain for the 50Hz frequency band. |
| 125Hz Adjustment Knob | Adjusts the gain for the 125Hz frequency band. |
| 315Hz Adjustment Knob | Adjusts the gain for the 315Hz frequency band. |
| 750Hz Adjustment Knob | Adjusts the gain for the 750Hz frequency band. |
| 2kHz Adjustment Knob | Adjusts the gain for the 2kHz frequency band. |
| 6kHz Adjustment Knob | Adjusts the gain for the 6kHz frequency band. |
| 16kHz Adjustment Knob | Adjusts the gain for the 16kHz frequency band. |
| Volume Knob | Controls the overall output volume. |
| BAL (Balance) Knob | Adjusts the balance between the left and right audio channels. |
4.2 Rear Panel Connections

Figure 4.2: Rear panel of the Douk Audio T8 PRO, showing the input and output ports.
| Port | Description |
|---|---|
| CH1 Input (XLR) | Balanced XLR input for connecting audio sources. |
| CH2 Input (RCA) | Unbalanced RCA input for connecting audio sources. |
| Output (XLR) | Balanced XLR output for connecting to amplifiers or active speakers. |
| Output (RCA) | Unbalanced RCA output for connecting to amplifiers or active speakers. |
| DC 12V IN | Power input for the DC 12V power adapter. |
5. Setup
Follow these steps to set up your Douk Audio T8 PRO.
5.1 Tube Installation
- Carefully unpack the two 6H1N-BN vacuum tubes from their protective packaging.
- Align the pins of each tube with the corresponding holes on the tube sockets located on the top of the T8 PRO unit.
- Gently push each tube straight down into its socket until it is firmly seated. Do not force the tubes.

Figure 5.1: Close-up view of the vacuum tubes installed on the Douk Audio T8 PRO, highlighting the warm glow during operation.
5.2 Audio Connections
The T8 PRO supports both balanced XLR and unbalanced RCA inputs and outputs.

Figure 5.2: Diagram illustrating various audio connection possibilities for the Douk Audio T8 PRO, including XLR and RCA inputs and outputs.
- Connect Audio Source:
- For balanced connection, connect your audio source (e.g., CD player, DAC) to the CH1 Input (XLR) ports on the rear panel.
- For unbalanced connection, connect your audio source to the CH2 Input (RCA) ports on the rear panel.
- Connect to Amplifier/Speakers:
- Connect the Output (XLR) ports to your amplifier or active speakers for balanced output.
- Alternatively, connect the Output (RCA) ports to your amplifier or active speakers for unbalanced output.
- Power Connection: Connect the provided DC 12V power adapter to the DC 12V IN port on the rear panel, then plug the adapter into a wall outlet.
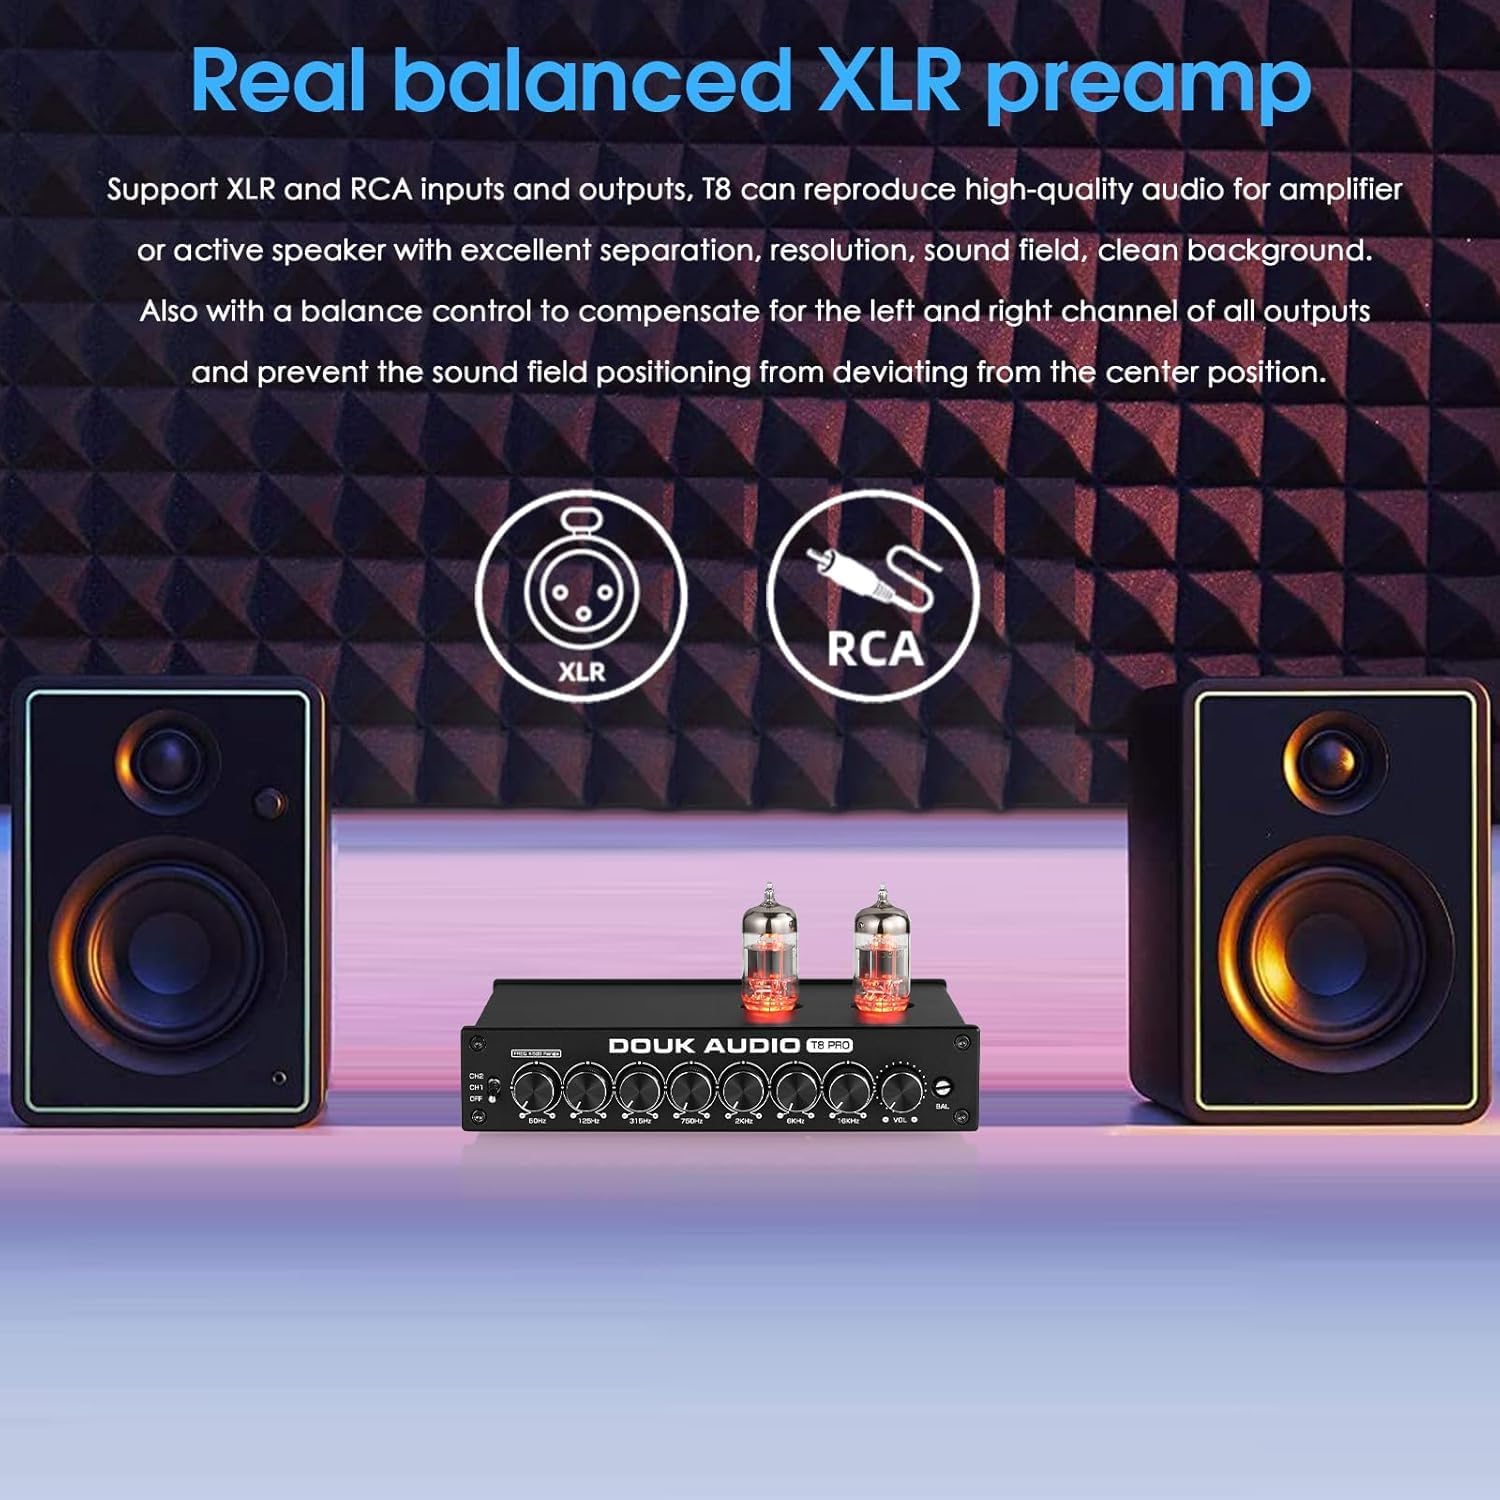
Figure 5.3: The Douk Audio T8 PRO connected to a pair of speakers, demonstrating its role as a balanced XLR preamplifier in an audio setup.
6. Operating Instructions
Once connected, you can begin operating your T8 PRO.
- Power On: Turn the CH2/CH1/OFF switch on the front panel to either CH1 (for XLR input) or CH2 (for RCA input) to power on the unit. The vacuum tubes will begin to glow.
- Volume Adjustment: Use the Volume Knob to set your desired listening level. Start with a low volume and gradually increase it.
- Balance Adjustment: Use the BAL (Balance) Knob to fine-tune the left and right channel balance. This helps compensate for any imbalances in your audio setup or listening environment.
- Equalizer Adjustment:
The T8 PRO features 7 frequency bands for precise audio shaping:
- 50Hz: Controls the very low bass frequencies.
- 125Hz: Controls the mid-bass frequencies.
- 315Hz: Controls the lower midrange frequencies.
- 750Hz: Controls the central midrange frequencies.
- 2kHz: Controls the upper midrange frequencies.
- 6kHz: Controls the lower treble frequencies.
- 16kHz: Controls the very high treble frequencies.
Adjust each frequency knob to boost or cut the corresponding frequency band to tailor the sound to your preference or to correct room acoustics. The neutral position for each knob is the center detent.
- Tube Sound Characteristics: The 6H1N-BN tubes provide a warm, delicate, full, and mellow sound signature. Experiment with the EQ settings to complement the tube characteristics.
7. Tube Rolling (Optional)
The T8 PRO features a pluggable socket design, allowing users to experiment with different compatible vacuum tubes to alter the sound signature.
The default tubes are 6H1N-BN. Compatible tube models include: 12AU7, ECC85, 6SN7GT, 6N1, or 6AQ8.
Note: Ensure the unit is powered off and unplugged, and tubes have cooled down before attempting to replace them. Handle tubes carefully by their base to avoid damage.
8. Maintenance
Proper maintenance ensures the longevity and performance of your T8 PRO.
- Cleaning: Use a soft, dry cloth to wipe the exterior of the unit. Do not use liquid cleaners or abrasive materials.
- Ventilation: Ensure the ventilation holes are free from dust and obstructions.
- Storage: If storing the unit for an extended period, unplug it from the power source and store it in a cool, dry place away from direct sunlight and extreme temperatures.
- Tube Life: Vacuum tubes have a finite lifespan. If you notice a degradation in sound quality or tube failure, consider replacing them with new compatible tubes.
9. Troubleshooting
If you encounter issues with your T8 PRO, refer to the following common problems and solutions.
| Problem | Possible Cause | Solution |
|---|---|---|
| No power / Unit does not turn on. | Power adapter not connected or faulty; Power outlet not working; Power switch in OFF position. | Ensure power adapter is securely connected to the unit and a working outlet. Check the CH2/CH1/OFF switch is set to CH1 or CH2. |
| No sound output. | Incorrect input/output connections; Volume knob too low; Incorrect input selected; Faulty cables. | Verify all audio cables are correctly connected. Increase the Volume knob. Ensure the CH2/CH1/OFF switch is set to the correct input (CH1 for XLR, CH2 for RCA). Try different cables. |
| Distorted or poor sound quality. | Input signal too strong; EQ settings are extreme; Faulty tubes; Loose tube connection. | Reduce the input volume from your source device. Reset EQ knobs to center position. Gently reseat the vacuum tubes. Consider replacing tubes if they are old or damaged. |
| Humming or buzzing noise. | Ground loop issue; Interference from other electronics; Faulty cables. | Ensure all components are properly grounded. Try moving the unit away from other electronic devices. Use shielded audio cables. |
| One channel is silent or quieter. | Balance knob off-center; Loose cable connection; Faulty cable or tube. | Adjust the BAL knob to the center. Check connections for both left and right channels. Swap cables or tubes (if applicable) to isolate the issue. |
If the problem persists after trying these solutions, please contact Douk Audio customer support for further assistance.
10. Specifications
Technical specifications for the Douk Audio T8 PRO.
| Feature | Detail |
|---|---|
| Brand | Douk Audio |
| Model Name | T8 PRO |
| Color | Black |
| Material | Metal (Aluminum alloy chassis, electrolytic iron plate) |
| Power Output | 1 Watt (as a preamplifier, this refers to minimal power consumption or signal gain capability) |
| Product Dimensions (D x W x H) | 12.8 cm x 18.6 cm x 3.8 cm (5.04in x 7.32in x 1.50in) |
| Number of Bands (EQ) | 7 (50Hz, 125Hz, 315Hz, 750Hz, 2kHz, 6kHz, 16kHz) |
| Power Source | DC Power (12V) |
| Output Channels | 2 (Stereo) |
| Input/Output Interfaces | Balanced XLR, Unbalanced RCA |
| Default Vacuum Tubes | 6H1N-BN |
| Compatible Vacuum Tubes | 12AU7, ECC85, 6SN7GT, 6N1, 6AQ8 (with adapters if necessary) |
11. Warranty and Support
Douk Audio products are designed for reliability and performance. For warranty information and technical support, please refer to the official Douk Audio website or contact your retailer.


