
1. Introduction
Thank you for choosing the Stalwart Digital Safe Box. This safe is designed to provide secure storage for your valuables, including cash, jewelry, documents, and passports. Featuring a programmable digital keypad and manual override keys, it offers reliable protection for home or office use. This manual provides detailed instructions for setup, operation, and maintenance to ensure optimal performance and security.

Figure 1: Front view of the Stalwart Digital Safe Box, showcasing the electronic keypad and manual override key slot.
2. Safety Information
- Keep Override Keys Secure: Store the manual override keys in a safe location away from the safe itself. Do not store them inside the safe.
- Battery Safety: Use only the specified battery type (4 AA batteries). Do not mix old and new batteries, or different types of batteries. Remove batteries if the safe will not be used for an extended period.
- Mounting: For enhanced security, consider mounting the safe to a floor or wall using the provided expansion screws. Ensure the mounting surface is structurally sound.
- Avoid Extreme Conditions: Do not expose the safe to extreme temperatures, humidity, or direct sunlight, as this may affect electronic components.
3. Package Contents
Please verify that all items listed below are included in your package:
- Stalwart Digital Safe Box
- Manual Override Keys (2)
- AA Batteries (4)
- Expansion Screws (2) for mounting
- Instruction Manual (this document)

Figure 2: The package includes two manual override keys, four AA batteries, and two expansion screws for installation.
4. Product Overview
Familiarize yourself with the main components of your Stalwart Digital Safe Box:
- Electronic Keypad: Used for entering your digital code to open the safe.
- Manual Override Key Slot: Located behind the keypad cover, used for emergency access with the physical keys.
- Battery Compartment: Located on the inside of the door, holds 4 AA batteries.
- Locking Bolts: Steel bolts that secure the safe door when closed.
- Reset Button: Located inside the safe, used to program new codes.
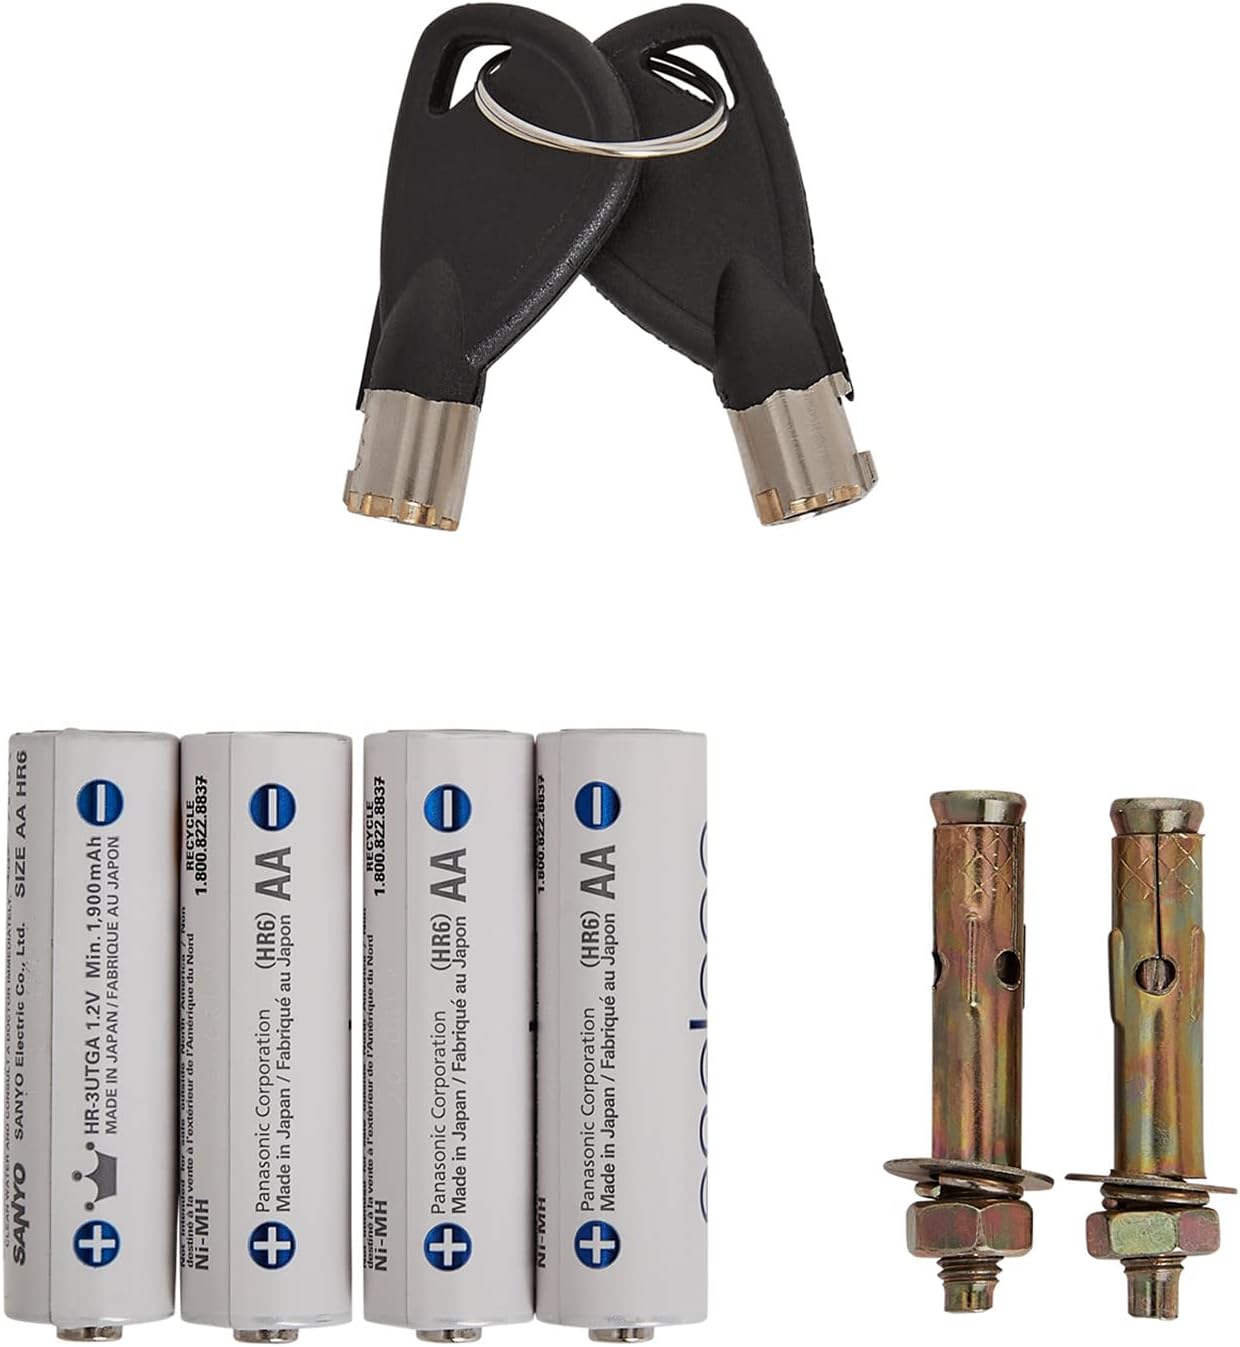
Figure 3: Key features include reinforced solid steel walls, fast access key entry, and a convenient battery compartment with a reset button.
5. Setup
5.1. Battery Installation
- Locate the battery compartment on the inside of the safe door.
- Slide open the battery compartment cover.
- Insert 4 AA batteries, ensuring correct polarity (+/-).
- Close the battery compartment cover.
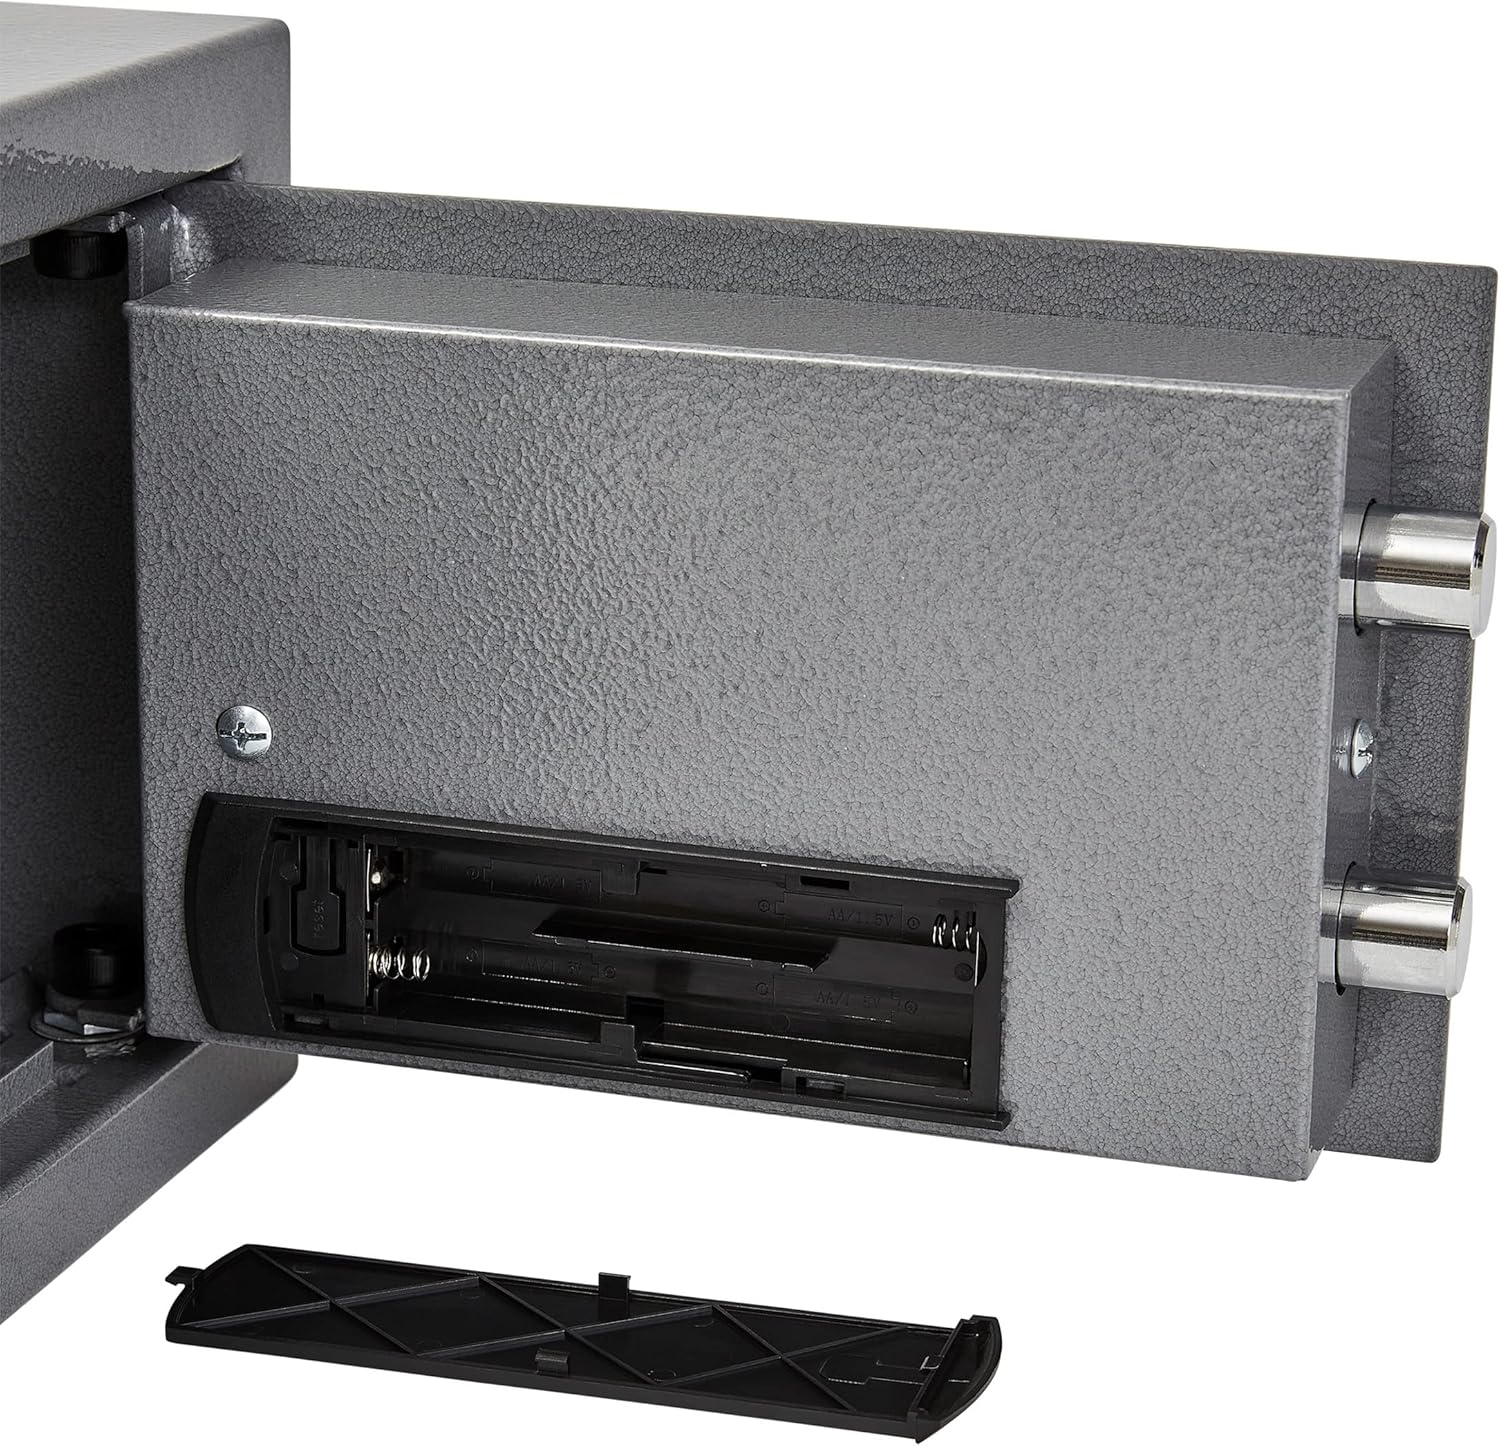
Figure 4: The battery compartment is located on the interior of the safe door for easy access.
5.2. Initial Opening (Using Manual Override Key)
The safe is shipped in a locked state. Use the manual override key for the first opening:
- Gently remove the keypad cover to reveal the keyhole.
- Insert one of the manual override keys into the keyhole and turn it clockwise.
- While the key is turned, rotate the knob on the keypad counter-clockwise to open the safe door.
- Once open, remove the key and store it in a secure location outside the safe.
5.3. Mounting the Safe (Optional)
For added security, the safe can be mounted to a floor or wall:
- Choose a suitable location with a solid mounting surface.
- Open the safe door. Locate the pre-drilled holes on the back or bottom of the safe.
- Mark the drilling points on the wall or floor through the holes.
- Drill pilot holes using an appropriate drill bit for your mounting surface.
- Align the safe with the drilled holes and secure it using the provided expansion screws.
- Ensure the safe is firmly attached before use.
6. Operating Instructions
6.1. Setting Your Personal Code
You can program a 3-8 digit personal code:
- With the safe door open, press the red reset button located on the inside of the door, near the hinge. You will hear a beep, and the yellow light on the keypad will illuminate.
- Within 5 seconds, enter your desired 3-8 digit code on the keypad.
- Press the "A" or "B" button to confirm your code. You will hear a beep, and the yellow light will turn off.
- Test your new code with the door open before closing it.
6.2. Opening the Safe with Your Code
- Enter your 3-8 digit personal code on the keypad.
- Press the "A" or "B" button to confirm. The green light will illuminate, and you will hear a beep.
- Within 5 seconds, rotate the knob counter-clockwise to open the safe door.

Figure 5: A hand demonstrates entering a code on the digital keypad to access the safe.
6.3. Closing and Locking the Safe
- Close the safe door firmly.
- Rotate the knob clockwise to engage the locking bolts. The safe is now locked.
6.4. Using Manual Override Keys (Emergency Access)
If you forget your code or the batteries are depleted, use the manual override keys:
- Gently remove the keypad cover to expose the keyhole.
- Insert one of the manual override keys into the keyhole and turn it clockwise.
- While the key is turned, rotate the knob counter-clockwise to open the safe door.
- Once open, remove the key.
7. Maintenance
- Battery Replacement: Replace batteries annually or when the low battery indicator (red light) illuminates during operation. Follow the battery installation steps in Section 5.1.
- Cleaning: Clean the safe's exterior with a soft, damp cloth. Avoid abrasive cleaners or solvents.
- Key Storage: Always store manual override keys in a secure, separate location from the safe.
8. Troubleshooting
| Problem | Possible Cause | Solution |
|---|---|---|
| Safe does not open with code. | Incorrect code entered, or batteries are low/dead. | Re-enter code carefully. Replace batteries (Section 5.1). Use manual override key (Section 6.4). |
| Keypad does not respond. | Batteries are dead or incorrectly installed. | Check battery installation and replace if necessary (Section 5.1). |
| Cannot set a new code. | Reset button not pressed correctly, or code not entered within 5 seconds. | Ensure the reset button is pressed until a beep is heard and yellow light illuminates. Enter code and confirm within 5 seconds (Section 6.1). |
| Door does not close or lock properly. | Obstruction in the door frame, or locking bolts are not aligned. | Check for any obstructions. Ensure the door is fully closed before rotating the knob clockwise. |
9. Specifications
| Feature | Detail |
|---|---|
| Model Number | 65-EN-20-GRY |
| Exterior Dimensions (L x W x H) | 12.2" x 7.9" x 7.9" (31cm x 20cm x 20cm) |
| Interior Dimensions (L x W x H) | 12" x 5.5" x 7.75" (30.5cm x 14cm x 19.7cm) |
| Door Dimensions (L x W) | 10.4" x 6.0" (26.4cm x 15.2cm) |
| Wall Thickness | 1.5mm |
| Door Thickness | 3mm |
| Lock Type | Electronic Combination Lock with Manual Override |
| Material | Alloy Steel |
| Color | Gray |
| Power Source | 4 AA Batteries (included) |
| Mounting Type | Floor Mount (expansion screws included) |
| Item Weight | 10.36 pounds (4.7 kg) |
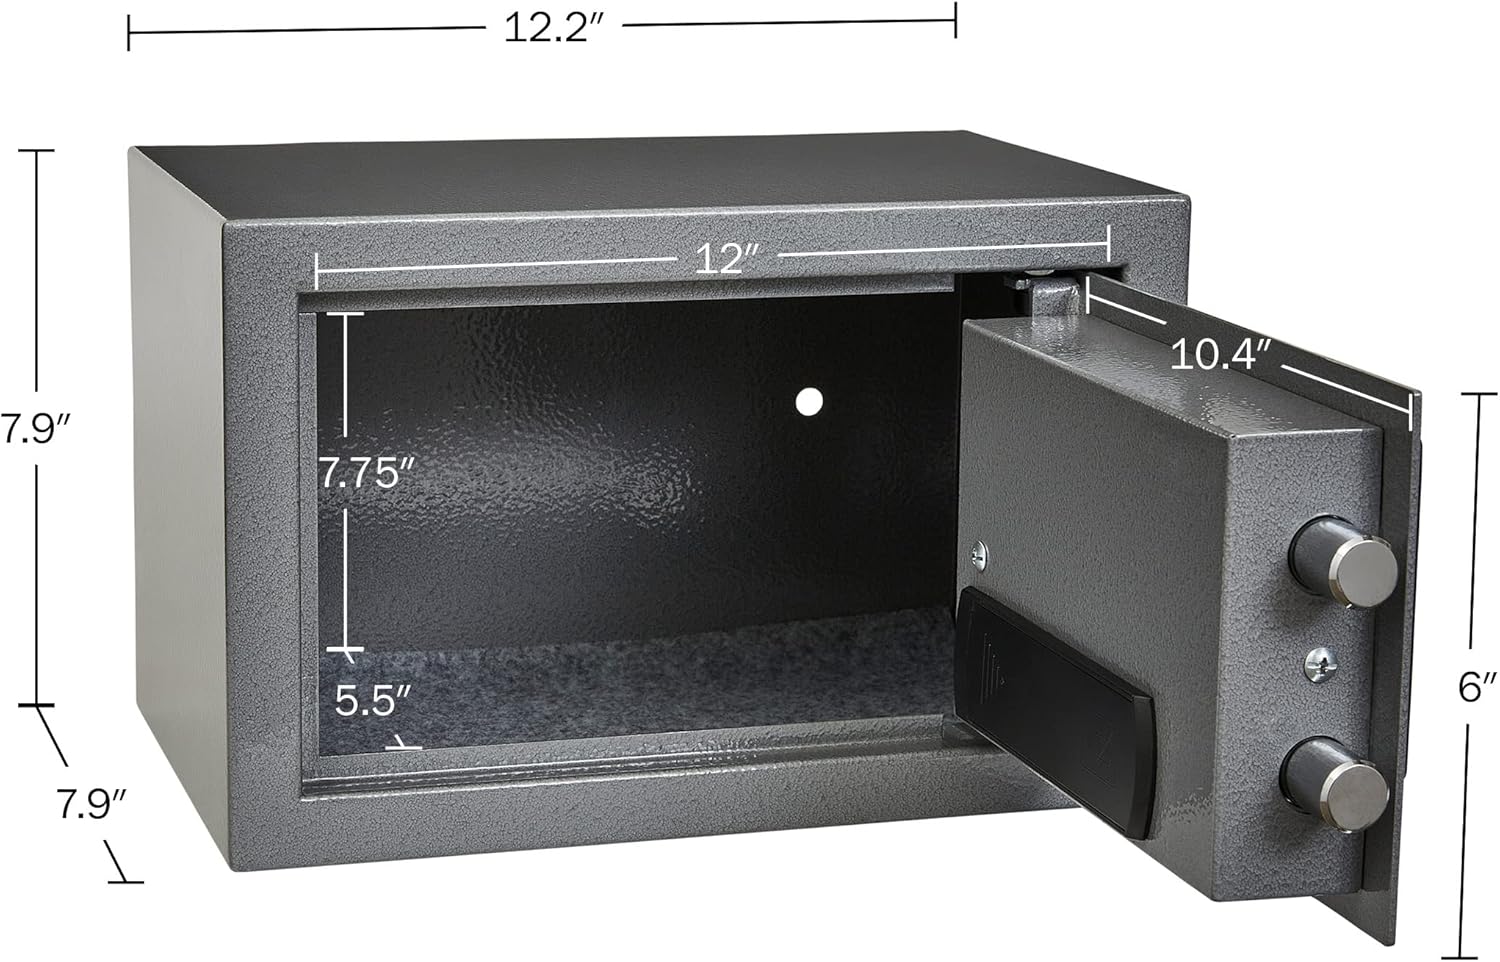
Figure 6: Detailed dimensions of the Stalwart Digital Safe Box, including exterior and interior measurements.
10. Warranty and Support
For warranty information or technical support, please refer to the contact details provided at the point of purchase or visit the official Stalwart website. Keep your purchase receipt as proof of purchase for any warranty claims.

