1. Introduction
This manual provides detailed instructions for the safe and effective operation, setup, and maintenance of your Anysun F958 50m Self-Leveling Endoscope Camera. This professional pipe inspection camera is designed for inspecting sewer lines, air ducts, underground cable pipes, chimneys, and other hard-to-reach areas. Please read this manual thoroughly before using the device to ensure optimal performance and longevity.
2. Product Overview
The Anysun F958 Endoscope Camera system is a robust and versatile tool for various inspection tasks. It features a self-leveling camera head, a 512 Hz sonde transmitter for precise location, and a high-resolution 1080P display for clear visuals.
Key Features:
- Self-Leveling Camera: Automatically maintains an upright image regardless of the camera's orientation, ensuring clear and consistent viewing.
- 512 Hz Sonde Transmitter: Emits a 512 Hz signal, allowing for precise location tracking with compatible detection devices, eliminating guesswork in locating blockages.
- 1080P HD Video Recording: Captures sharp, detailed video and images, highlighting even minor details.
- IP68 Waterproof Camera Head: Designed for submerged inspections, featuring a 23mm sapphire glass lens for enhanced scratch protection.
- 9-inch IPS Color Monitor: Provides real-time, high-quality display of inspection footage.
- 12 Adjustable LED Lights: Ensures optimal illumination in dark environments.
- 145° Wide-Angle Lens: Offers a broad field of view for comprehensive inspections.
- 5x Digital Zoom: Allows for closer examination of specific areas of interest.
- DVR Recorder with 16GB TF Card: Enables recording and storage of inspection footage for later review or sharing.
Components:
- Control Box with 9-inch IPS Monitor
- Camera Head (23mm, self-leveling, 512Hz sonde)
- 50m Fiberglass Cable Reel
- 3000mAh Lithium-ion Battery
- 16GB TF Card (pre-installed)
- Power Adapter/Charger
- Protective Carrying Case

Figure 2.1: Overview of the Anysun F958 Endoscope Camera system.
3. Setup
Follow these steps to prepare your Anysun F958 Endoscope Camera for its first use.
3.1 Charging the Battery
- Connect the power adapter to the charging port on the control box.
- Plug the adapter into a standard electrical outlet (100-240V).
- The charging indicator LED will illuminate red during charging.
- A full charge takes approximately 3 hours. The LED will turn green when fully charged.
- The battery provides 4-6 hours of continuous operation.
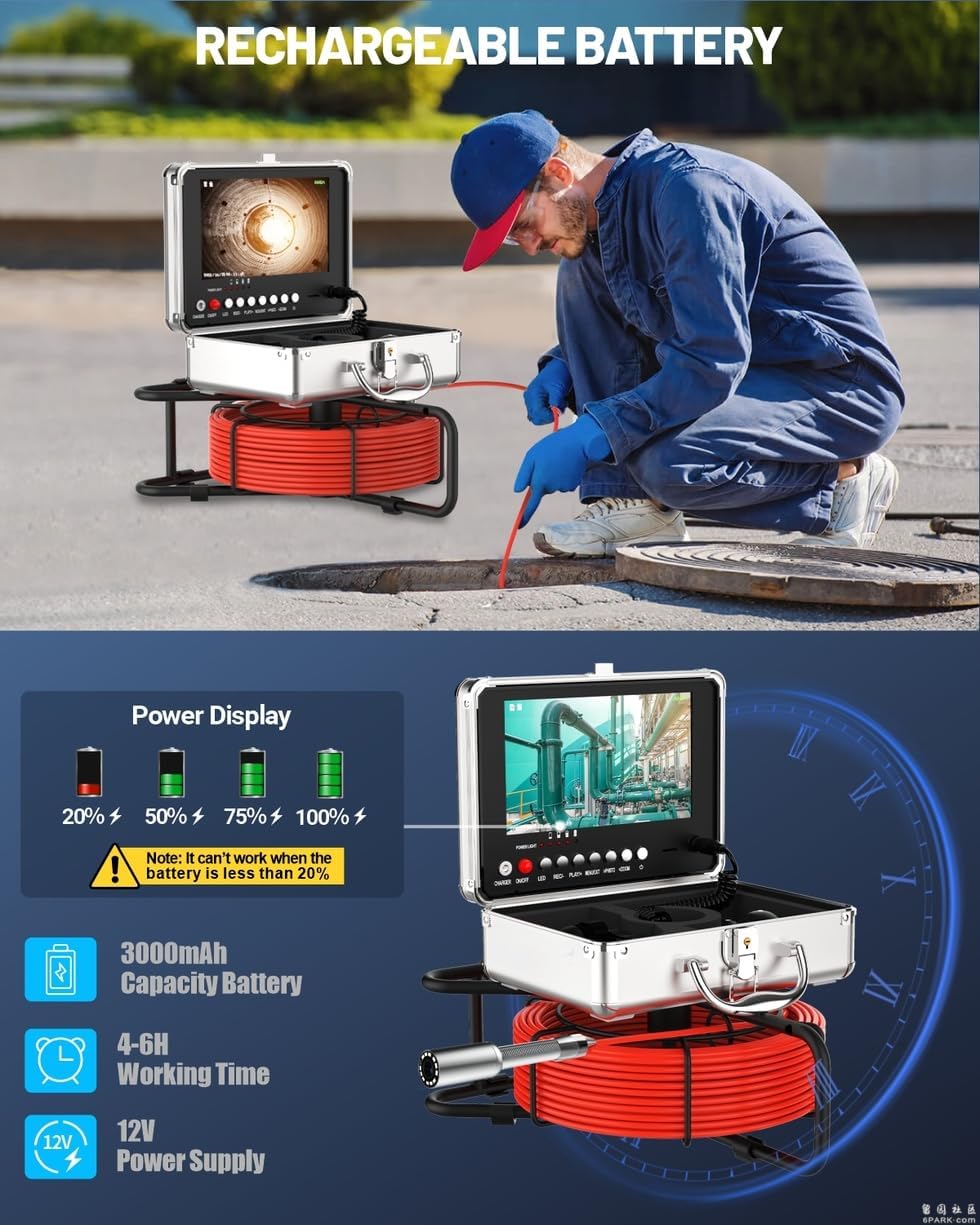
Figure 3.1: The control box features a power display indicating battery level. Ensure the battery is charged before use.
3.2 Inserting the TF Card
The device comes with a 16GB TF card pre-installed. If you need to replace or upgrade the card (supports up to 128GB):
- Locate the TF card slot on the side of the control box.
- Gently push the existing TF card to eject it, or insert a new card with the gold contacts facing down until it clicks into place.
- Ensure the card is securely seated for proper video recording and image capture.

Figure 3.2: The 9-inch IPS monitor and DVR recorder with the TF card slot visible.
3.3 Connecting the Camera Cable
The camera cable is typically pre-connected to the control box. If it needs to be reconnected:
- Align the connector of the camera cable with the corresponding port on the control box.
- Push firmly until it is securely connected. Ensure the connection is tight to maintain waterproof integrity.
4. Operating Instructions
4.1 Powering On/Off
- To power on, press and hold the 'POWER/ON/OFF' button on the control box until the screen illuminates.
- To power off, press and hold the 'POWER/ON/OFF' button again until the screen shuts down.
4.2 Using the Self-Leveling Camera and 512 Hz Sonde
The camera head automatically adjusts its orientation to keep the image upright on the monitor. This feature is active whenever the camera is powered on.
The built-in 512 Hz sonde transmitter continuously emits a signal. To locate the camera head underground, use a compatible 512 Hz locator (sold separately) to detect the signal and pinpoint the exact position of the camera.
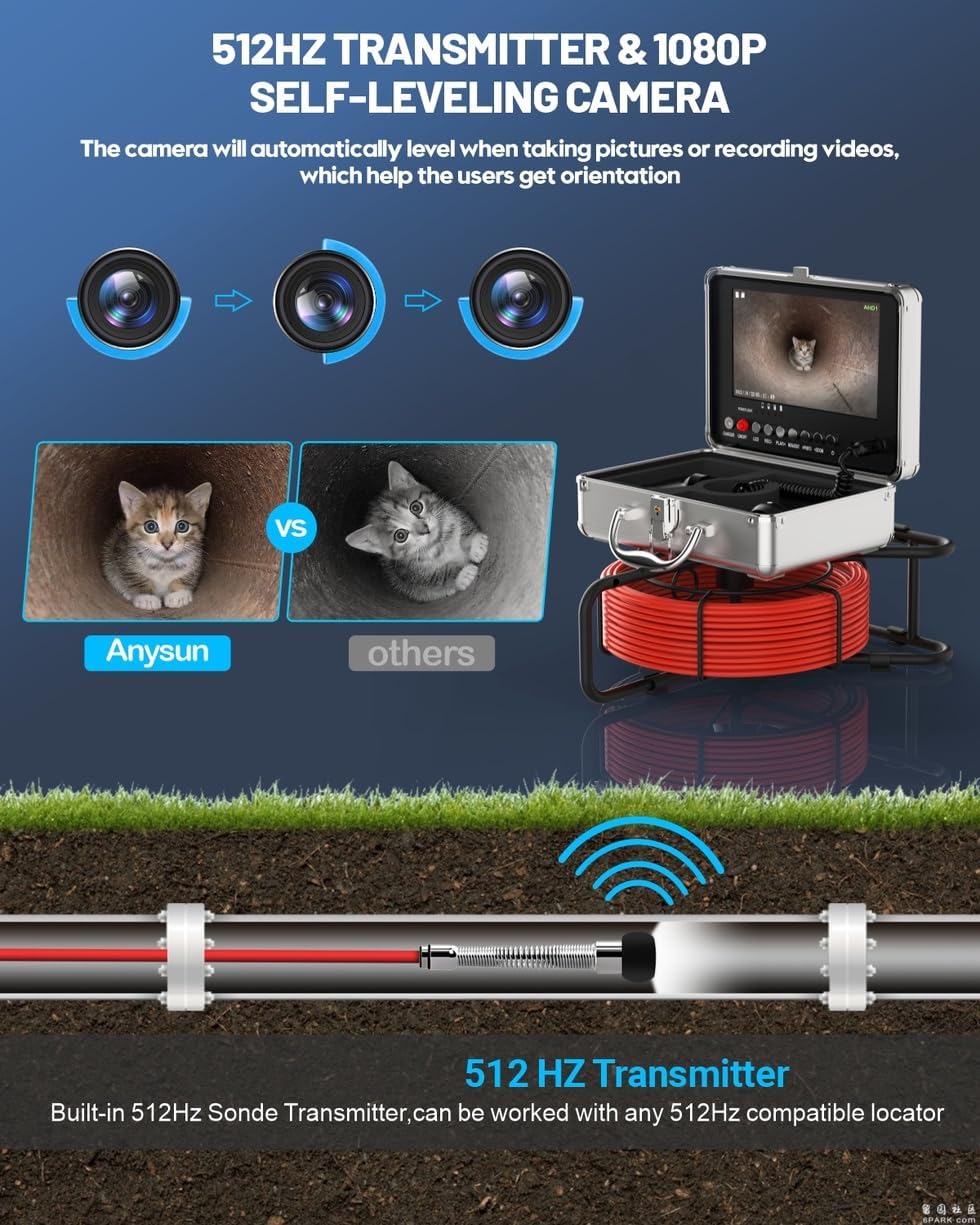
Figure 4.1: Illustration of the 512 Hz sonde transmitter and the self-leveling camera maintaining an upright view.
4.3 Adjusting LED Lights
The camera head is equipped with 12 adjustable LED lights to illuminate dark inspection areas.
- Use the 'LED' button on the control box to cycle through different brightness levels or to turn the lights off.
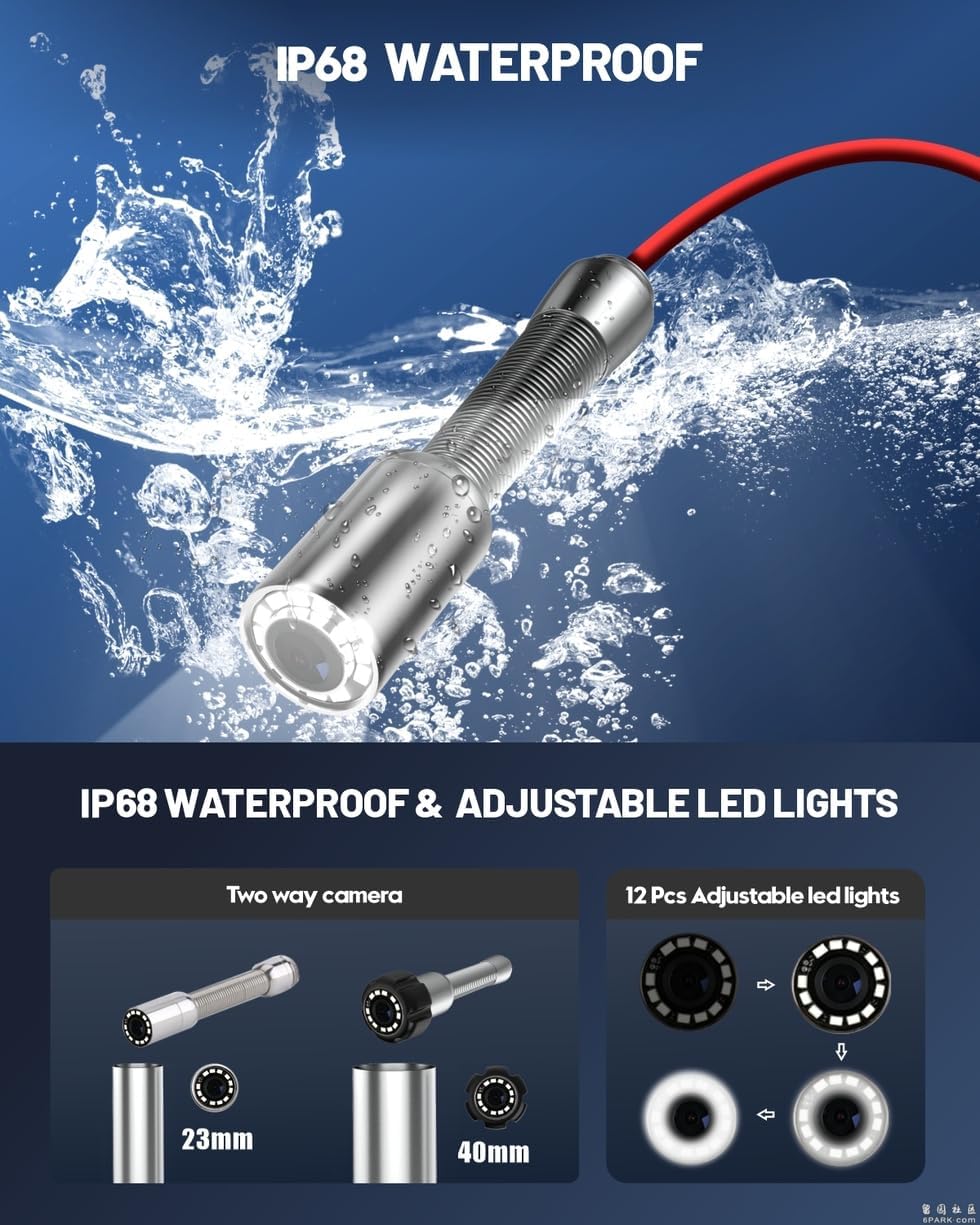
Figure 4.2: The IP68 waterproof camera head with its 12 adjustable LED lights.
4.4 Digital Zoom Function
The monitor supports 5 levels of digital zoom to magnify the live image.
- Press the 'ZOOM' button on the control box to activate and adjust the digital zoom level.

Figure 4.3: The digital zoom feature allows for detailed inspection of specific areas.
4.5 Recording Video and Capturing Images
The integrated DVR allows you to record video footage and capture still images directly to the TF card.
- To start video recording, press the 'REC' button. Press it again to stop recording.
- To capture a still image, press the 'PHOTO' button.
- Recorded files are saved in AVI format for videos and JPG for images.
4.6 Viewing Recorded Media
- Press the 'PLAY' button to enter playback mode.
- Use the navigation buttons (if available) to browse through recorded videos and images.
- Press 'PLAY' again to exit playback mode.
4.7 Cable Handling
Proper handling of the fiberglass cable is crucial for its longevity and performance.
- Always unreel and reel the cable smoothly from the steel wheel.
- Important: Do not bend the cable sharply at 90-degree angles, as this can damage the internal wiring and fiberglass core.
- Avoid forcing the cable through tight bends or obstructions.

Figure 4.4: Illustration demonstrating correct cable handling to prevent damage.
5. Maintenance
Regular maintenance ensures the optimal performance and extends the lifespan of your endoscope camera.
5.1 Cleaning the Camera Head
- After each use, especially in dirty or wet environments, gently wipe the camera head with a soft, damp cloth.
- For stubborn debris, use a mild cleaning solution. Avoid abrasive cleaners or solvents that could damage the sapphire glass lens.
- Ensure the lens is clean and free of obstructions for clear image quality.
5.2 Cable and Reel Care
- Clean the cable with a damp cloth as you reel it back onto the spool.
- Inspect the cable for any signs of wear, cuts, or damage. If damage is found, contact support for repair or replacement.
- Keep the cable reel clean and free of debris to ensure smooth operation.
5.3 Battery Care and Storage
- Store the device in a cool, dry place, away from direct sunlight and extreme temperatures.
- For long-term storage, ensure the battery is charged to approximately 50-70% to prolong its lifespan. Recharge every 3-6 months if not in use.
- Always use the provided charger to avoid battery damage.
6. Troubleshooting
If you encounter issues with your Anysun F958 Endoscope Camera, refer to the following common problems and solutions:
6.1 No Image on Monitor
- Check Power: Ensure the device is powered on and the battery is sufficiently charged.
- Cable Connection: Verify that the camera cable is securely connected to the control box.
- Camera Damage: Inspect the camera head and cable for visible damage.
6.2 Poor Image Quality
- Clean Lens: Ensure the camera lens is clean and free of dirt or debris.
- Adjust LED Lights: Increase the brightness of the LED lights for better illumination in dark areas.
- Focus: While the camera has a fixed focus, ensure it is not too close or too far from the object being inspected.
6.3 Battery Not Charging
- Charger Connection: Verify the power adapter is correctly connected to both the device and the power outlet.
- Power Outlet: Test the power outlet with another device to ensure it is functional.
- Charger Damage: Inspect the power adapter for any damage. Use only the original charger.
6.4 Cannot Record Video or Capture Images
- TF Card: Ensure a TF card is properly inserted into the slot.
- Card Capacity: Check if the TF card has sufficient free space. Delete old files or replace the card if full.
- Card Format: Ensure the TF card is formatted correctly (FAT32 is usually recommended).
If these troubleshooting steps do not resolve the issue, please contact Anysun customer support for further assistance.
7. Specifications
| Feature | Specification |
|---|---|
| Brand | Anysun |
| Model Number | F958 |
| Camera Resolution | 1080P HD |
| Camera View Angle | 145 degrees |
| Water Resistance Level | IP68 |
| Sonde Transmitter | 512 Hz |
| Monitor Size | 9 inch IPS |
| Monitor Display | Color |
| Digital Zoom | 5x |
| LED Lights | 12 adjustable LEDs |
| Cable Length | 50 meters |
| TF Card | 16GB included (supports up to 128GB) |
| Video Format | AVI |
| Photo Format | JPG |
| Battery Type | 1 Lithium-ion battery (included) |
| Battery Capacity | 3000mAh |
| Battery Life | 4-6 hours |
| Charging Time | 3 hours |
| Operating Temperature | -20 to 60 degrees Celsius |
| Storage Temperature | -30 to 80 degrees Celsius |
| Connectivity Technology | USB |
| Item Weight | 5.63 Kilograms |
| Package Dimensions | 38.5 x 33.5 x 25 cm |
8. Warranty and Support
Anysun is committed to providing high-quality products and customer satisfaction. While specific warranty details are not provided in this manual, Anysun offers professional technical support and aims for immediate response times to resolve any issues you may encounter.
For technical assistance, troubleshooting, or warranty inquiries, please refer to the contact information provided with your purchase or visit the official Anysun website.


