
Luqeeg 713ec5fa-79d0-49bd-949c-20b998bf2753
Contents
Luqeeg Digital Camera User Manual
Model: 713ec5fa-79d0-49bd-949c-20b998bf2753
1. Introduction
Thank you for purchasing the Luqeeg Digital Camera. This manual provides detailed instructions on how to use and maintain your camera. Please read this manual carefully before use to ensure proper operation and to maximize the camera's performance.
Package Contents

The package includes the following items:
- 1 x Luqeeg Digital Camera
- 1 x USB Cable
- 1 x User Manual (this document)
- 1 x Storage Bag
- 1 x Wrist Strap
Note: Memory card is not included and must be purchased separately.
2. Setup
2.1 Charging the Battery
The camera comes with a built-in 550mAh lithium battery. Before first use, ensure the battery is fully charged.
- Locate the USB port on the side of the camera.
- Connect the provided USB cable to the camera's USB port.
- Connect the other end of the USB cable to a USB power adapter (not included) or a computer's USB port.
- The camera's indicator light will show charging status (refer to camera's display for specific indicators).
- Once fully charged, disconnect the USB cable.

Image: USB port for charging and data transfer.
2.2 Inserting a Memory Card
The camera supports memory cards up to 128GB (not included). A memory card is required to save photos and videos.
- Locate the memory card slot on the side of the camera.
- Ensure the camera is powered off.
- Insert the memory card into the slot with the metal contacts facing the correct direction (usually towards the front of the camera or as indicated by a diagram near the slot) until it clicks into place.
- To remove, gently push the card in until it clicks, then release, and it will spring out.
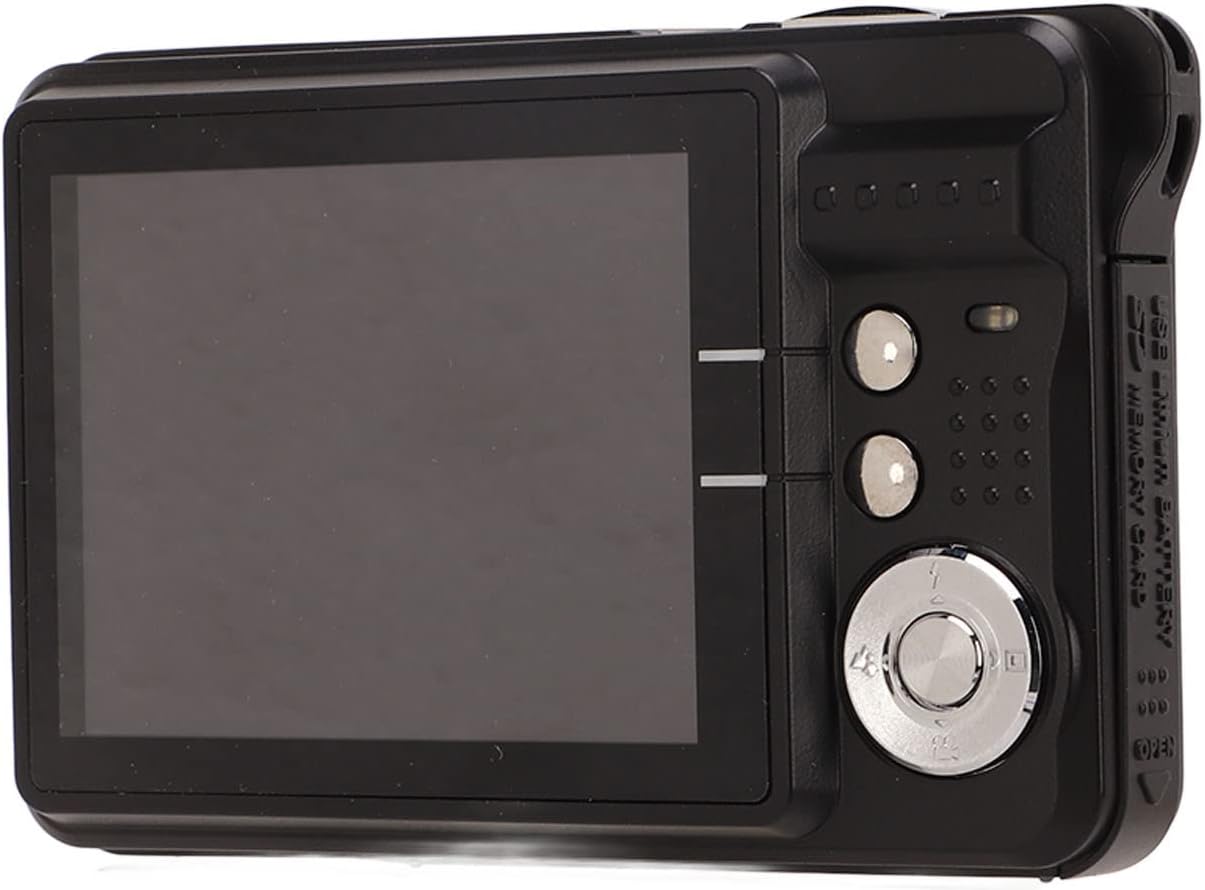
Image: Back of the camera with visible memory card slot.
3. Operating Instructions
3.1 Powering On/Off
Press and hold the power button (usually located on the top or side of the camera) to turn the camera on or off.
3.2 Taking Still Images
- Hold the camera steady and aim it so your subject is visible on the 2.7-inch LCD screen.
- Set the shooting menu: Press the 'A', 'Flash', or 'Scene' buttons to adjust flash settings or select a scene mode. Other settings can be accessed through the main menu.
- Use the zoom function (T for telephoto, W for wide-angle) to frame your shot.
- Press the shutter button to capture the image.

Image: Front view of the camera.

Image: Camera displaying zoom and resolution capabilities.
The camera supports up to 48MP image resolution (8000x6000 pixels) for clear and detailed photos.
3.3 Recording Videos
The camera can record videos in various resolutions, including 4K (3840x2160), 2.7K (2688x1520), FHD (1920x1080), and HD (1280x720).
- Switch the camera to video recording mode (refer to your camera's mode dial or menu).
- Frame your subject on the LCD screen.
- Press the record button (usually marked with a red dot) to start recording.
- Press the record button again to stop recording.
3.4 Using the Fill Light
The built-in fill light can be activated in low-light conditions to illuminate your subject.
- Access the flash/fill light settings through the camera's menu or a dedicated button.
- Select the appropriate mode (e.g., Auto, On, Off) for the fill light.

Image: Camera lens and built-in fill light.
4. Features
- 8x Digital Zoom: Allows you to magnify distant subjects for closer shots.
- 2.7-inch LCD Screen: Provides a clear display for framing shots, reviewing photos, and navigating menus.
- 48MP Image Resolution: Captures high-quality still images with significant detail.
- 4K Video Resolution: Records smooth and clear videos.
- Built-in Fill Light: Enhances illumination in dark environments.
- Anti-Shake Function: Helps reduce blur caused by camera movement, resulting in clearer images.
- Selfie Mode: Optimized settings for self-portraits.
- Continuous Shooting: Captures a rapid sequence of images, ideal for action shots.
- Portable Design: Compact and lightweight, easy to carry in a pocket or with the included wrist strap.

Image: Camera screen displaying a group photo.

Image: Camera screen displaying a beach scene.
These features are designed to provide a versatile and user-friendly photography experience for various situations.
5. Specifications
| Feature | Description |
|---|---|
| Photosensitive Component | CMOS 5MP processor |
| Image Resolution | Up to 48MP (8000x6000), also 30MP, 24MP, 20MP, 18MP, 16MP, 12MP, 8MP, 7MP, 5MP, 2MP |
| Image Format | JPEG |
| Video Resolution | 4K (3840x2160), 2.7K (2688x1520), FHD (1920x1080), HD (1280x720) |
| Video Format | AVI |
| Screen Size | 2.7 inches LCD |
| Digital Zoom | 8x |
| Shutter | Electronic |
| Storage | Maximum support memory card 128GB (not included) |
| Battery | Built-in lithium battery, 550mAh |
| Gross Weight | 164g / 5.8oz |
| Image Stabilization | Digital |
| Connectivity | USB |
6. Troubleshooting
If you encounter any issues with your Luqeeg Digital Camera, please refer to the following common problems and solutions:
- Camera does not power on:
- Ensure the battery is fully charged.
- Check if the power button is pressed and held sufficiently.
- Cannot take photos/videos:
- Verify that a memory card is inserted and has sufficient free space.
- Check if the memory card is properly formatted (refer to camera menu for formatting option).
- Ensure the camera is not in playback mode.
- Images are blurry:
- Hold the camera steady during shooting.
- Ensure there is adequate lighting.
- Check if the anti-shake function is enabled.
- Screen is blank or frozen:
- Try turning the camera off and then on again.
- If the issue persists, remove and reinsert the battery (if accessible, otherwise allow battery to drain and recharge).
- Cannot transfer files to computer:
- Ensure the USB cable is securely connected to both the camera and the computer.
- Check if the camera is in the correct USB connection mode (e.g., Mass Storage, PC Connect).
- Try a different USB port on your computer.
If the problem persists after trying these solutions, please contact customer support.
7. Maintenance
- Cleaning the Camera Body: Use a soft, dry cloth to wipe the camera body. For stubborn dirt, slightly dampen the cloth with water. Avoid using harsh chemicals or solvents.
- Cleaning the Lens: Use a lens brush or a soft, lint-free microfiber cloth specifically designed for camera lenses. Gently wipe the lens in a circular motion. Do not touch the lens with your fingers.
- Storage: When not in use for extended periods, store the camera in a cool, dry place, away from direct sunlight and extreme temperatures. Remove the memory card if not in use.
- Battery Care: Avoid fully discharging the battery frequently. Recharge the battery regularly, even if the camera is not in use, to maintain battery health.
- Avoid Water and Dust: This camera is not water-resistant. Keep it away from water, moisture, and excessive dust to prevent damage.
8. Warranty and Support
Luqeeg products are designed for reliability and performance. For specific warranty details, please refer to the warranty card included with your purchase or visit the official Luqeeg website.
For technical support, troubleshooting assistance, or inquiries about your product, please contact Luqeeg customer service through the following channels:
- Online Support: Visit the Luqeeg Store on Amazon for FAQs and product information.
- Email Support: Refer to your product packaging or the official website for customer service email address.
Please have your product model number (713ec5fa-79d0-49bd-949c-20b998bf2753) and purchase information ready when contacting support.
Ask a question about this manual
Ask about setup, troubleshooting, compatibility, parts, safety, or missing instructions. Manuals+ will review the question and use this page’s manual context to help answer it.